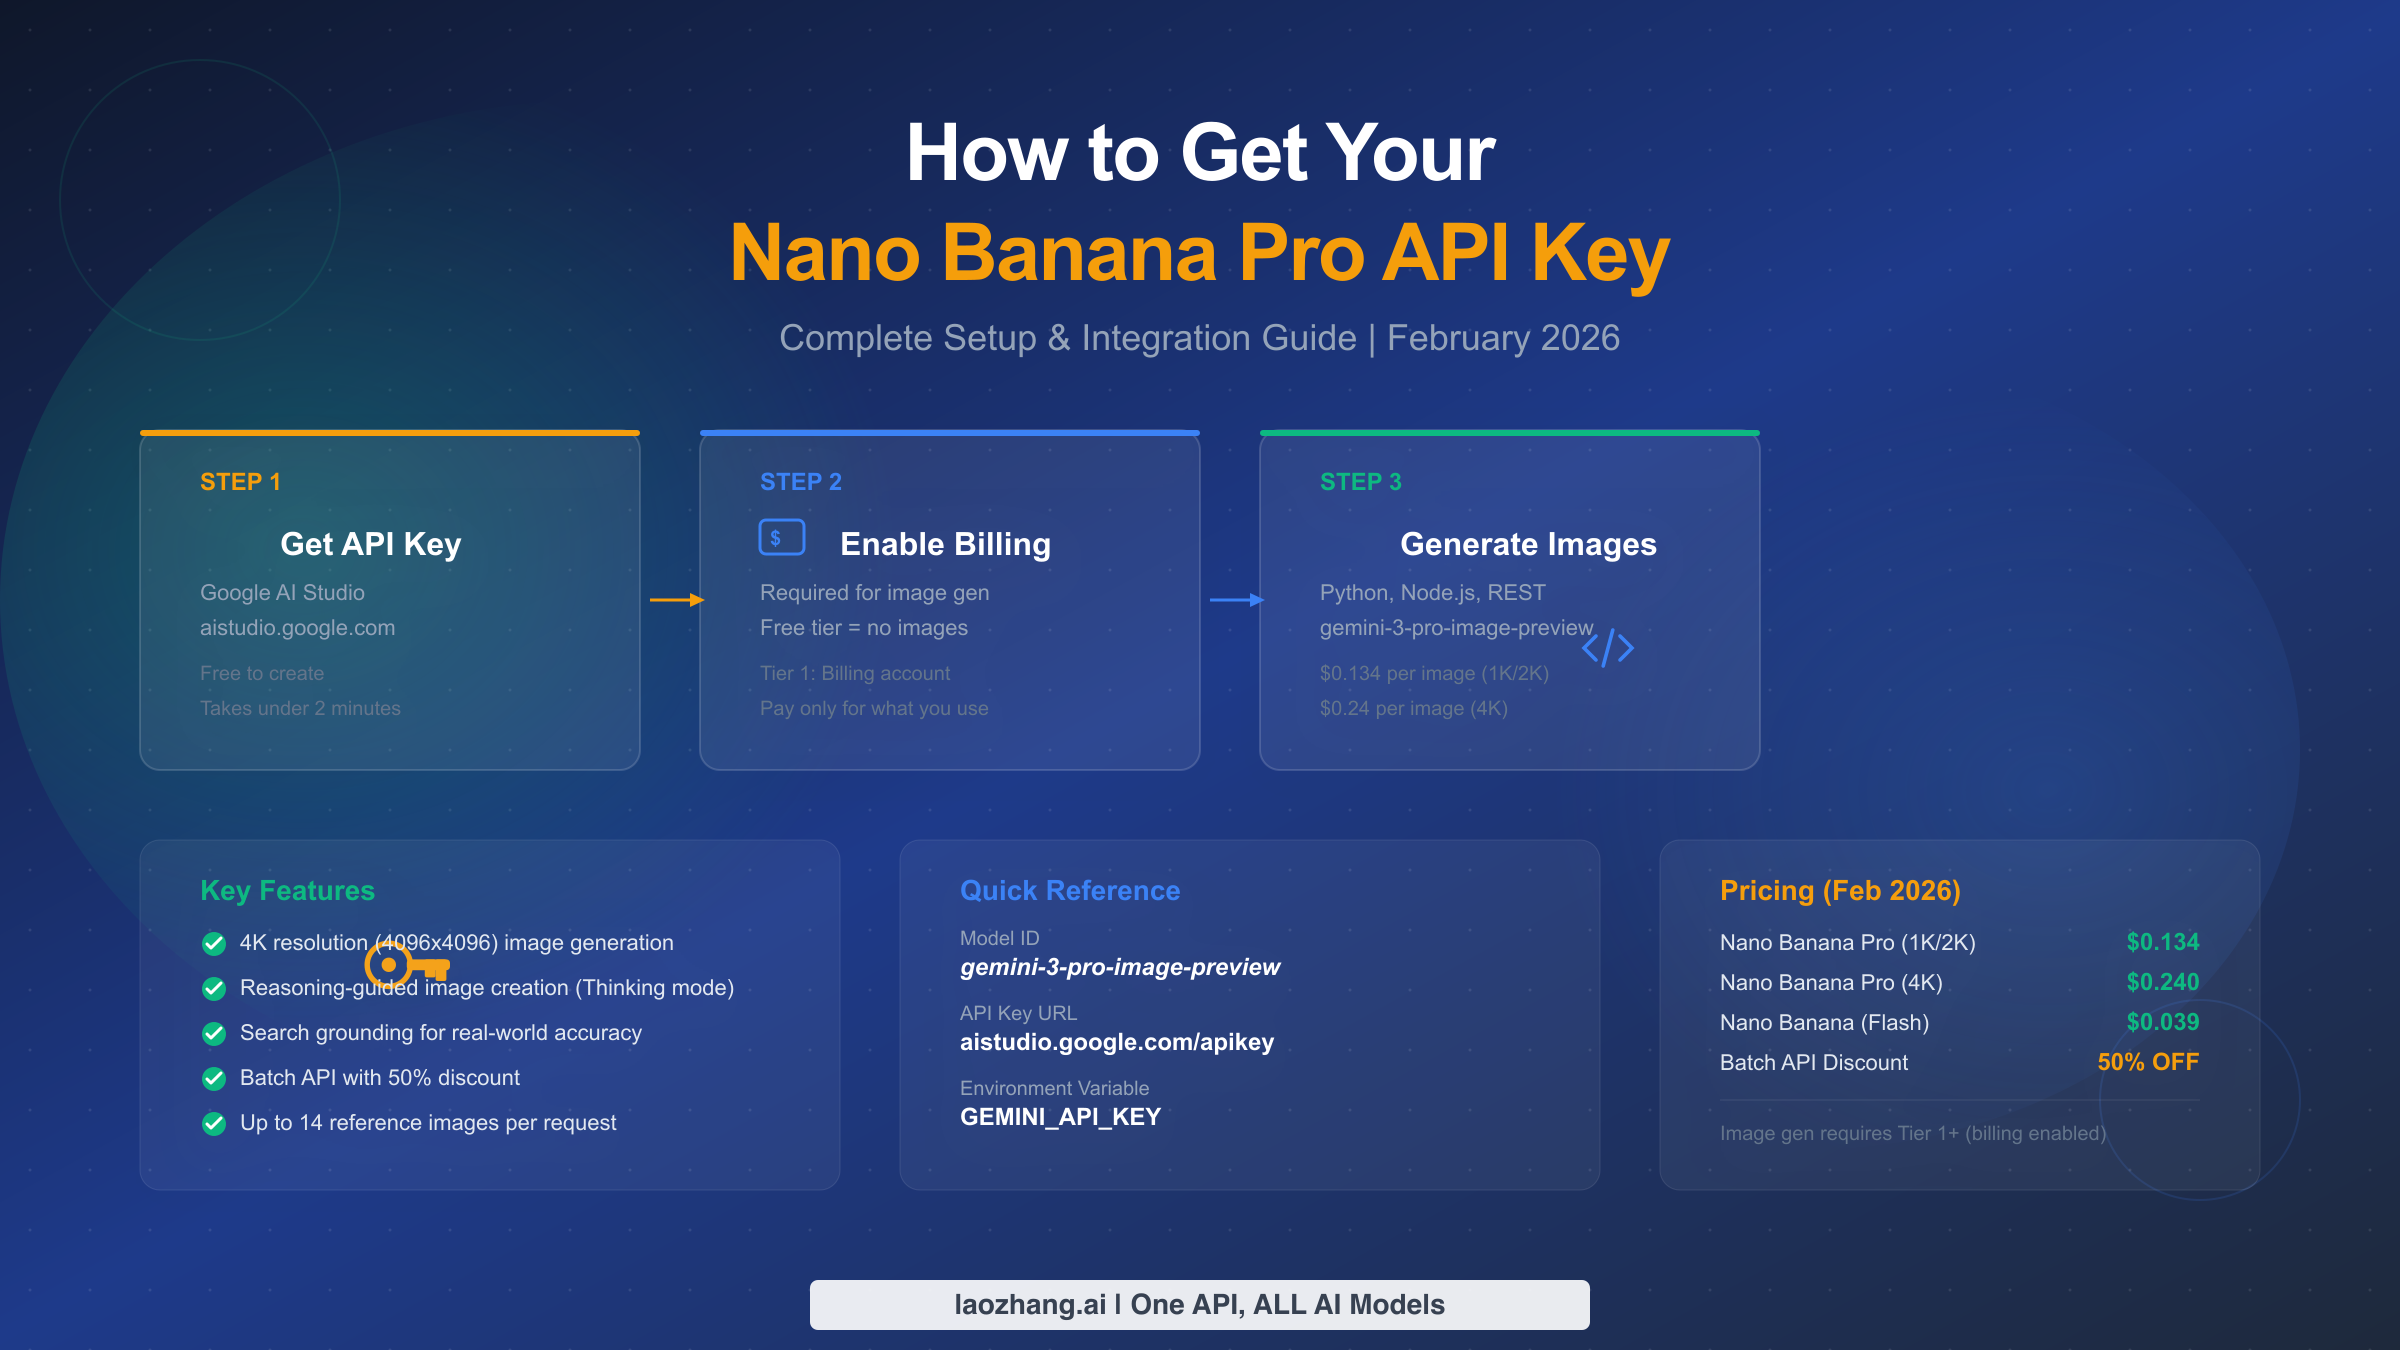
To get a Nano Banana Pro API key, visit Google AI Studio, sign in with your Google account, and click "Create API Key." The key works with the gemini-3-pro-image-preview model, generating images at approximately $0.134 per image for standard resolution and $0.24 for 4K as of February 2026. One critical detail that most tutorials miss: image generation requires billing enabled on your Google Cloud project (Tier 1 or higher) — the free API tier does not support image output. This guide walks you through the entire process, from creating your API key to generating your first image, with complete code examples in Python, Node.js, and REST API.
TL;DR
Getting your Nano Banana Pro API key takes under 5 minutes, but successfully generating your first image requires understanding a few key steps that trip up most developers. You need to create the key at aistudio.google.com/apikey, enable billing on your Google Cloud project (free tier cannot generate images), install your preferred SDK, and use the model ID gemini-3-pro-image-preview. The cost is approximately $0.134 per image at 1K/2K resolution, with the Batch API offering a 50% discount. This guide covers every step with runnable code in three languages, security best practices, and a complete pricing breakdown verified against Google's official documentation in February 2026.
What Is Nano Banana Pro and Why Do You Need an API Key?
Before diving into the setup steps, it is worth understanding what you are setting up access to and why the API key is necessary. This context helps you make better decisions about which model to use, how to configure your project, and how to optimize your costs from the start.
Nano Banana Pro is the current flagship AI image generation model in Google's Gemini family, identified by the model ID gemini-3-pro-image-preview (Google AI official documentation, February 2026). Unlike traditional text-only AI models, Nano Banana Pro is a natively multimodal model that can both understand and generate images within the same conversation context. This means you can send it a text prompt and receive a high-quality image in response, or send it an existing image and ask it to modify, extend, or reimagine it.
The distinction between Nano Banana Pro and its sibling, Nano Banana (Flash), is significant and worth understanding before you obtain your API key. Nano Banana Pro supports up to 4K resolution (4096×4096 pixels), features reasoning-guided image creation through its Thinking mode, and can incorporate search grounding for real-world accuracy when generating images. The Flash variant, using model ID gemini-2.5-flash-image, generates images at roughly one-third the cost ($0.039 per image versus $0.134) but limits you to lower resolutions and lacks the Thinking mode and 4K capabilities. For a detailed breakdown of these differences, see the complete comparison of free vs pro limits.
What makes Nano Banana Pro particularly powerful compared to standalone image generators is its native multimodality. You can provide up to 14 reference images in a single request, enabling tasks like style transfer, image editing, and visual composition that would require multiple tools in other pipelines. The model also supports structured output in JSON format, which is useful when you need to combine image generation with metadata extraction or automated post-processing workflows. Its input context window accepts up to 65,536 tokens and the output can reach 32,768 tokens (ai.google.dev/models, February 2026), giving you substantial room for complex multi-turn conversations that involve both text reasoning and image creation.
An API key is your authentication credential — it tells Google's servers that you have permission to access the Gemini API. Without it, every API request you send will be rejected. The key itself is a string of characters (typically starting with "AIza") that you include in your HTTP requests, either as a query parameter or in the request header. Each key is tied to a specific Google Cloud project, which determines your billing, rate limits, and available quotas. You can create multiple keys for the same project, which is useful for separating different applications or environments (development versus production, for example). Understanding this relationship between keys and projects is important because your rate limits, billing, and usage tracking all happen at the project level, not the key level — creating a second key for the same project does not double your quotas.
Step-by-Step: Get Your Nano Banana Pro API Key in 5 Minutes
The fastest path to your API key goes through Google AI Studio, which is Google's developer-friendly interface for the Gemini API. While you can also manage API keys through the Google Cloud Console, AI Studio simplifies the process significantly and is the method recommended by Google's own documentation.
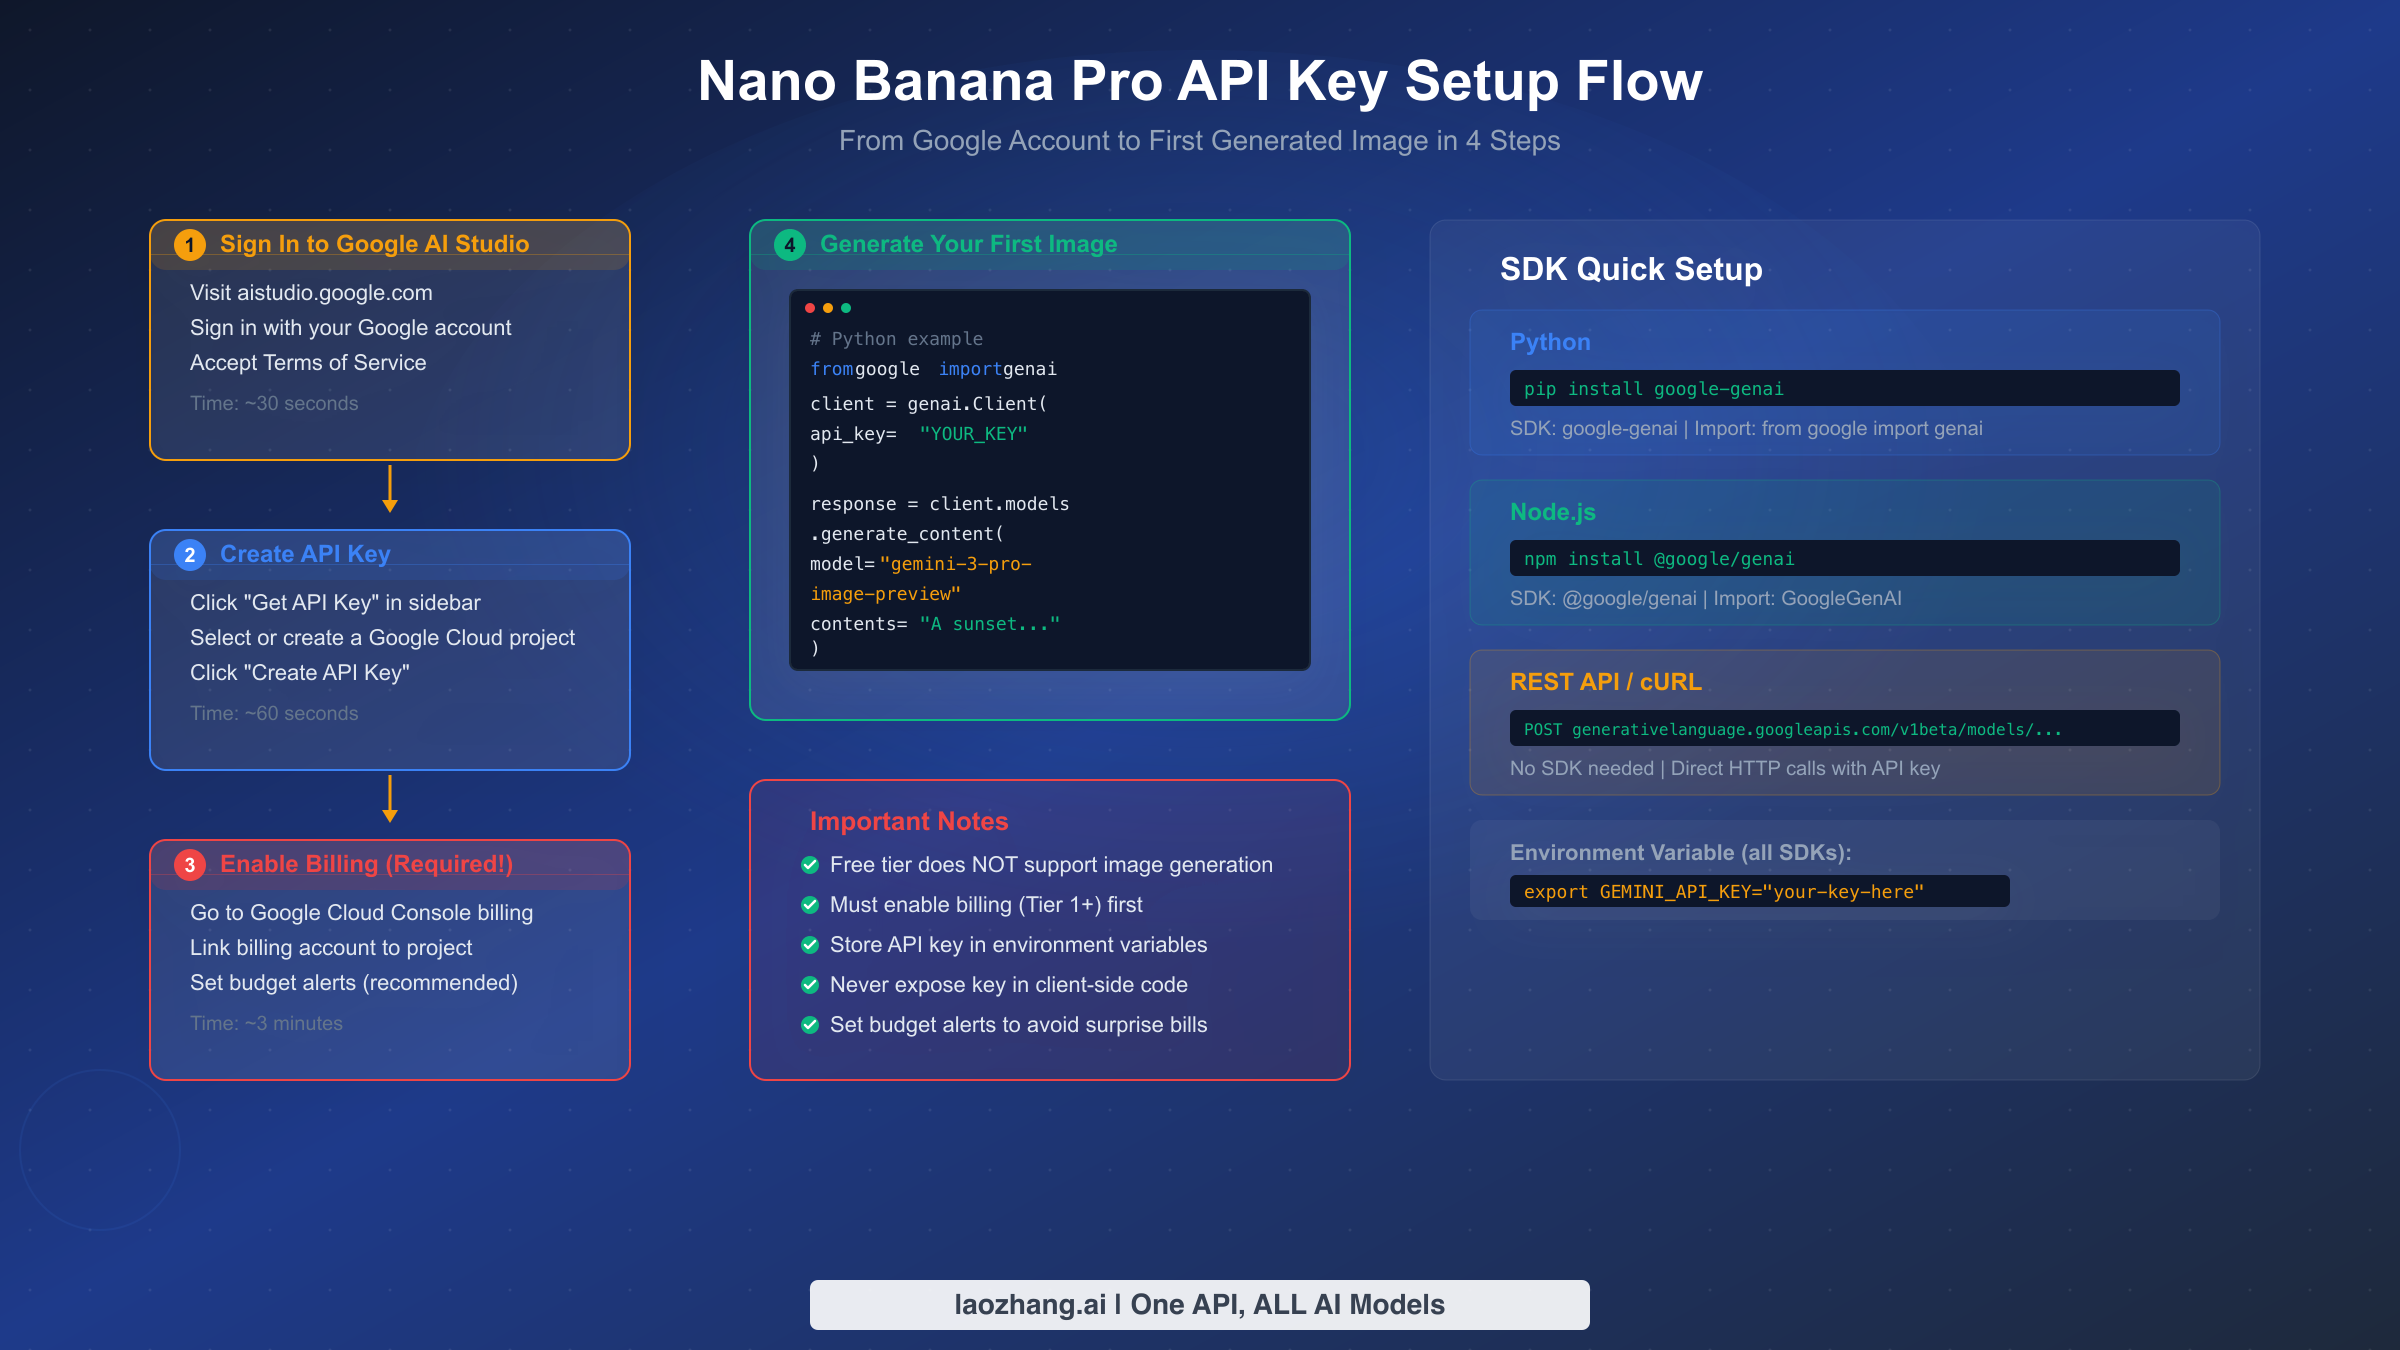
Step 1: Sign in to Google AI Studio. Navigate to aistudio.google.com and sign in with your Google account. Any standard Gmail or Google Workspace account works — you do not need a separate Google Cloud account to get started. If this is your first time visiting AI Studio, you may be prompted to accept the terms of service. The interface will display your existing projects and API keys if you have any.
Step 2: Navigate to the API Key page. Click the "Get API Key" button in the left sidebar, or go directly to aistudio.google.com/apikey. This page shows all API keys associated with your Google Cloud projects. If you have never created a Google Cloud project before, AI Studio can create one for you automatically in the next step.
Step 3: Create your API key. Click the "Create API Key" button. You will see two options: create a key in a new project or create a key in an existing project. For most developers getting started, choosing "Create API key in new project" is the simplest path. AI Studio will automatically create a Google Cloud project, enable the Generative Language API, and generate your API key — all in a single click. The entire process takes about 10 seconds.
Step 4: Copy and securely store your key. Once generated, your API key will be displayed on screen. Click the copy button to copy it to your clipboard. This is critically important: store your API key immediately in a secure location. Do not paste it directly into your source code, commit it to version control, or share it publicly. The recommended approach is to store it in an environment variable (covered in the Security section below). Your key will look something like AIzaSyD... followed by approximately 35 additional characters.
After copying your key, you can verify it works by running a quick test. Open your terminal and execute this cURL command, replacing YOUR_API_KEY with the key you just copied:
bashcurl "https://generativelanguage.googleapis.com/v1beta/models?key=YOUR_API_KEY"
If your key is valid, you will receive a JSON response listing available models, including gemini-3-pro-image-preview. If you receive an error, double-check that you copied the entire key without any extra spaces or line breaks.
One common point of confusion: Google AI Studio and Google Cloud Console are two different interfaces to the same underlying infrastructure. Your API key created in AI Studio is also visible in the Cloud Console under APIs & Services → Credentials, and vice versa. AI Studio is designed to be developer-friendly with a streamlined interface, while the Cloud Console gives you access to more granular controls like API restrictions, quota management, and billing configuration. You will need both interfaces during setup — AI Studio for creating the key and Cloud Console for enabling billing and configuring restrictions.
It is also worth noting that API keys created in AI Studio are automatically scoped to the Generative Language API, which is all you need for Nano Banana Pro image generation. If you create a key through the Cloud Console instead, you may need to manually enable the Generative Language API for your project before the key will work with Gemini models.
Enable Billing and Understand the Tier System
This is where most developers hit their first wall, and it is the step that nearly every tutorial either skips or mentions only in passing. The free API tier in Google AI Studio allows you to make text-based API calls with Gemini models, but image generation is explicitly excluded from the free tier (Google AI official pricing page, February 2026). If you attempt to generate an image without billing enabled, you will receive a RESOURCE_EXHAUSTED error — which is confusing because it sounds like a rate limit issue when it is actually a billing requirement. For a detailed guide on resolving this specific error, see our guide to fixing the RESOURCE_EXHAUSTED error.
To enable billing, you need to link a billing account to the Google Cloud project associated with your API key. Start by visiting the Google Cloud Console and clicking "Link a billing account." You will need to provide a valid payment method (credit card, debit card, or in some regions, bank account). Google does not charge you upfront — you only pay for the API calls you actually make. Once billing is enabled, your project automatically enters Tier 1, which unlocks image generation capabilities.
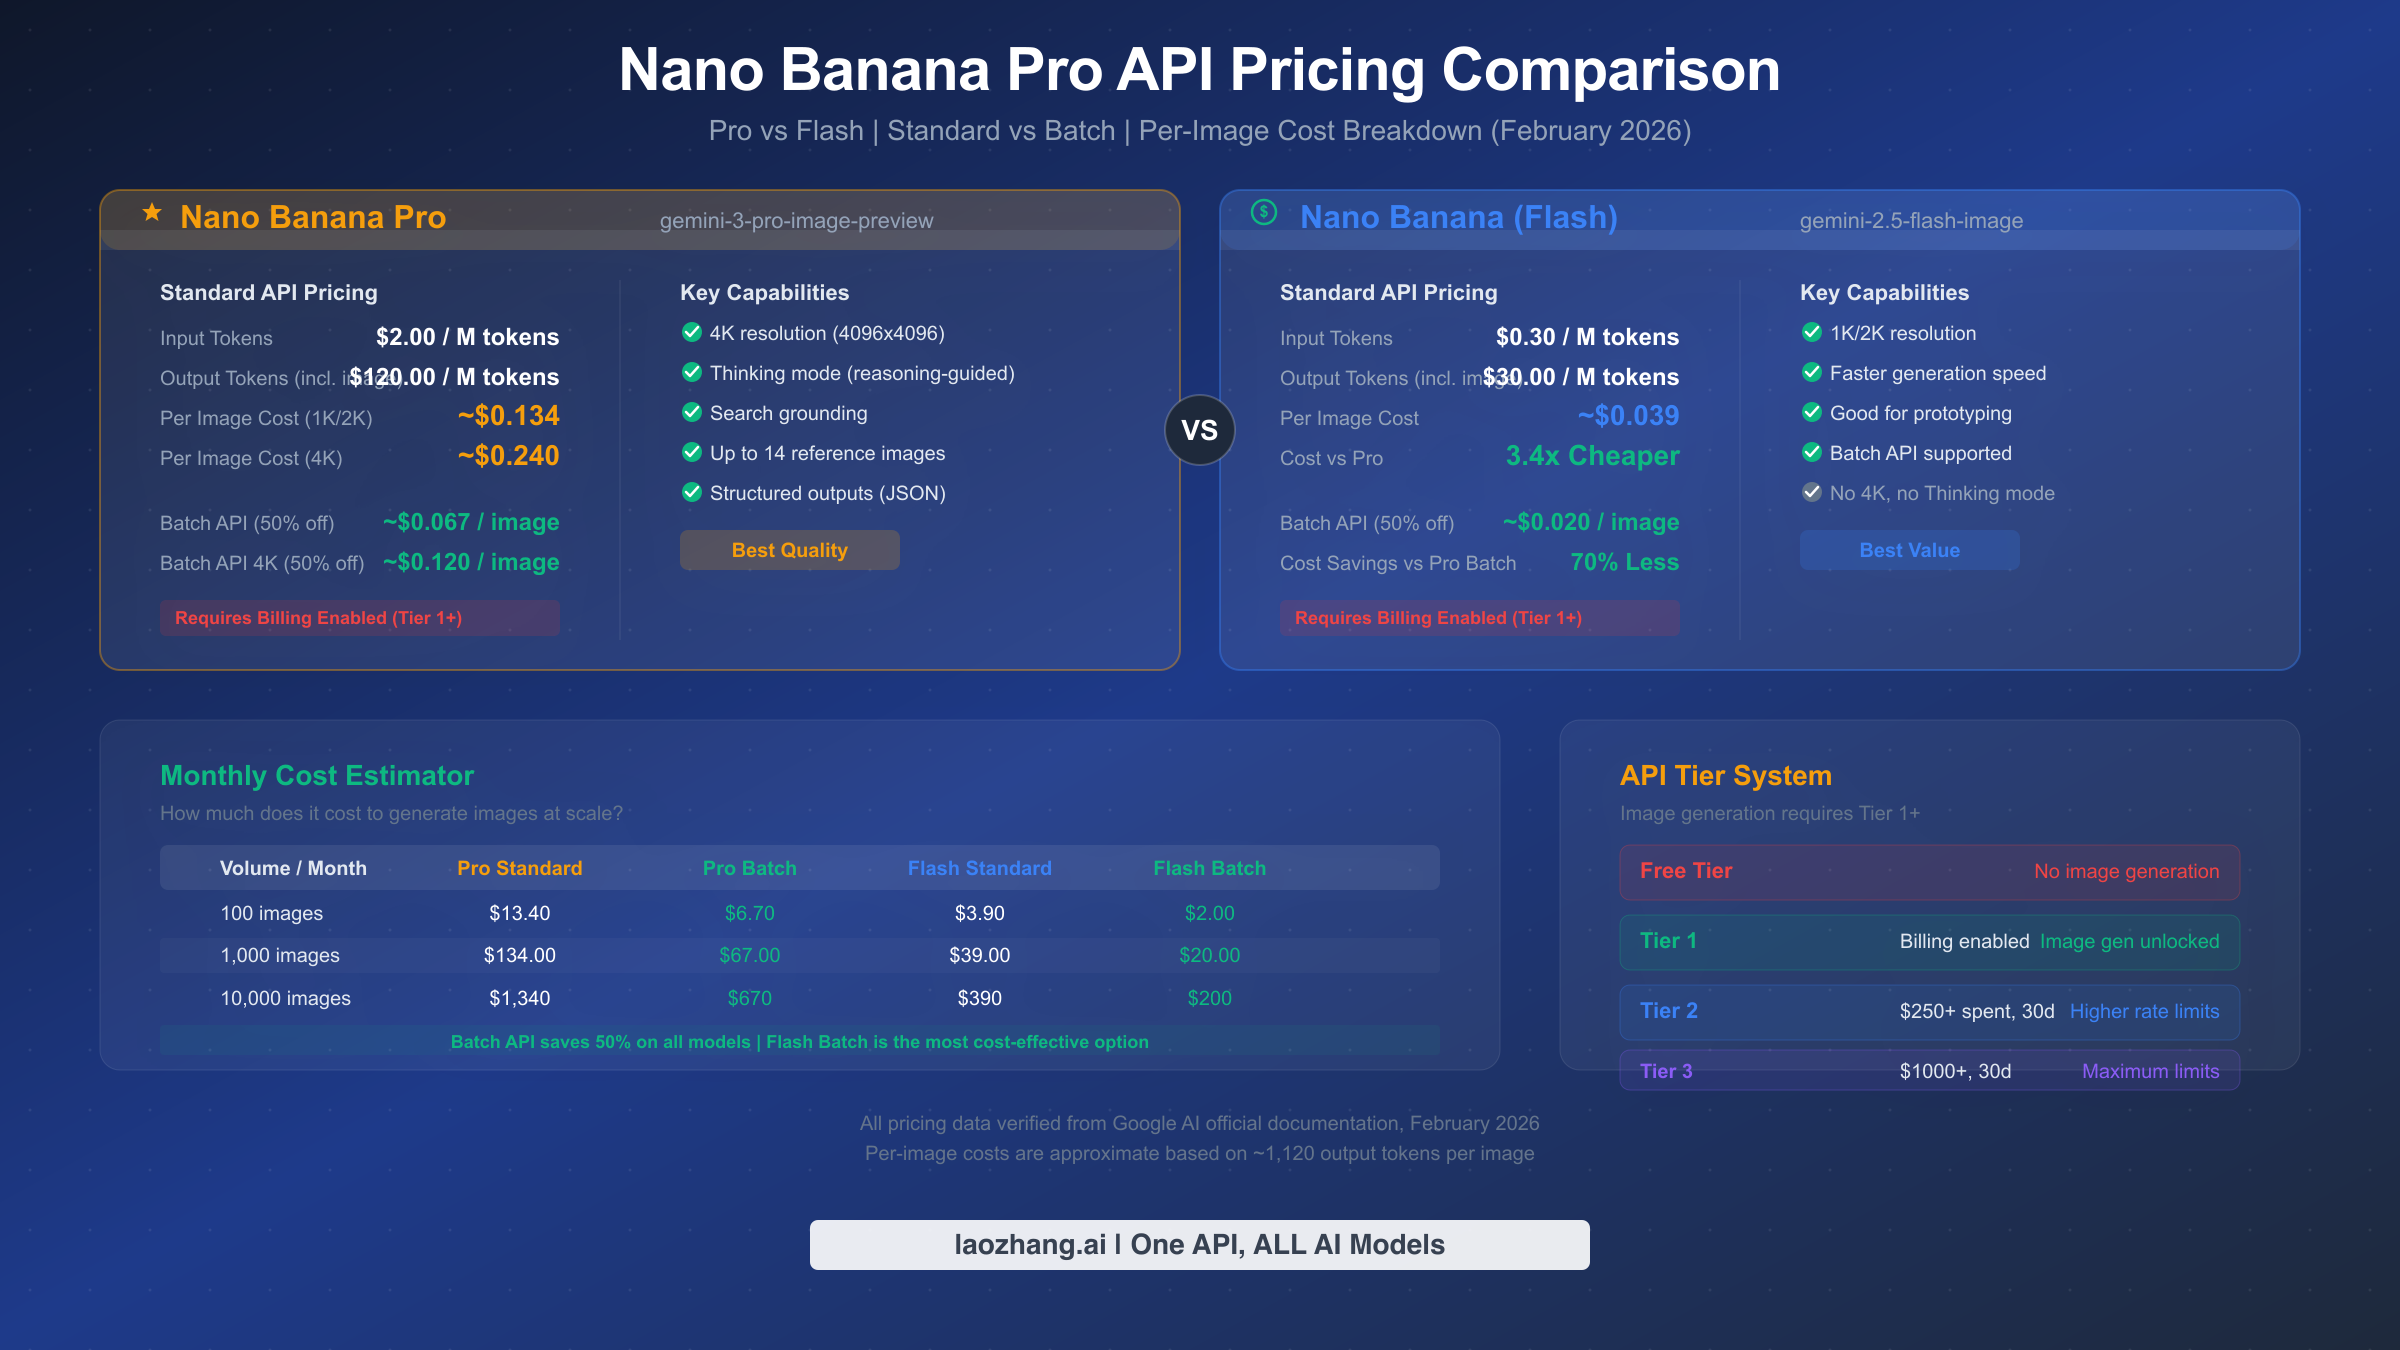
Google's API tier system determines your rate limits and available features, and understanding it saves you from unexpected restrictions. The Free tier provides basic text API access but no image generation at all. Tier 1 activates once you enable billing (no minimum spend required) and unlocks image generation with standard rate limits. Tier 2 requires $250 or more in cumulative spending over at least 30 days, providing higher rate limits. Tier 3 requires $1,000 or more in cumulative spending over at least 30 days and provides the maximum rate limits available (all tier data from ai.google.dev/rate-limits, February 2026). For image generation specifically, the rate limits on Tier 1 typically allow 5-10 images per minute for standard users, which is sufficient for development and moderate production workloads.
Setting a budget alert is strongly recommended to prevent unexpected charges. In the Google Cloud Console, navigate to Billing → Budgets & Alerts, and create a budget for your project. You can set it to alert you at 50%, 90%, and 100% of a dollar amount you choose — starting with $10-20 is reasonable for development. Budget alerts send you email notifications but do not automatically stop your API usage, so if you want hard spending limits, you will need to implement rate limiting in your application code.
A common question developers ask is whether they need a Google Cloud credit card on file just for testing. The answer is yes — billing requires a valid payment method even if you plan to spend only a few cents during development. However, Google frequently offers free trial credits ($300 for new Google Cloud accounts), which can offset your initial API costs. Check the Google Cloud Console for any available credits on your account before starting, as they can cover a substantial amount of testing and prototyping work.
Generate Your First Image: Python, Node.js, and REST API
With your API key created and billing enabled, you are ready to generate your first image. Below are complete, runnable code examples in three languages that you can copy directly into your project. Each example generates an image from a text prompt using the gemini-3-pro-image-preview model.
Python (google-genai SDK)
The Python SDK is the most popular way to interact with the Nano Banana Pro API. Install it first, then set up your environment variable and run the generation code:
bashpip install google-genai
export GEMINI_API_KEY="your-api-key-here"
pythonfrom google import genai
from google.genai import types
import base64
import os

client = genai.Client(api_key=os.environ["GEMINI_API_KEY"])

response = client.models.generate_content(
    model="gemini-3-pro-image-preview",
    contents="Generate a photorealistic image of a futuristic city skyline at sunset, with flying vehicles and neon lights reflecting off glass towers.",
    config=types.GenerateContentConfig(
        response_modalities=["TEXT", "IMAGE"],
    ),
)


for part in response.candidates[0].content.parts:
    if part.inline_data is not None:
        image_data = base64.b64decode(part.inline_data.data)
        with open("generated_image.png", "wb") as f:
            f.write(image_data)
        print(f"Image saved! MIME type: {part.inline_data.mime_type}")
    elif part.text is not None:
        print(f"Model response: {part.text}")
Node.js (@google/genai SDK)
For JavaScript and TypeScript developers, Google provides the @google/genai package. This is the officially maintained SDK, and it mirrors the Python SDK's functionality closely:
bashnpm install @google/genai
export GEMINI_API_KEY="your-api-key-here"
javascriptimport { GoogleGenAI } from "@google/genai";
import fs from "fs";

const ai = new GoogleGenAI({ apiKey: process.env.GEMINI_API_KEY });

async function generateImage() {
  const response = await ai.models.generateContent({
    model: "gemini-3-pro-image-preview",
    contents: "Generate a photorealistic image of a futuristic city skyline at sunset, with flying vehicles and neon lights reflecting off glass towers.",
    config: {
      responseModalities: ["TEXT", "IMAGE"],
    },
  });

  for (const part of response.candidates[0].content.parts) {
    if (part.inlineData) {
      const imageBuffer = Buffer.from(part.inlineData.data, "base64");
      fs.writeFileSync("generated_image.png", imageBuffer);
      console.log(`Image saved! MIME type: ${part.inlineData.mimeType}`);
    } else if (part.text) {
      console.log(`Model response: ${part.text}`);
    }
  }
}

generateImage();
REST API (cURL)
If you prefer working directly with the HTTP API — useful for testing, debugging, or integrating from languages without an official SDK — you can use cURL or any HTTP client:
bashcurl -X POST \
  "https://generativelanguage.googleapis.com/v1beta/models/gemini-3-pro-image-preview:generateContent?key=${GEMINI_API_KEY}" \
  -H "Content-Type: application/json" \
  -d '{
    "contents": [{
      "parts": [{
        "text": "Generate a photorealistic image of a futuristic city skyline at sunset."
      }]
    }],
    "generationConfig": {
      "responseModalities": ["TEXT", "IMAGE"]
    }
  }'
The response will contain a base64-encoded image in the candidates[0].content.parts array. Look for parts with an inlineData field — that is your generated image. A critical point that many tutorials overlook: you must include "responseModalities": ["TEXT", "IMAGE"] in your configuration. Without it, the model will only return text, even if you ask it to generate an image. Also be aware that some prompts may trigger content safety filters, which can result in an empty response without an error message. For strategies on working within these content policies, see our guide to avoiding content policy violations.
When writing prompts for Nano Banana Pro, specificity dramatically improves results. Instead of "a cat," try "a photorealistic tabby cat sitting on a sunlit windowsill, with soft bokeh background, shot on a 50mm lens." The model responds well to photographic terminology (aperture, lens type, lighting direction), artistic style references (watercolor, oil painting, digital art), and composition instructions (rule of thirds, centered, bird's eye view). For production applications, consider building a prompt template system that injects consistent style parameters while allowing the user-facing prompt to focus on content.
Another practical consideration is response time. Standard API image generation typically completes in 5-15 seconds depending on complexity and current server load. If your application has strict latency requirements, consider generating images asynchronously and caching results. The Batch API, while cheaper, delivers results within 24 hours rather than seconds, so it is not suitable for real-time user-facing applications.
API Key Security Best Practices
Securing your API key is not optional — a leaked key can result in unauthorized usage that runs up your bill, and Google holds you responsible for all charges incurred under your key regardless of who made the requests. This section covers the essential security measures that no other Nano Banana Pro tutorial currently includes.
Environment variables are the minimum standard. Never hardcode your API key in source code. Instead, store it in an environment variable and read it at runtime. Create a .env file in your project root (and immediately add .env to your .gitignore file):
bash# .env file - NEVER commit this to version control
GEMINI_API_KEY=AIzaSyD_your_key_here
In Python, use the python-dotenv package to load it automatically: from dotenv import load_dotenv; load_dotenv(). In Node.js, use the dotenv package: import 'dotenv/config'. For production deployments, use your platform's secrets management (AWS Secrets Manager, Google Cloud Secret Manager, Vercel Environment Variables, or similar).
Restrict your API key's scope. In the Google Cloud Console under APIs & Services → Credentials, you can restrict each API key by IP address, HTTP referrer, or API service. For development, you might leave the key unrestricted, but for production, you should restrict it to only the APIs you actually use (in this case, the Generative Language API) and to your server's IP addresses. This way, even if your key leaks, it cannot be used from unauthorized locations or for unauthorized APIs.
Rotate your keys periodically. Create a new API key, update your application to use the new key, verify everything works, and then delete the old key. This limits the window of exposure if a key has been compromised without your knowledge. Google makes this straightforward through AI Studio — you can have multiple active keys for the same project, which allows zero-downtime rotation.
Set up billing alerts and quotas. As mentioned in the billing section, budget alerts in Google Cloud Console notify you when spending approaches your thresholds. Additionally, you can configure per-project quotas in the IAM & Admin section to set hard limits on API usage. This creates a safety net: even if your key is compromised, the attacker's usage will be capped by your quota settings. A reasonable starting configuration is a monthly budget of $20-50 for development, with alerts at 50% and 90%.
Monitor your API key usage actively. The Google Cloud Console provides detailed usage metrics under APIs & Services → Dashboard. You can see exactly how many requests each API key is making, when usage spikes occur, and which endpoints are being called. If you notice unusual patterns — such as a spike in requests at 3 AM when your application should be idle — that is an early indicator of compromise. Setting up Cloud Monitoring alerts for abnormal traffic patterns adds another layer of protection beyond simple budget alerts. For production applications processing sensitive data, consider implementing a proxy layer between your client applications and the API so that the actual API key never leaves your server infrastructure.
Pricing Breakdown and Cost Optimization
Understanding the pricing structure helps you choose the right model and API mode for your use case. All pricing data below is verified from Google's official documentation as of February 2026.
Nano Banana Pro charges based on token usage, with output tokens being significantly more expensive than input tokens because image generation happens in the output phase. Specifically, the input cost is $2.00 per million tokens and the output cost is $120.00 per million tokens (ai.google.dev/pricing, February 2026). Since a typical image generation uses approximately 1,120 output tokens, the per-image cost works out to roughly $0.134 for standard resolution (1K or 2K). If you generate at 4K resolution (4096×4096), the output token count increases, bringing the per-image cost to approximately $0.24.
The Nano Banana model (Flash variant, gemini-2.5-flash-image) is dramatically cheaper: $0.30 per million input tokens and $30.00 per million output tokens, resulting in a per-image cost of approximately $0.039 — about 3.4 times less expensive than Pro. The trade-off is lower resolution, no 4K support, and no Thinking mode. For many applications such as thumbnail generation, social media posts, or rapid prototyping, Flash provides excellent value.
The Batch API is Google's most powerful cost optimization tool, offering a flat 50% discount on all models with the trade-off of asynchronous processing (results delivered within 24 hours rather than in real-time). With Batch API, the per-image cost for Nano Banana Pro drops to approximately $0.067, and Nano Banana (Flash) drops to approximately $0.020 per image. If your application can tolerate delayed results — for example, batch processing a catalog of product images overnight — the Batch API should be your default choice.
| Model | Standard (per image) | Batch (per image) | Best For |
|---|---|---|---|
| Nano Banana Pro (1K/2K) | ~$0.134 | ~$0.067 | High-quality, 4K, Thinking mode |
| Nano Banana Pro (4K) | ~$0.240 | ~$0.120 | Maximum resolution |
| Nano Banana (Flash) | ~$0.039 | ~$0.020 | Cost-effective, prototyping |
To put these costs in practical context, consider a few common scenarios. A SaaS application generating 100 product images per day would cost approximately $402 per month using Pro Standard, $201 using Pro Batch, $117 using Flash Standard, or just $60 using Flash Batch. For a personal blog generating 5 cover images per week, the monthly cost would be well under $3 regardless of which model and mode you choose. The Batch API's 50% discount makes it the obvious choice for any non-real-time workload, and it should be your default unless you need sub-minute response times.
For developers in regions where direct Google API access is restricted or who want consolidated billing across multiple AI models, third-party API providers like laozhang.ai offer Nano Banana Pro access at rates typically below 50% of official pricing — approximately $0.05 per image — with no rate limiting and simplified integration. This can be particularly useful for teams that use multiple AI services (image generation, text models, embeddings) and want to consolidate their API management and billing into a single provider. For a deeper comparison of Nano Banana Pro against competing models, see our Nano Banana Pro vs Flux2 comparison.
Common Errors and Quick Fixes
When working with the Nano Banana Pro API, you will likely encounter at least one of these five errors during setup. Understanding what each error means and how to fix it saves hours of debugging time.
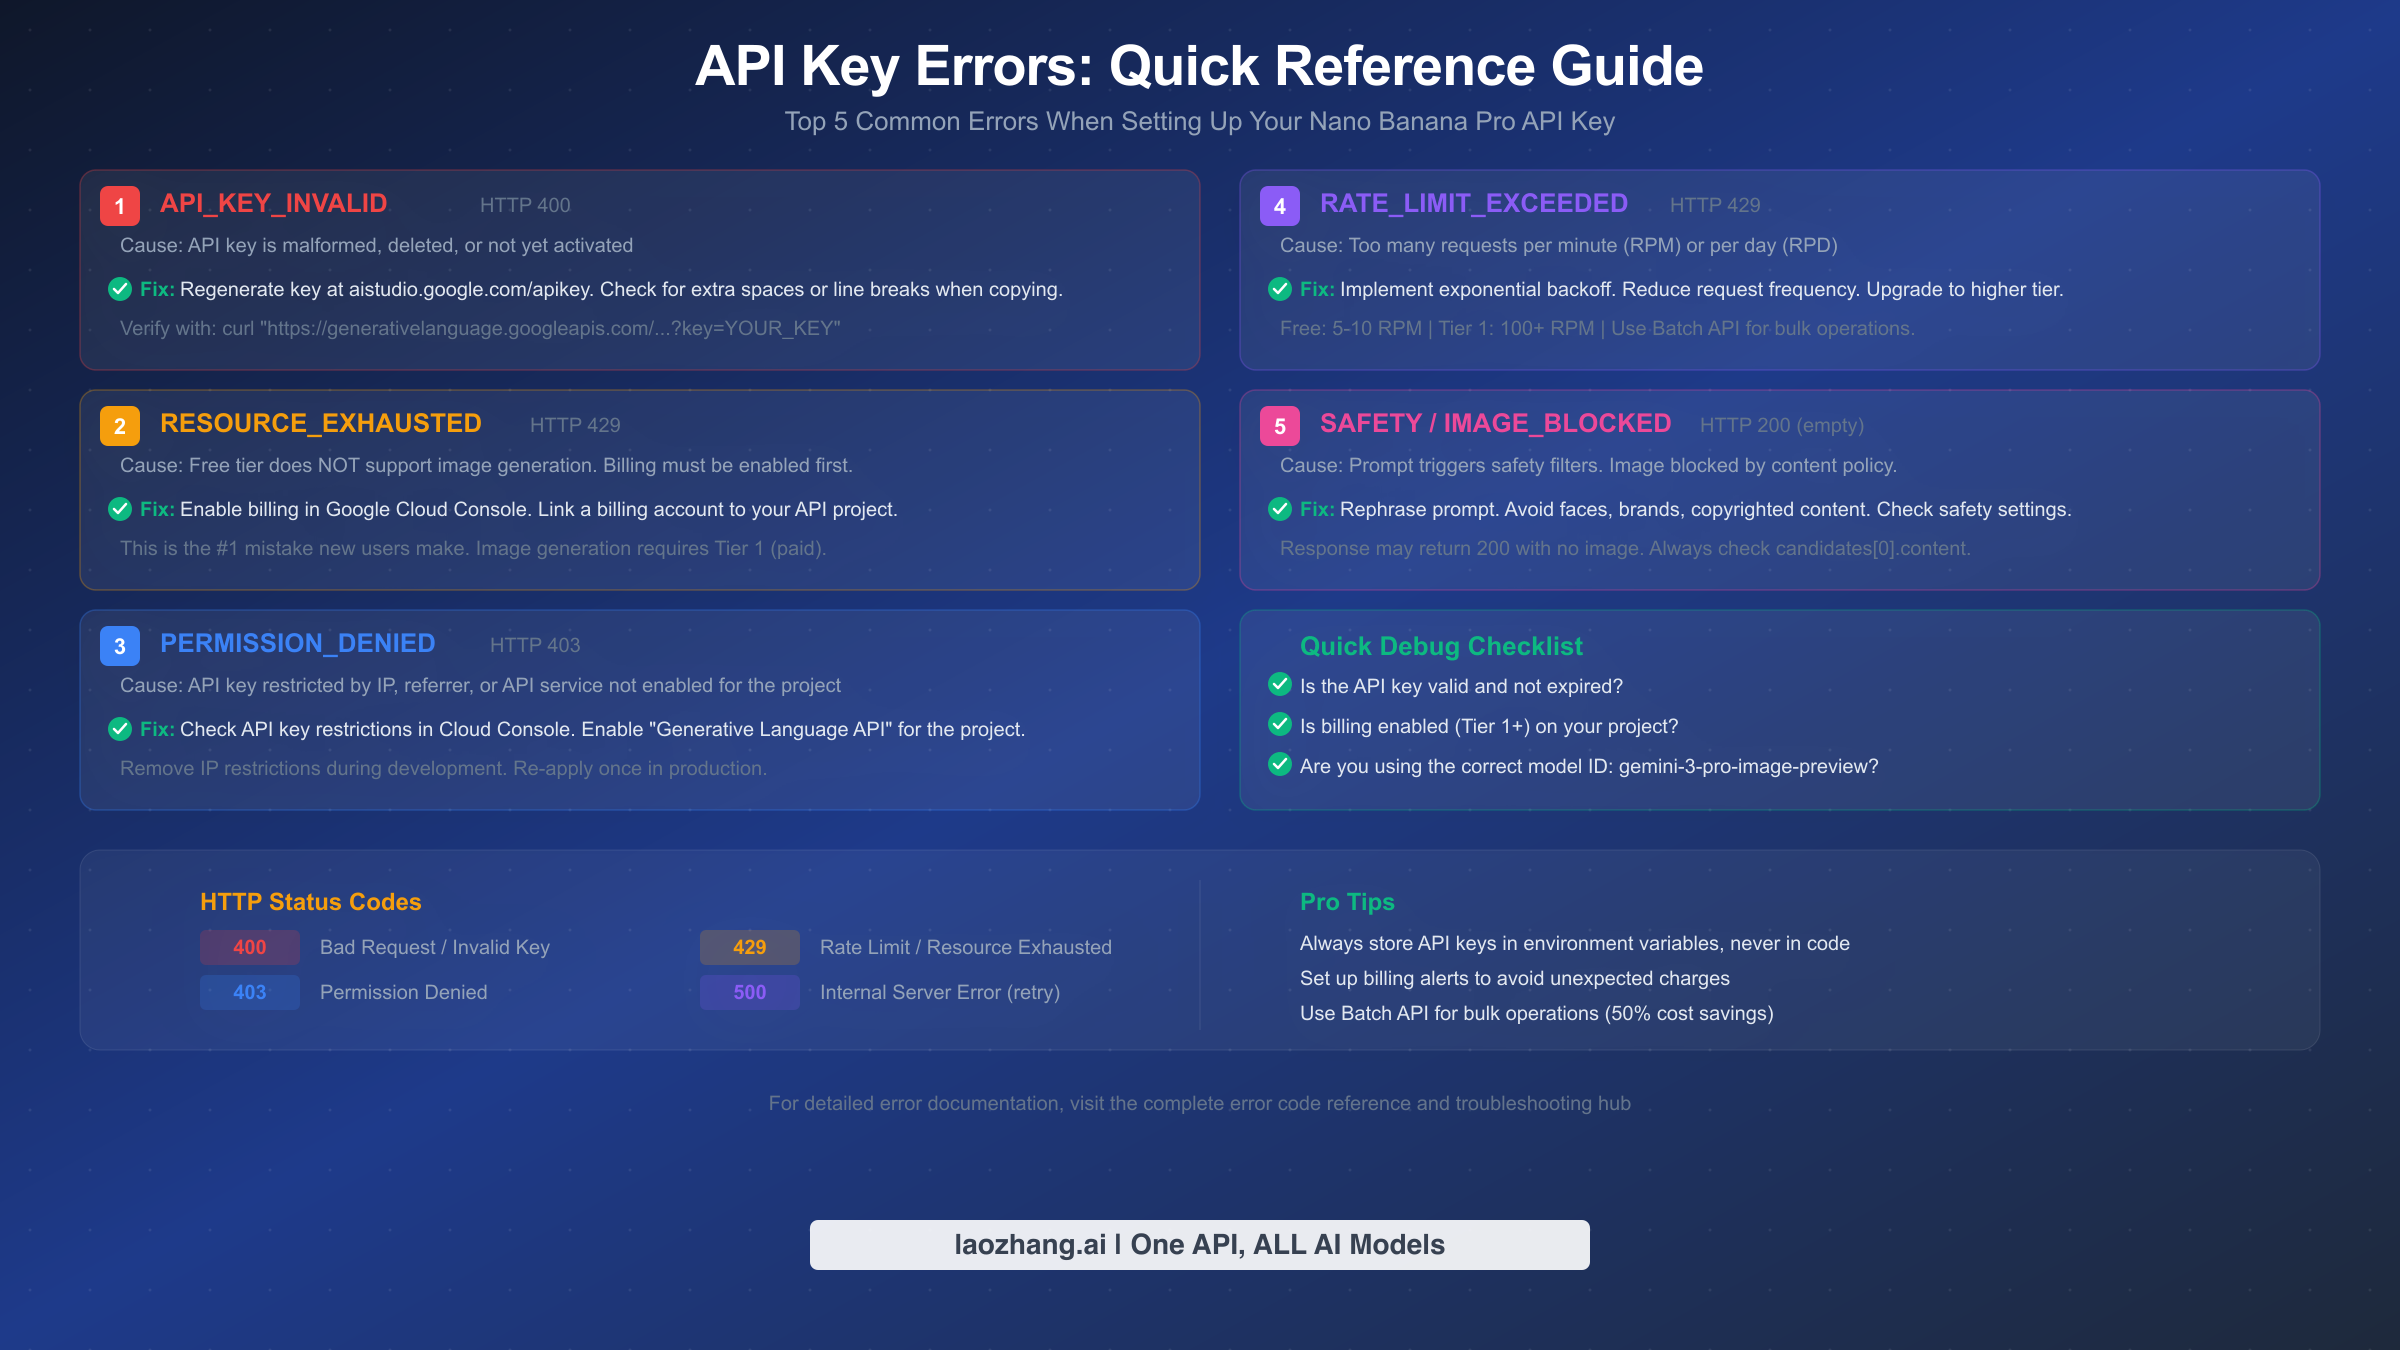
API_KEY_INVALID (HTTP 400) is the most straightforward error — your API key is malformed, has been deleted, or has not yet been activated. The most common cause is accidentally copying extra whitespace or line breaks when copying the key from AI Studio. To fix it, regenerate your key at aistudio.google.com/apikey and carefully copy the entire string without leading or trailing spaces. You can verify your key works with the simple cURL test described in the setup section above.
RESOURCE_EXHAUSTED (HTTP 429) is the single most confusing error for new users, because it appears to be a rate limit issue but is actually almost always a billing problem. If you are on the free tier and attempt to generate an image, you will receive this error because image generation is not available on the free tier. The fix is straightforward: enable billing on your Google Cloud project (see the Billing section above). If you have billing enabled and still see this error, then it genuinely is a rate limit issue — you are making too many requests per minute. Implement exponential backoff in your code, or wait a minute before retrying. For detailed troubleshooting of this specific error, our complete error code reference and step-by-step debugging guide walk through every possible cause and solution.
PERMISSION_DENIED (HTTP 403) means your API key exists but lacks the necessary permissions. Common causes include: the Generative Language API is not enabled for your project, the key has IP or referrer restrictions that block your current location, or the key belongs to a project in a region where Gemini API is not available. Fix it by checking your API key restrictions in the Cloud Console (APIs & Services → Credentials) and ensuring the Generative Language API is enabled for your project.
RATE_LIMIT_EXCEEDED (HTTP 429) is the legitimate rate limiting error — you are sending too many requests within the allowed time window. On the free tier, limits are approximately 5-10 requests per minute. On Tier 1 (billing enabled), limits increase to approximately 100-300 requests per minute (verified article data, February 2026). The best fix is implementing exponential backoff with jitter in your code, or using the Batch API for bulk operations which has separate, more generous quotas. For comprehensive troubleshooting across all error types, visit our comprehensive troubleshooting hub.
SAFETY / IMAGE_BLOCKED (HTTP 200 with empty image) is the most subtle error because the API returns a 200 success status code but with no image data in the response. This happens when your prompt triggers Google's content safety filters. The response body will contain a finishReason of SAFETY instead of STOP. To fix it, rephrase your prompt to avoid generating real human faces, brand logos, copyrighted characters, or content that could be considered inappropriate. Always check response.candidates[0].content.parts for the presence of inlineData before attempting to decode the image.
A robust error handling pattern that covers all five of these scenarios is essential for production applications. The key principles are: always check the HTTP status code first, distinguish between billing-related 429 errors and genuine rate limits by checking your billing status, implement exponential backoff with a random jitter factor for rate limit errors, and never assume a 200 response contains an image — always verify the presence of inlineData in the response parts. Building these checks into your API wrapper from the start saves significant debugging time later, especially as you scale from development to production workloads.
Frequently Asked Questions
Is the Nano Banana Pro API free to use? The API key itself is free to create, and you can make free-tier text API calls with it. However, image generation specifically requires a paid tier (Tier 1 or higher), meaning you must enable billing on your Google Cloud project. There is no free quota for image generation through the API. If you want to try image generation without API costs, the Google AI Studio web interface (not the API) may offer limited free generation through the consumer-facing AI Pro subscription ($19.99/month), but this is separate from API access.
What is the difference between Nano Banana and Nano Banana Pro? Nano Banana (Flash) uses model ID gemini-2.5-flash-image and costs approximately $0.039 per image — about 3.4 times cheaper than Pro. However, it lacks 4K resolution support, Thinking mode, and search grounding. Nano Banana Pro (gemini-3-pro-image-preview) offers the highest quality output, 4K resolution, and advanced features like reasoning-guided generation. Choose Flash for cost-sensitive or high-volume applications, and Pro when image quality is your top priority.
How long do generated images last? Images returned by the API as base64-encoded data in the response body are permanent — once you decode and save them, they exist on your storage indefinitely. However, if you use any URLs provided by the API for preview purposes, those URLs are temporary and may expire within hours. Always save the base64 data immediately upon receiving the response rather than relying on preview URLs. For more details on this behavior, see our article on the temporary image expiration issue.
Can I use one API key for multiple applications? Yes, a single API key can be used across multiple applications. However, this is not recommended for production deployments. If one application's key is compromised, all applications sharing that key are affected. Best practice is to create separate API keys for each application or environment (development, staging, production) within the same Google Cloud project, and to use separate projects for truly independent applications.
What are the rate limits for Nano Banana Pro? Rate limits depend on your API tier. On the free tier, you get approximately 5-10 requests per minute (RPM) and 50-100 requests per day (RPD) for text, but image generation is not available. On Tier 1 (billing enabled), limits increase to approximately 100-300 RPM with up to 10,000 RPD. Image generation has its own rate dimension called IPM (Images Per Minute). The Batch API has separate quotas measured in queue tokens, with Tier 1 allowing 2 million batch queue tokens for Nano Banana Pro (ai.google.dev/rate-limits, February 2026).
How much does it cost to generate 1,000 images? With Nano Banana Pro at standard resolution, 1,000 images cost approximately $134 through the standard API, or about $67 using the Batch API (50% discount). With Nano Banana (Flash), the same 1,000 images cost approximately $39 standard or $20 via Batch. For the lowest possible cost, Flash + Batch API brings the per-image price down to approximately $0.020 — meaning 1,000 images for just $20.
Do I need a Google Cloud account or just a Google account? You need a standard Google account (Gmail) to access Google AI Studio and create an API key. However, when you create your first API key, AI Studio automatically creates a Google Cloud project for you behind the scenes. You do not need to manually set up a Google Cloud account or navigate the Cloud Console for basic API key creation. You only need to visit the Cloud Console directly when enabling billing, configuring API restrictions, or setting up budget alerts. The transition from a simple Google account to a Google Cloud-enabled project is seamless and handled automatically by AI Studio.
Can I use Nano Banana Pro with Vertex AI instead of AI Studio? Yes, both platforms provide access to the same underlying Gemini models, but the authentication mechanism differs. With AI Studio, you use an API key (the approach covered in this guide). With Vertex AI, you use Google Cloud service account credentials and OAuth 2.0 tokens, which provides more granular access control suitable for enterprise deployments. The pricing is identical regardless of which platform you use to access the API. For most individual developers and small teams, AI Studio with API keys is the fastest and simplest path. Vertex AI becomes the better choice when you need IAM-level access control, VPC Service Controls, or compliance with specific enterprise security frameworks.