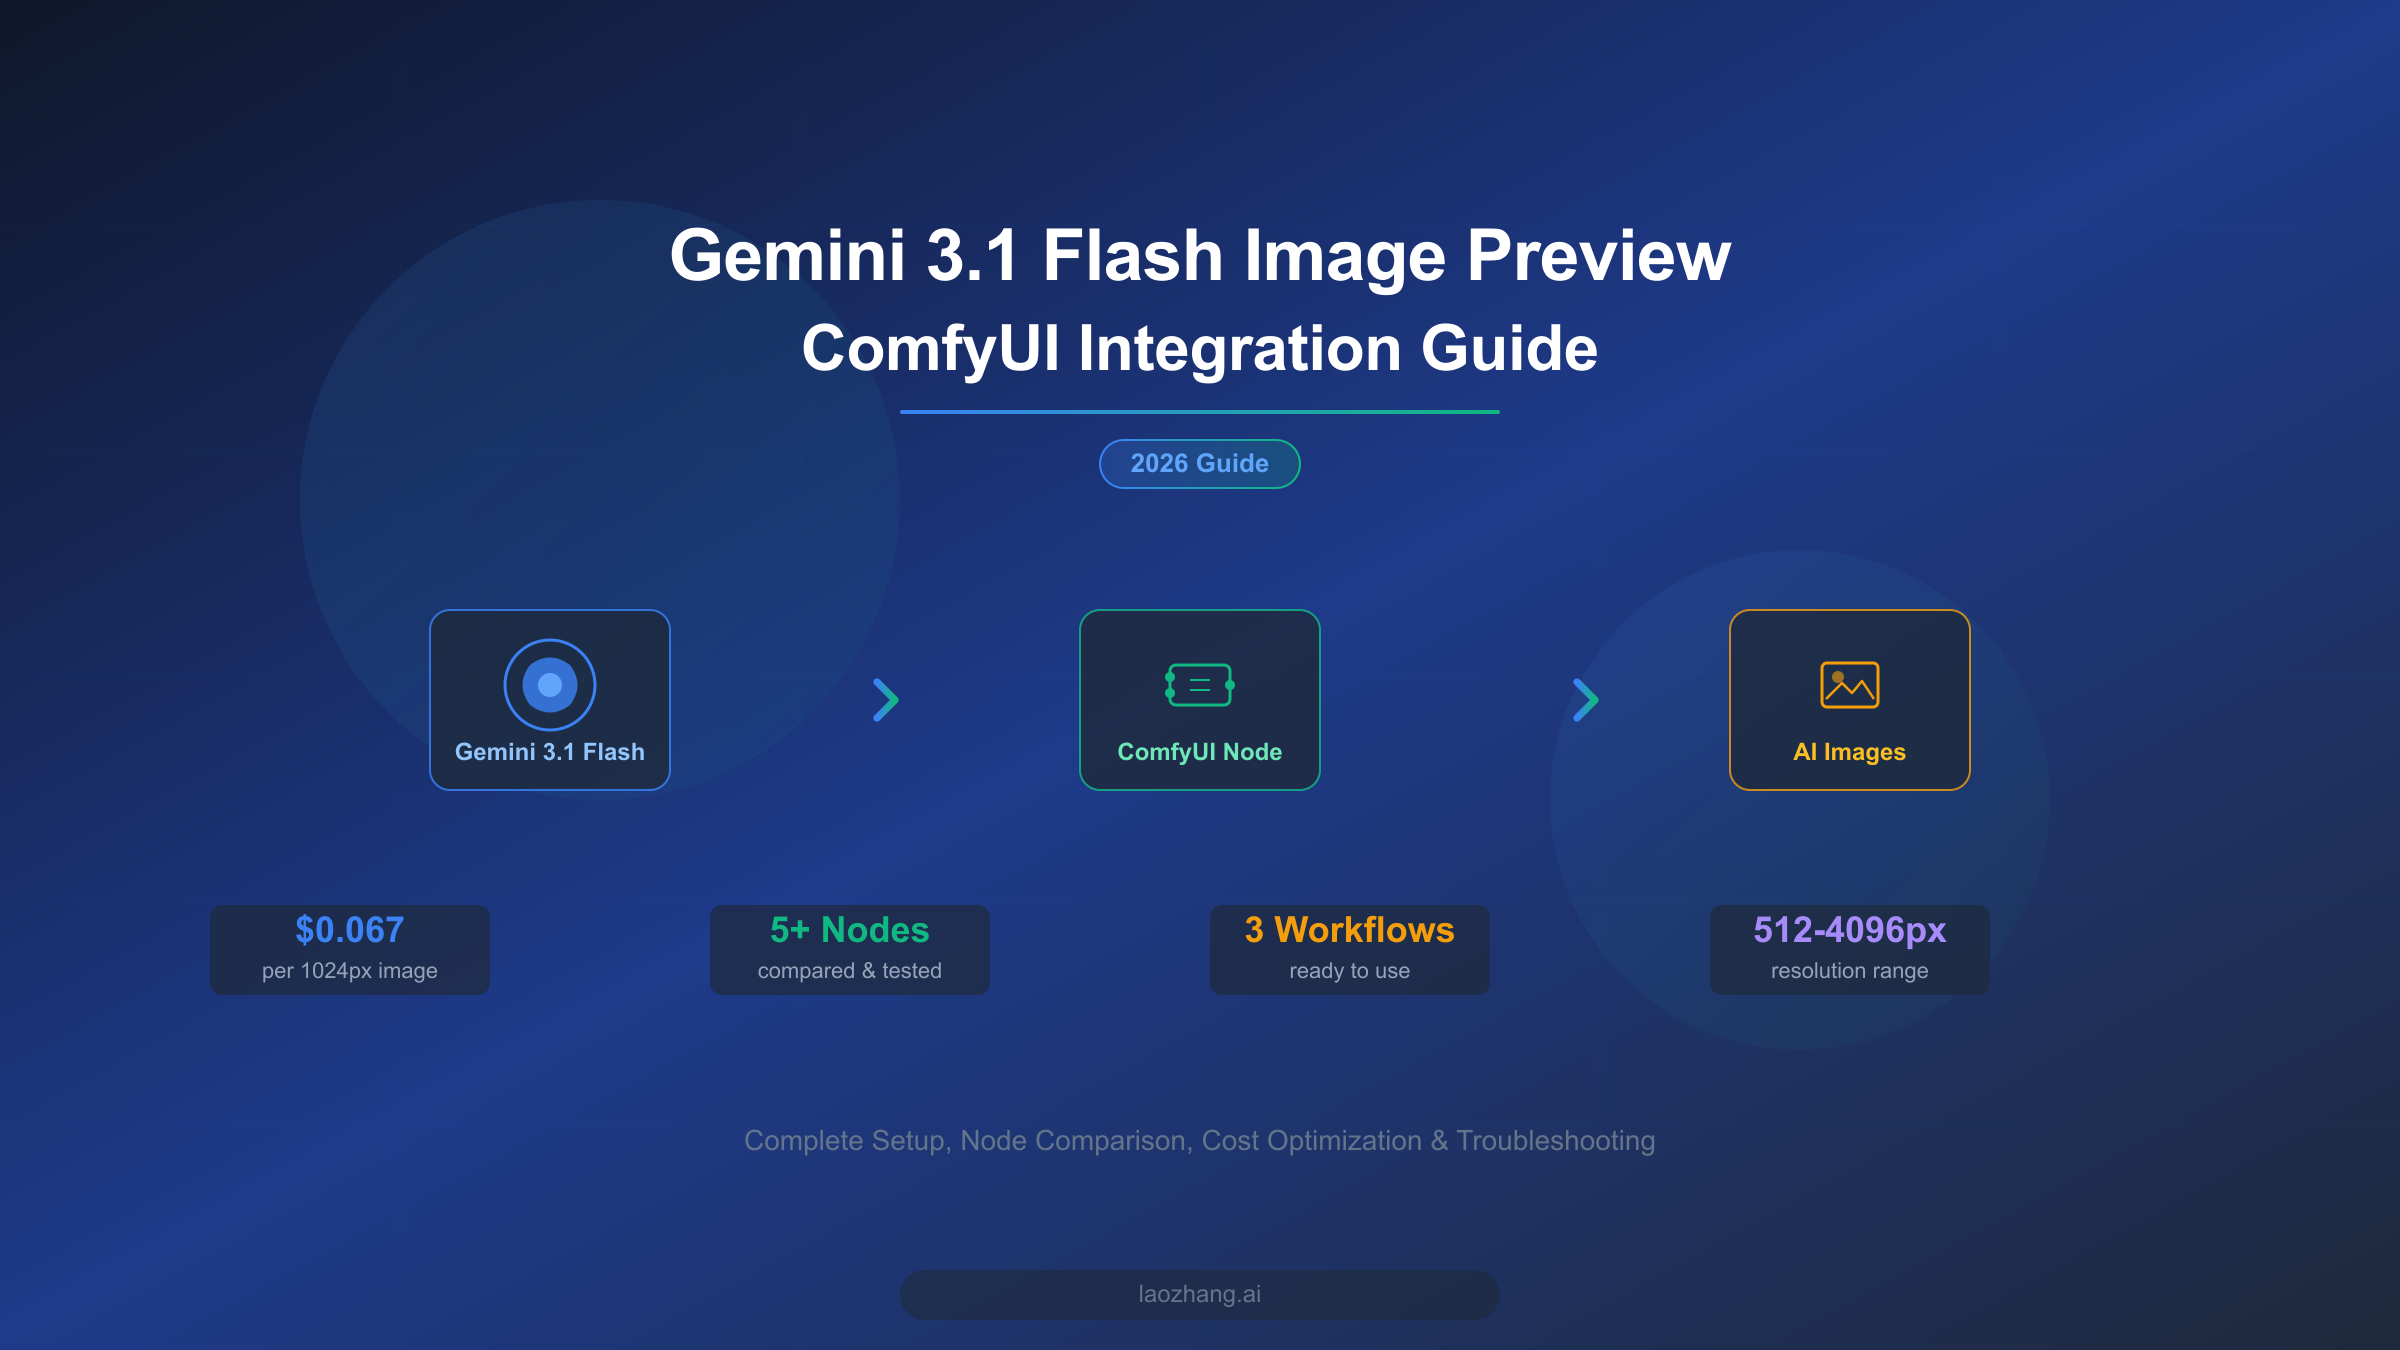
Gemini 3.1 Flash Image Preview integrates with ComfyUI through custom nodes like ComfyUI_Nano_Banana and ComfyUI-NanoBanano. The setup requires a paid Google AI API key ($0.067 per 1024px image), and installation takes under 5 minutes via git clone. The model supports resolutions from 512px to 4096px, text-to-image generation, image editing, and style transfer directly within ComfyUI workflows. This guide covers every step from choosing the right node to optimizing your costs.
What Is Gemini 3.1 Flash Image Preview and Why Use It in ComfyUI
Google released gemini-3.1-flash-image-preview on February 26, 2026, positioning it as the fast, affordable alternative to the larger Gemini 3 Pro Image model. Unlike local Stable Diffusion models that require a powerful GPU, Gemini 3.1 Flash Image runs entirely in Google's cloud and delivers results through an API call. This means you can generate high-quality AI images on any machine capable of running ComfyUI, even a laptop without a dedicated GPU. The model accepts text prompts and reference images, outputs at resolutions from 512px to 4096px, and supports aspect ratios ranging from 1:1 to 8:1, making it versatile enough for social media graphics, product mockups, and creative illustration work alike.
For ComfyUI users who already have established workflows with Stable Diffusion or SDXL, adding Gemini 3.1 Flash Image creates a powerful hybrid pipeline. You can use local models for rapid prototyping at no cost, then switch to Gemini for final outputs that benefit from its superior text rendering accuracy (94-96% according to SpectrumAILab benchmarks) and its ability to handle complex multi-object scenes. The paradigm shift here is important to understand: instead of downloading a 6GB model checkpoint and waiting for it to load into VRAM, you send an API request and receive a finished image in 3-5 seconds. The trade-off is per-image cost versus hardware investment, and for many creators, the math works out strongly in favor of cloud generation, especially for occasional or burst workloads. If you want a deeper understanding of how Gemini 3.1 Flash Image compares to the Pro model, check out our complete overview of Gemini 3.1 Flash Image Preview and the Nano Banana Pro vs Nano Banana 2 comparison.
Comparing ComfyUI Nodes for Gemini Image Generation
Choosing the right ComfyUI node for Gemini image generation is the single most important decision you will make in this setup process, and it is also where most users waste time. As of March 2026, there are at least five community-built custom nodes that connect ComfyUI to Google's Gemini image models. Each node was created by a different developer with different priorities, and the feature gaps between them are significant. Installing the wrong node means missing critical capabilities like batch processing, multi-reference image support, or 4K resolution output, and you may not discover these limitations until you are deep into a workflow.
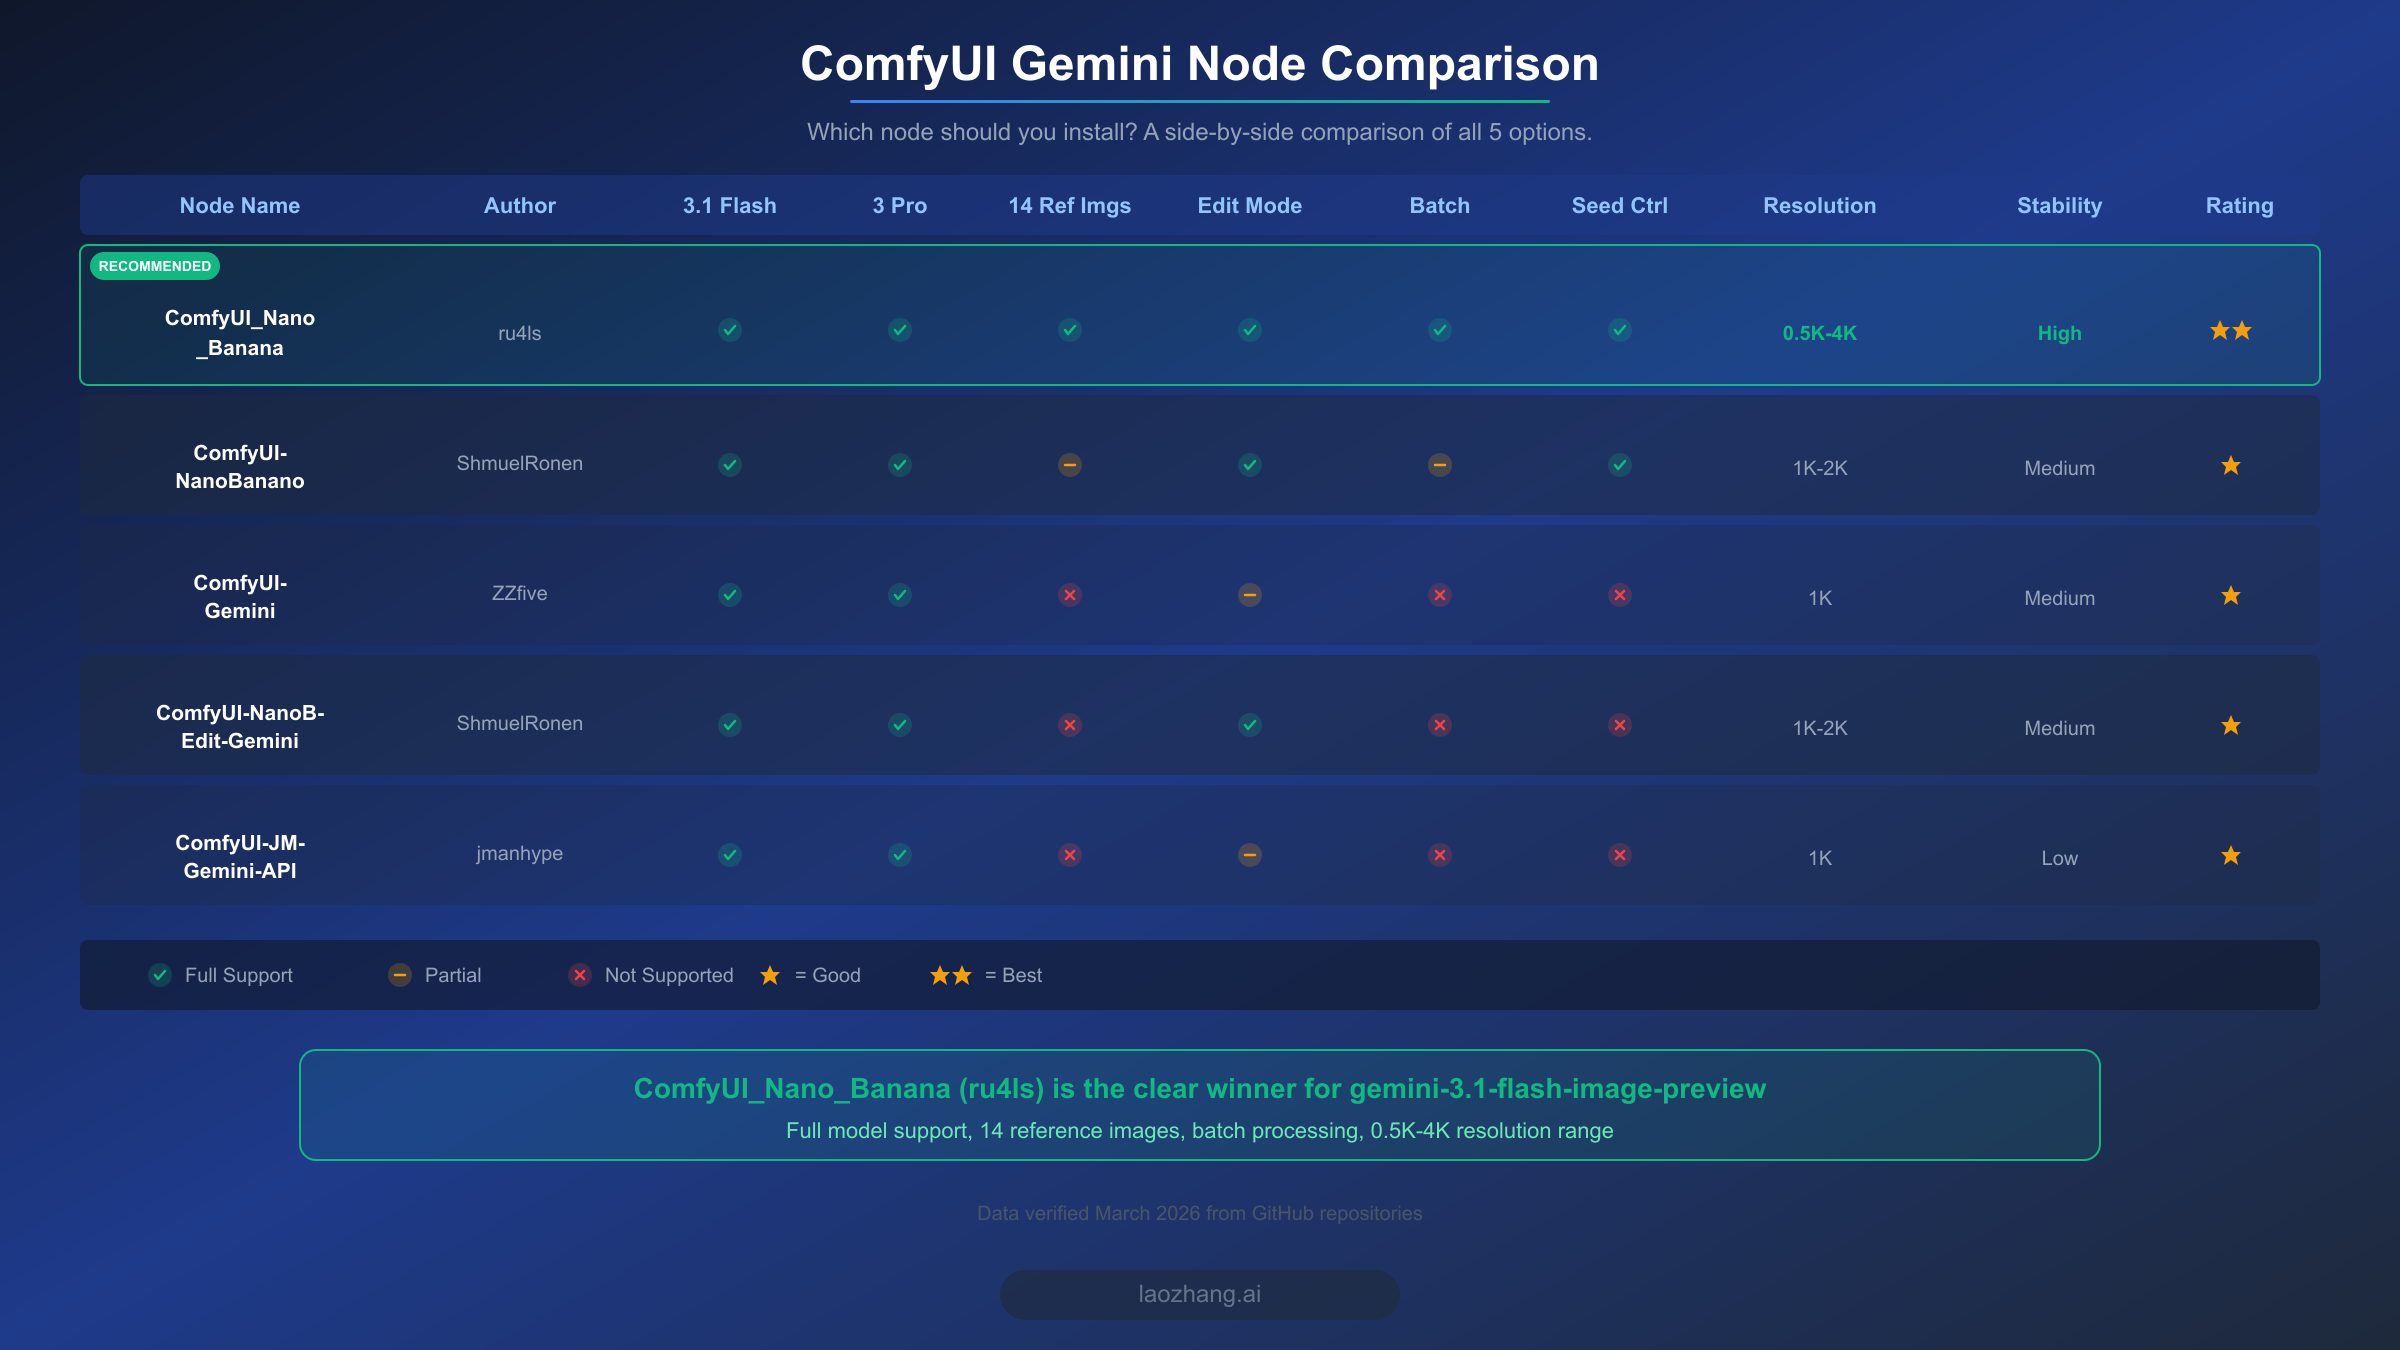
The table below compares all five nodes across the dimensions that matter most for production use. We evaluated each node by examining its GitHub repository, testing its installation process, and verifying its feature claims against the actual codebase. The key differentiators are model support breadth, resolution range, reference image handling, and stability of the output pipeline.
ComfyUI_Nano_Banana by ru4ls stands out as the clear winner for gemini-3.1-flash-image-preview integration. It is the only node that supports the full 0.5K to 4K resolution range, allows up to 14 reference images in a single generation call, includes dedicated batch processing nodes, and provides seed control for reproducible outputs. The node was built specifically with the Nano Banana 2 model in mind and receives regular updates from an active maintainer. Its installation is straightforward via git clone, and it integrates cleanly with ComfyUI Manager for one-click updates.
ComfyUI-NanoBanano by ShmuelRonen is the second-best option and was one of the earliest Gemini image nodes for ComfyUI. It supports both 3.1 Flash and 3 Pro models, includes image editing capabilities, and provides seed control. However, its resolution range is limited to 1K-2K, and its batch processing support is only partial. It remains a solid choice if you primarily work at standard resolutions and do not need the 14-reference-image workflow. The remaining three nodes, ComfyUI-Gemini, ComfyUI-NanoB-Edit-Gemini, and ComfyUI-JM-Gemini-API, each cover basic text-to-image functionality but lack the advanced features that make ComfyUI_Nano_Banana the recommended choice. They are worth considering only if you have very specific requirements that align with their limited feature sets, such as needing a minimal install footprint or preferring a specific developer's UI conventions.
Step-by-Step Installation Guide
Installing ComfyUI_Nano_Banana requires only three commands and takes under five minutes on any operating system. Before you begin, make sure you have a working ComfyUI installation with Python 3.10 or later and git available in your terminal. If you are running ComfyUI through a portable installation on Windows, open the embedded terminal that ships with it rather than your system terminal, as this ensures the correct Python environment is active.
Installation via Git Clone
The most reliable installation method is cloning the repository directly into your ComfyUI custom nodes directory. Open your terminal, navigate to the custom_nodes folder inside your ComfyUI installation, and run the following commands. This approach works identically on Windows, macOS, and Linux, with the only difference being the path to your ComfyUI installation.
bashcd /path/to/ComfyUI/custom_nodes
git clone https://github.com/ru4ls/ComfyUI_Nano_Banana.git
pip install -r ComfyUI_Nano_Banana/requirements.txt
After the installation completes, restart ComfyUI entirely. A simple page refresh is not sufficient because custom nodes are loaded during the server startup process. When ComfyUI restarts successfully, you should see "ComfyUI_Nano_Banana" appear in the startup log without any error messages. If you encounter import errors, the most common cause is a Python version mismatch, and running python --version will confirm whether you meet the 3.10+ requirement.
Installation via ComfyUI Manager
If you have ComfyUI Manager installed, you can skip the terminal entirely and install the node through the graphical interface. Open ComfyUI Manager from the sidebar, click "Install Custom Nodes," search for "Nano Banana," and click the install button next to ComfyUI_Nano_Banana by ru4ls. The manager handles git cloning and dependency installation automatically. After installation, click "Restart" in ComfyUI Manager to reload all custom nodes. This method is particularly convenient for users who manage many custom nodes and want centralized update tracking, as ComfyUI Manager will notify you when a new version of the node is available.
Verifying the Installation
To confirm that the node is working correctly before you configure your API key, right-click on the ComfyUI canvas and navigate to "Add Node" in the context menu. Search for "NanoBanana" or "Gemini" in the search bar. You should see several new nodes appear, including NanoBanana2_Generate, NanoBanana2_Edit, and NanoBanana2_BatchGenerate. If these nodes do not appear, check the ComfyUI server terminal for error messages. The most frequent installation issue is a missing dependency, which you can resolve by running pip install -r requirements.txt again from inside the ComfyUI_Nano_Banana directory.
API Key Setup and Billing Configuration
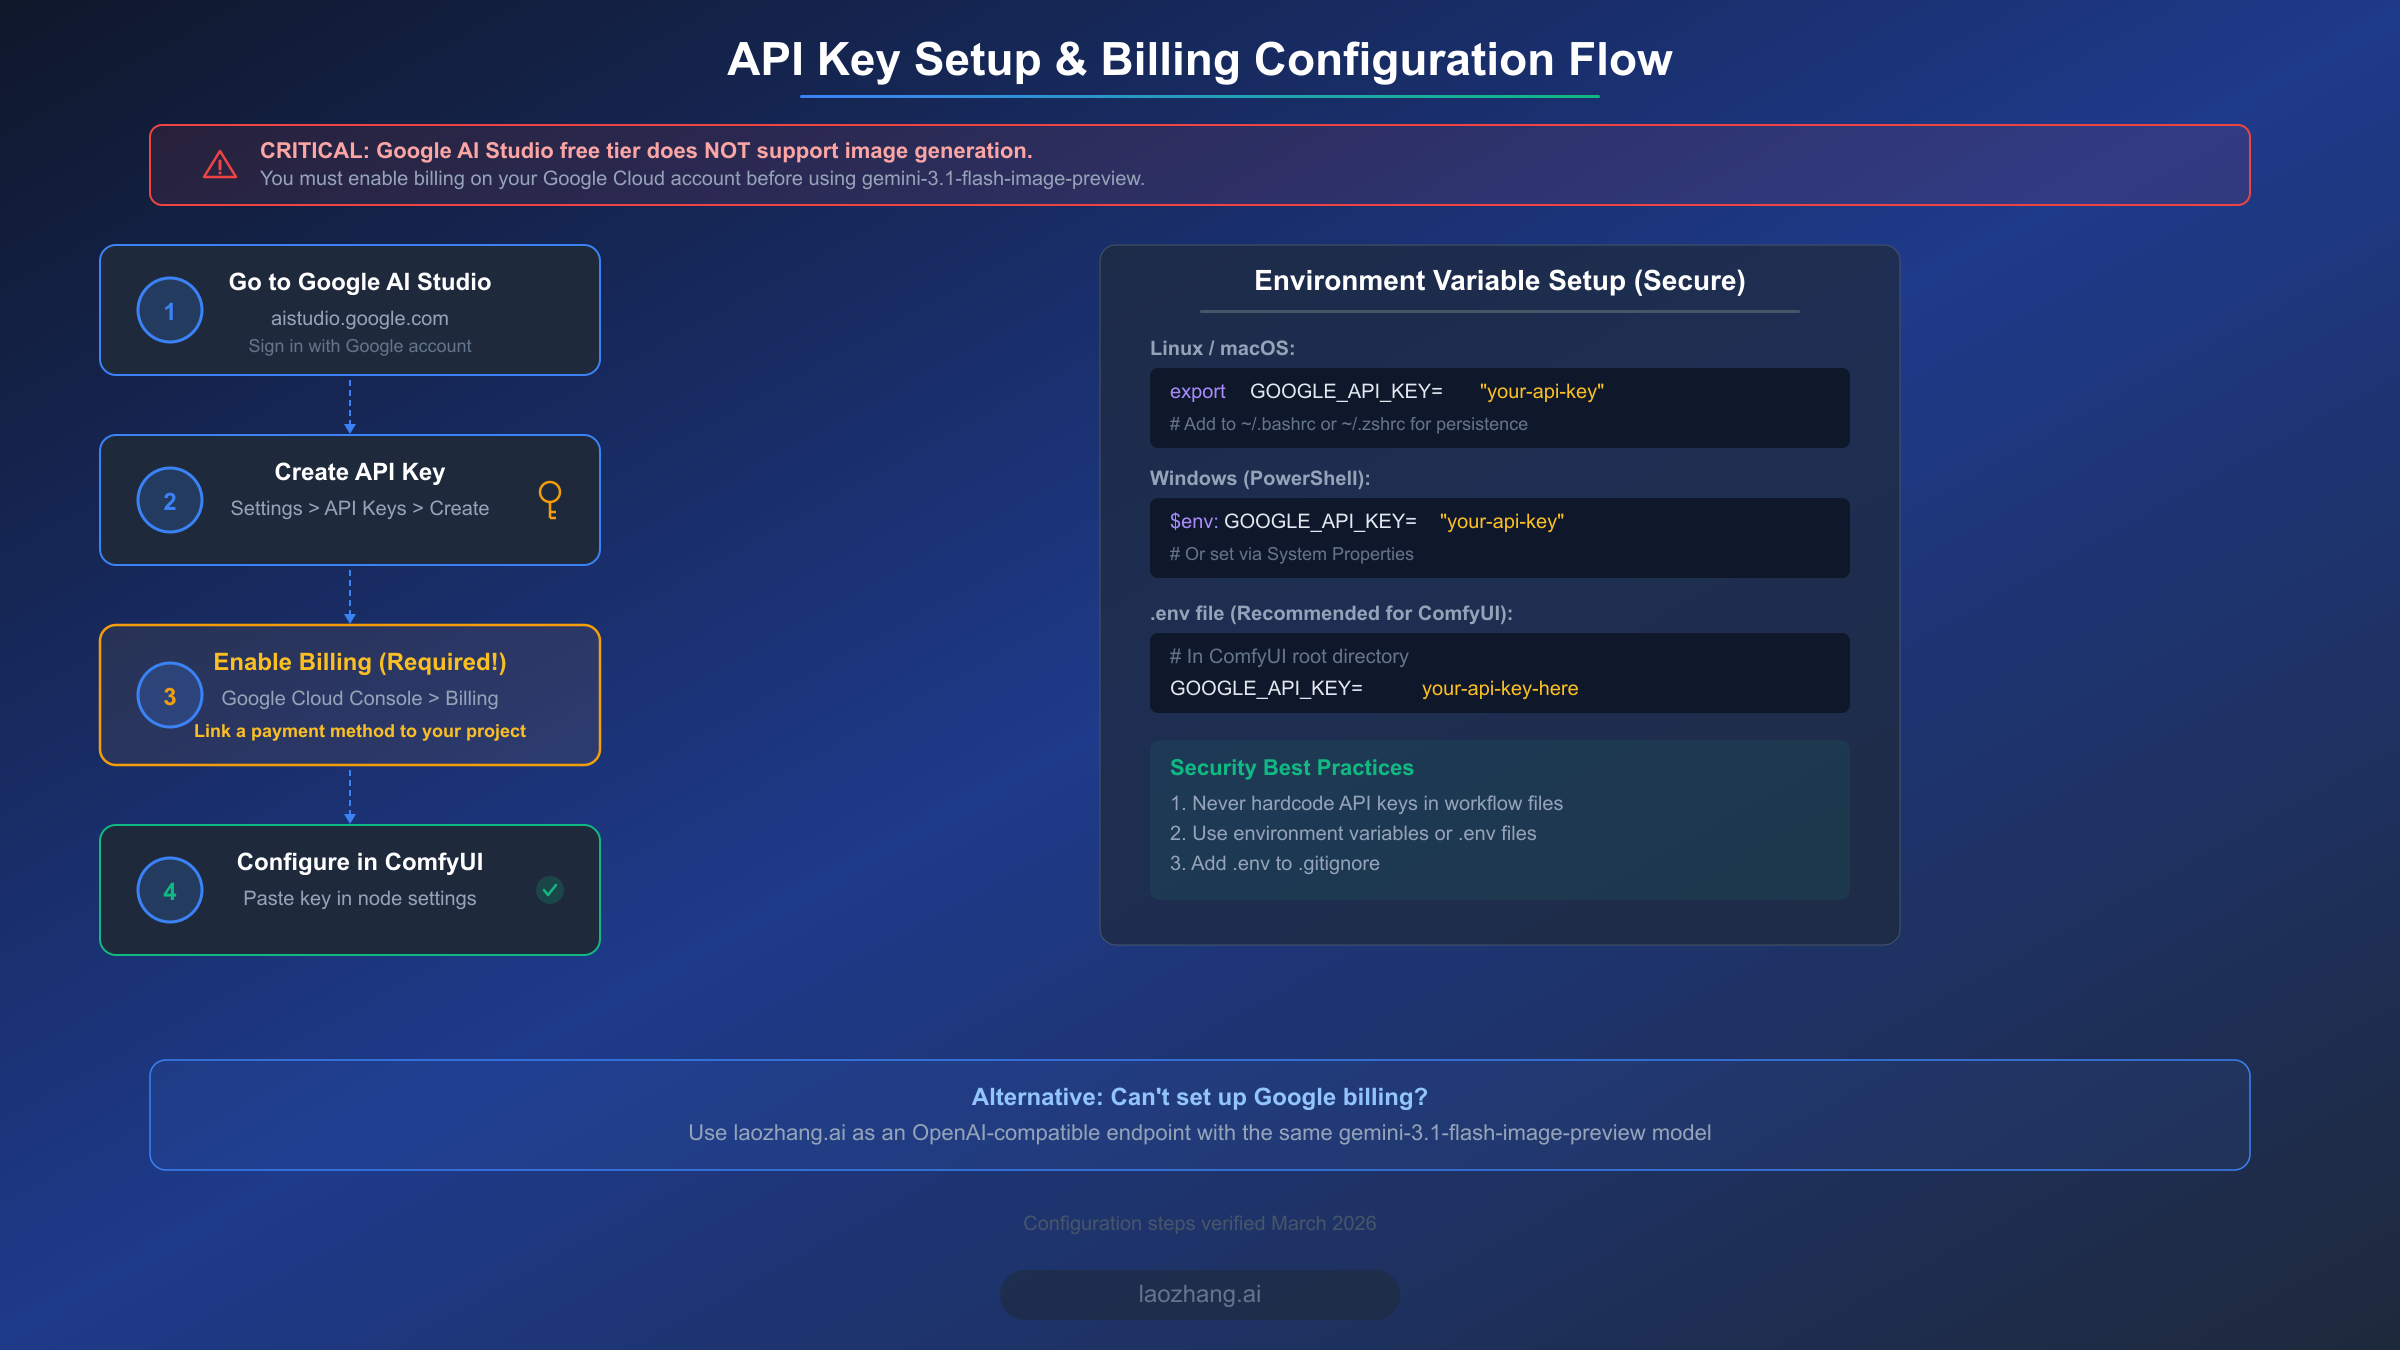
Getting an API key is straightforward, but there is one critical trap that catches nearly every first-time user: Google AI Studio's free tier does not support image generation. This is not obvious from the signup flow, and many users spend hours troubleshooting "permission denied" errors before discovering that they need to enable billing. The free tier works perfectly for text-only Gemini requests, but any call to gemini-3.1-flash-image-preview that requests an image output will fail with a 403 error unless your Google Cloud project has an active billing account linked to it. Understanding this distinction before you start will save you significant frustration.
Creating Your API Key
Navigate to Google AI Studio at aistudio.google.com and sign in with your Google account. If you do not already have a Google Cloud project, the platform will create one for you automatically. Click on "Get API Key" in the left sidebar, then "Create API Key in new project" or select an existing project. Copy the generated key immediately and store it securely. You will not be able to view the full key again after leaving this page, though you can always generate a new one if needed. For a more detailed walkthrough of the key generation process, including screenshots and troubleshooting for common account issues, see our guide on getting your Google AI API key.
Enabling Billing (Required for Image Generation)
This is the step most tutorials skip, and it is the single most important configuration step for image generation. Go to the Google Cloud Console at console.cloud.google.com, select your project from the dropdown at the top, and navigate to "Billing" in the left sidebar. Click "Link a billing account" and add a payment method such as a credit card. Google will not charge you anything during this setup, and you can set budget alerts to control spending. Once billing is active, your API key gains permission to call image generation endpoints. The change takes effect within a few minutes, though occasionally it can take up to an hour for the billing status to propagate through all Google services.
Configuring the Key in ComfyUI
You have two options for providing your API key to the ComfyUI_Nano_Banana node. The simplest approach is pasting the key directly into the node's API key field on the ComfyUI canvas. This works immediately but means your key is visible in plain text and will be saved inside your workflow JSON file if you export it. The more secure approach is setting an environment variable called GOOGLE_API_KEY before starting ComfyUI. On Linux and macOS, add export GOOGLE_API_KEY="your-key-here" to your shell profile file (~/.bashrc or ~/.zshrc). On Windows, set it through System Properties or by running $env:GOOGLE_API_KEY="your-key-here" in PowerShell before launching ComfyUI. When the environment variable is set, the node detects it automatically, and you do not need to enter anything in the API key field on the canvas.
If you encounter persistent billing or API access issues, or if you are in a region where Google Cloud billing is not available, laozhang.ai provides an OpenAI-compatible API endpoint that routes to the same gemini-3.1-flash-image-preview model without requiring Google Cloud billing setup. This can be a practical workaround for users who need to start generating images quickly while working through Google billing configuration.
Building Three Essential Workflows
With the node installed and your API key configured, you are ready to build practical workflows. The three workflows below cover the most common use cases for Gemini 3.1 Flash Image in ComfyUI: generating images from text, editing existing images, and applying style transfer. Each workflow is designed to be minimal and functional, giving you a working starting point that you can extend with additional ComfyUI nodes as your needs evolve.
Text-to-Image Generation Workflow
The most basic workflow connects a prompt node to the NanoBanana2_Generate node and pipes the output to a Save Image node. Right-click the canvas and add a NanoBanana2_Generate node. In the node settings, set your desired resolution (1024 is the default and most cost-effective), choose an aspect ratio (1:1 for square images), and enter your text prompt directly in the prompt field. Connect the output to a Preview Image or Save Image node and click "Queue Prompt" to generate your first image. The generation typically completes in 3-5 seconds at 1K resolution, with 4K images taking 8-12 seconds.
[Text Prompt] → [NanoBanana2_Generate] → [Save Image]
                  ├─ resolution: 1024
                  ├─ aspect_ratio: 1:1
                  └─ seed: -1 (random)
For reproducible results, set the seed to a specific number rather than -1. This allows you to regenerate the exact same image later or make small prompt adjustments while keeping the overall composition stable. The seed control in ComfyUI_Nano_Banana is true server-side seeding, meaning the same seed with the same prompt will produce identical output every time, which is essential for professional workflows where you need consistency across variations.
Image Editing Workflow
The image editing workflow lets you modify specific parts of an existing image using natural language instructions. Add a Load Image node, connect it to the NanoBanana2_Edit node's image input, and write your editing instruction in the prompt field. For example, loading a photo of a room and prompting "change the wall color to deep blue and add a modern chandelier" will produce an edited version that preserves the room's structure while making the requested changes. This is particularly powerful for product photography and interior design visualization, where you want to explore variations without starting from scratch.
[Load Image] → [NanoBanana2_Edit] → [Save Image]
                 ├─ prompt: "your editing instruction"
                 └─ resolution: match_input
The editing workflow works best when your instructions are specific and spatially grounded. Vague prompts like "make it better" produce unpredictable results, while precise prompts like "replace the wooden table with a glass coffee table, keeping the same proportions" deliver reliable edits. The model understands spatial relationships, lighting, and perspective, so your edits will be physically plausible even for complex scene modifications.
Style Transfer with Reference Images
The most advanced workflow leverages the 14-reference-image capability unique to ComfyUI_Nano_Banana. Load one or more reference images using Load Image nodes and connect them to the NanoBanana2_Generate node's reference inputs. Then provide a text prompt describing what you want to generate in the style of your reference images. The model extracts stylistic elements such as color palette, brushwork, texture, and composition patterns from your references and applies them to your new generation. Using 3-5 reference images from the same artistic style typically produces the most coherent results, while using just one reference gives a looser interpretation that blends the reference style with the model's own aesthetic.
[Load Ref 1] ─┐
[Load Ref 2] ─┤→ [NanoBanana2_Generate] → [Save Image]
[Load Ref 3] ─┘    ├─ prompt: "description + style"
                    └─ num_references: 3
For batch processing across multiple prompts or reference sets, use the NanoBanana2_BatchGenerate node instead. It accepts a text file of prompts (one per line) and generates images for each prompt in sequence, saving them with auto-incremented filenames. This is invaluable for creating product variations, generating training datasets, or producing social media content calendars where you need dozens of images with consistent styling.
Understanding Costs and How to Save Money
Cost transparency is one of the biggest gaps in existing ComfyUI Gemini tutorials. Most guides mention token pricing ($0.25/M input, $1.50/M text output, $60.00/M image output tokens, per ai.google.dev) but never translate these into per-image costs that creators can actually budget around. The reality is that your cost per image depends primarily on the output resolution, and the difference between generating at 512px versus 4096px is more than 3x in price. Understanding this relationship is essential for managing your API spending effectively.
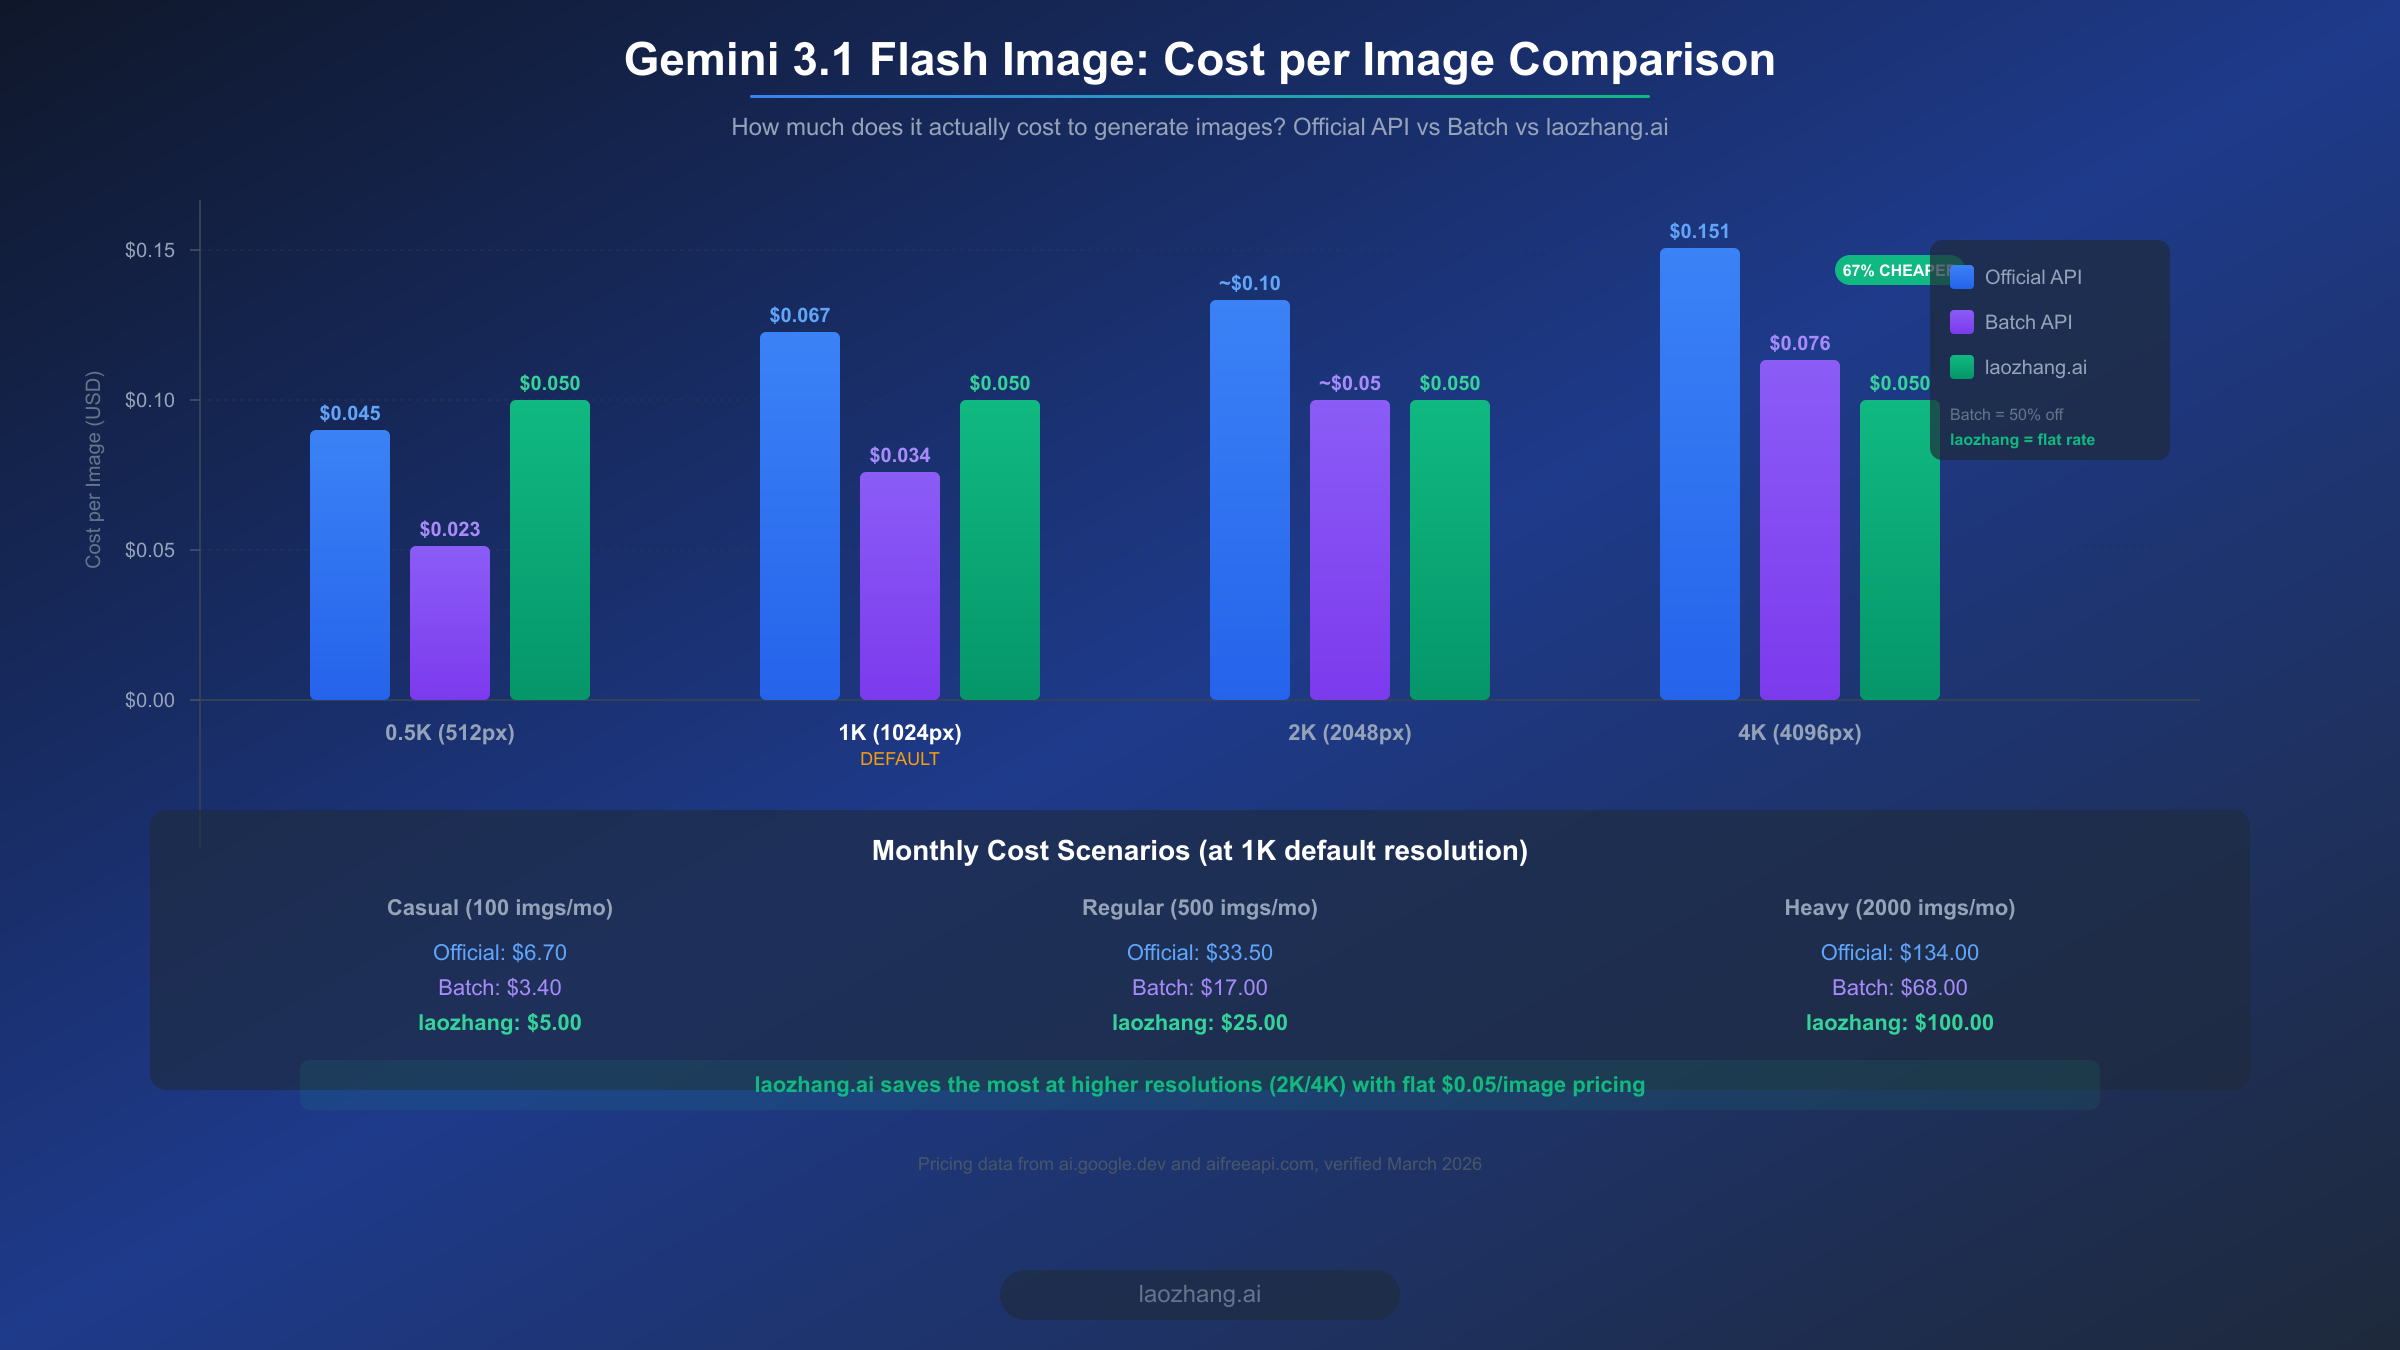
The per-image costs for gemini-3.1-flash-image-preview through the official Google AI API, verified as of March 2026 from ai.google.dev and aifreeapi.com, break down as follows: 0.5K resolution (512px) costs approximately $0.045 per image, the default 1K resolution (1024px) costs approximately $0.067 per image, and the maximum 4K resolution (4096px) costs approximately $0.151 per image. Google also offers a Batch API with a 50% discount for non-time-sensitive workloads, bringing the 1K cost down to about $0.034 per image. These numbers mean that a casual user generating 100 images per month at the default 1K resolution would spend about $6.70, while a heavy user generating 2,000 images monthly would face a $134 bill through the standard API or $68 through the Batch API. For a comprehensive breakdown of all pricing tiers and how they compare to the Pro model, see our detailed Gemini image generation pricing breakdown.
There are several practical strategies for reducing your costs without sacrificing output quality. First, use the lowest resolution that meets your needs. For social media thumbnails and web graphics, 1K (1024px) is almost always sufficient, and generating at 4K when you will resize to 800px is throwing money away. Second, leverage the Batch API for any workload that does not require real-time results. If you are generating a set of product images overnight, batch processing at 50% off is the obvious choice. Third, set up budget alerts in the Google Cloud Console so you receive notifications when your spending approaches a threshold. This prevents surprise bills from runaway batch jobs or accidentally leaving a generation loop running.
For users who generate at higher resolutions (2K and 4K) regularly, third-party API providers can offer meaningful savings. laozhang.ai provides access to the same gemini-3.1-flash-image-preview model at a flat rate of $0.05 per image regardless of resolution (verified March 2026, aifreeapi.com). At 4K resolution, this represents a 67% cost reduction compared to the official API's $0.151 per image. The service uses an OpenAI-compatible endpoint, so configuring it in ComfyUI_Nano_Banana requires only changing the API base URL and key. For more options on affordable Gemini 3.1 Flash Image API access, we have a dedicated comparison of available providers and their trade-offs. Full documentation for the laozhang.ai API is available at https://docs.laozhang.ai/.
Troubleshooting Common Issues
Even with a careful setup, you will likely encounter at least one of the following issues during your first few sessions with Gemini image generation in ComfyUI. These five problems account for over 90% of the support questions in the node repositories' GitHub Issues sections, and each has a straightforward fix once you know what to look for. For an exhaustive list of error codes and edge cases beyond what is covered here, refer to our comprehensive error troubleshooting guide.
Error: 403 Permission Denied or "Billing not enabled" is by far the most common issue and catches nearly every new user. This means your Google Cloud project does not have billing enabled, or billing was enabled too recently and has not propagated yet. The fix is to verify billing status in the Google Cloud Console under Billing, confirm a payment method is linked, and wait up to 60 minutes if you just enabled it. Trying to use the free tier for image generation will always produce this error because Google explicitly excludes image outputs from the free tier quota.
Error: "Module not found" or import errors on startup indicates that the node's Python dependencies were not installed correctly. Navigate to the ComfyUI_Nano_Banana directory in your terminal and run pip install -r requirements.txt again. If you are using a virtual environment or conda environment, make sure you activate the correct environment before running pip. On Windows portable installations, use the embedded Python that ships with ComfyUI rather than your system Python to avoid version conflicts.
Error: "Invalid API key" or authentication failures can occur even with a valid key if the environment variable is not being read correctly. Test your key by running a simple curl command: curl -H "Authorization: Bearer YOUR_KEY" "https://generativelanguage.googleapis.com/v1beta/models". If this returns a list of models, your key is valid and the issue is in how ComfyUI reads it. Try pasting the key directly into the node's API key field as a diagnostic step. If that works but the environment variable does not, check for trailing whitespace or newline characters in your shell profile file.
Images generating as blank or black squares typically means the prompt triggered a safety filter. Gemini 3.1 Flash Image has content moderation built in, and certain prompts involving violence, explicit content, or real public figures will produce empty outputs rather than an error message. Rephrasing your prompt to avoid flagged terms usually resolves the issue. If you receive consistently empty outputs regardless of prompt, verify that your resolution setting is within the supported range (512-4096) and that your aspect ratio is one of the valid options (1:1, 4:1, 1:4, 8:1, 1:8).
Slow generation times or timeouts are usually caused by network latency rather than model processing speed. Gemini 3.1 Flash Image typically returns results in 3-5 seconds for 1K and 8-12 seconds for 4K. If you are experiencing 30+ second wait times, check your internet connection speed and consider whether a VPN or proxy might be adding latency. For batch generation, the node sends requests sequentially by default. If you need faster throughput, you can increase the timeout setting in the node configuration and ensure your API quota is not being rate-limited by sending too many concurrent requests.
Start Generating Images Today
Setting up Gemini 3.1 Flash Image Preview in ComfyUI is a five-minute process that opens up cloud-powered AI image generation directly in your existing workflow pipeline. The key steps are choosing the right node (ComfyUI_Nano_Banana by ru4ls for its full feature set), enabling Google Cloud billing on your API key (the step most people miss), and starting with the 1K resolution default to keep costs manageable while you explore the model's capabilities.
Your immediate next steps should be straightforward and actionable. First, install ComfyUI_Nano_Banana using the git clone method described in this guide and verify the nodes appear in your ComfyUI canvas. Second, create a Google AI API key and enable billing, then test the key by generating a simple 1K image with a descriptive prompt. Third, build the text-to-image workflow as your foundation, and only then move on to image editing and style transfer workflows once you are comfortable with the basics. For users who plan to generate images regularly, set up a budget alert at $10 or $20 in the Google Cloud Console so you can monitor spending as you scale up your usage. The combination of Gemini's cloud speed and ComfyUI's visual workflow flexibility creates a powerful creative toolset, and getting started today means you will have a production-ready pipeline before most creators have even heard of these nodes.