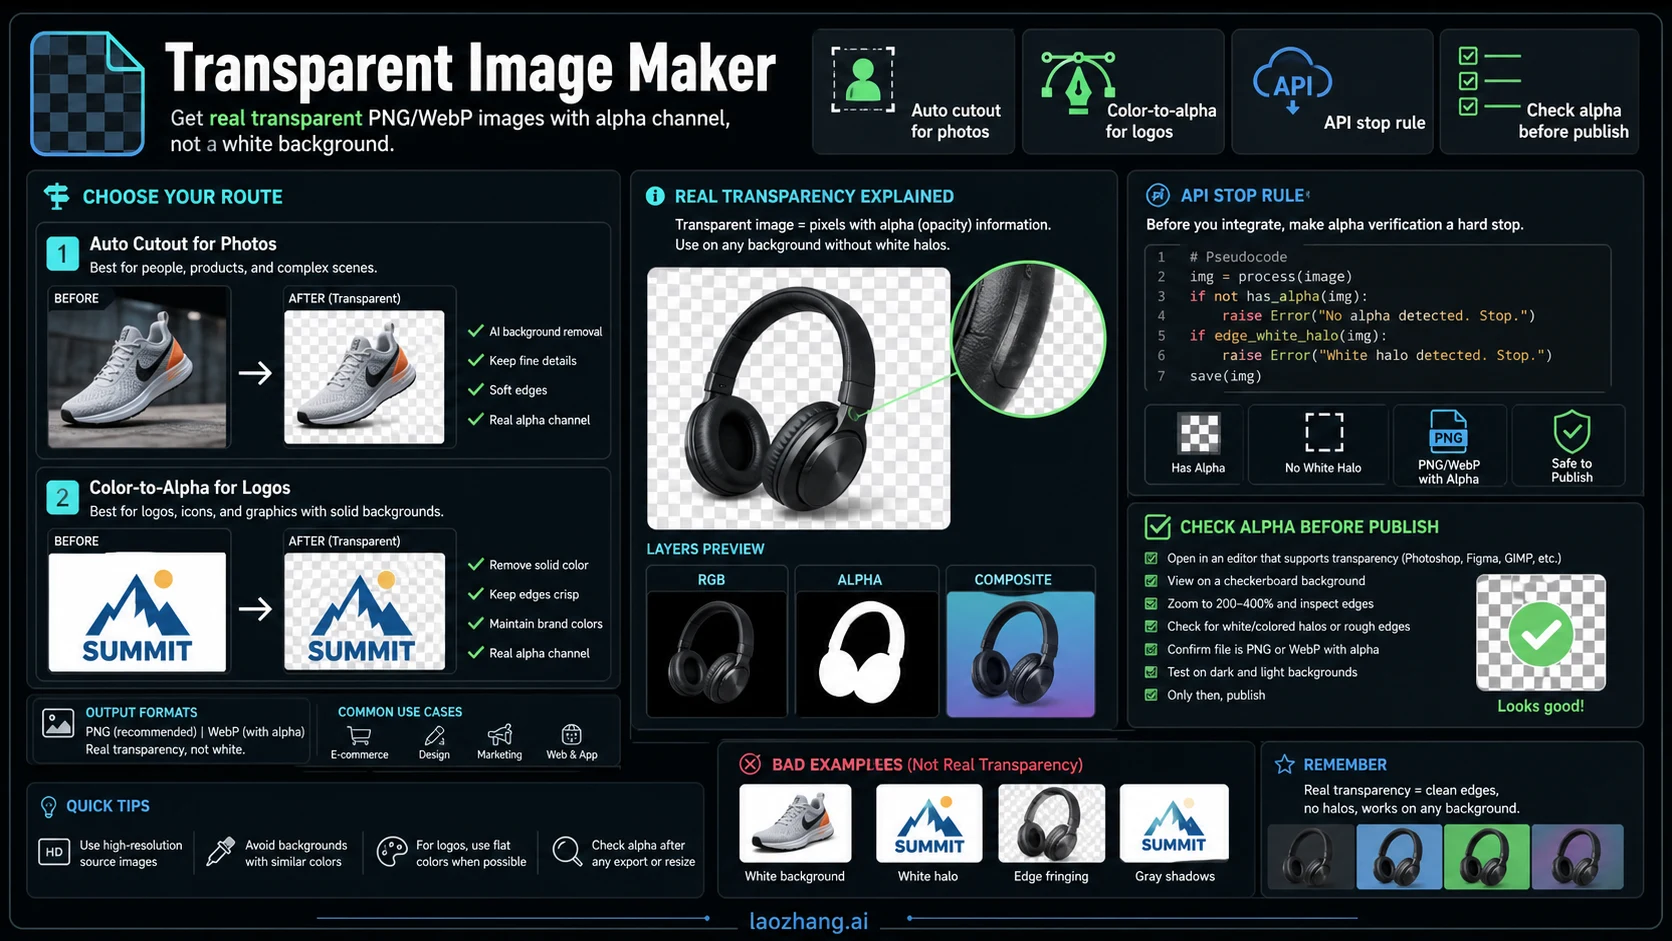
A transparent image maker is useful only when the downloaded file carries real alpha, not when the tool paints the background white and calls the job finished. Start with the route that matches the asset: automatic background removal for product photos and portraits, color-to-alpha or magic-wand editing for logos and signatures, and a verified API or batch route when the same rule must run many times.
The fast decision is simple. If the subject is photographic, upload it to an automatic background remover, export PNG or WebP with alpha, and inspect the edge on both light and dark backgrounds. If the source is a logo, icon, stamp, or flat-color drawing, remove the exact background color instead of asking an AI cutout model to guess. If the plan is programmatic, check transparency support before building the request; OpenAI's current gpt-image-2 image tool surface does not support transparent backgrounds, so background: "transparent" is a stop rule rather than a reliable shortcut.
Use the tool result as a draft, not as proof. The final check is the alpha channel, the fringe around hair or glass, the shadow behavior, and whether the file still works after it is placed on a real product card, slide, marketplace page, or app UI.
Choose the Route Before You Upload
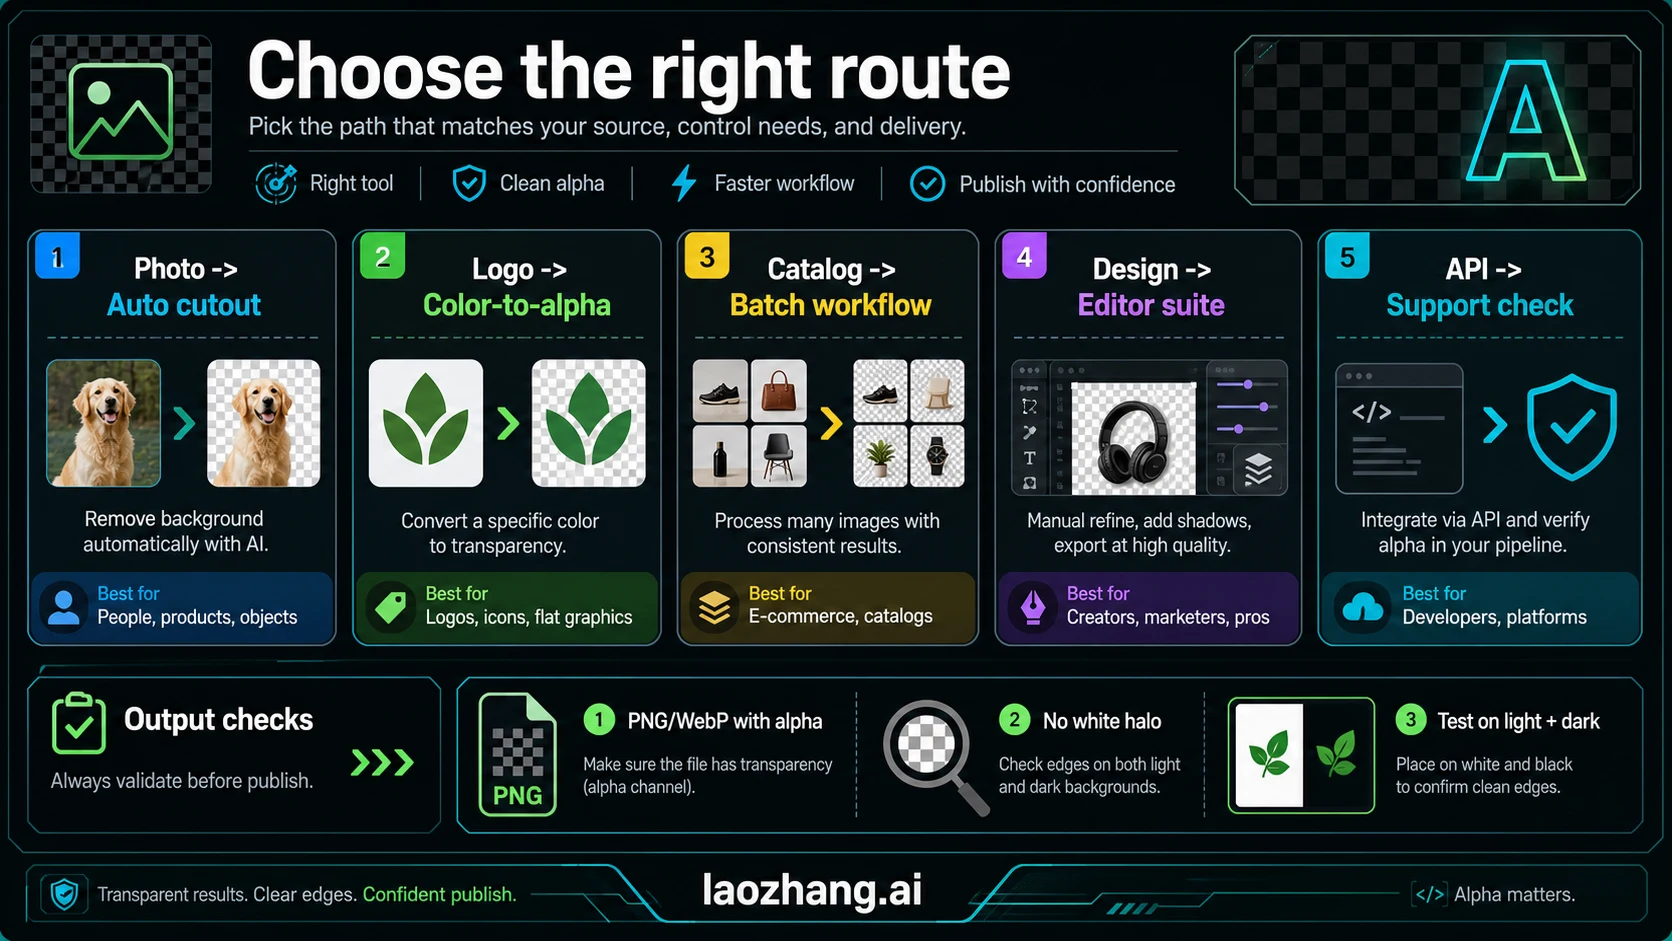
Most transparent image maker pages promise the same action: upload an image, remove the background, download a transparent PNG. The missing step is choosing the right route before the upload. A photographic subject needs segmentation. A logo or stamp needs exact color removal. A catalog needs repeatability. A developer workflow needs documented output support and a fallback when the requested alpha channel is not supported.
| Asset or job | Best first route | What to verify before approval |
|---|---|---|
| Product photo, portrait, pet, object | Automatic background remover such as remove.bg, Adobe Express, Photoroom, Pixelcut, Canva, Picsart, or Erase.bg | PNG or WebP has alpha; hair, glass, and shadows do not leave halos |
| Logo, signature, stamp, flat icon | Magic wand, color-to-alpha, or transparent color tool | The exact background color is removed without eating the mark |
| Ecommerce catalog | Batch-capable remover or product-photo workflow | Consistent crop, padding, shadow, output size, and rights |
| Slide or social design | Canva, Adobe Express, or another design-suite route | The cutout works on the final design background |
| API or automation | Image API or background-removal API with documented transparency support | Request actually supports transparent output; alpha test is automated |
The best route is usually the one that preserves the subject with the least guessing. A shirt against a wall is a segmentation problem. A black signature on a white scan is a color-to-alpha problem. A jewelry photo with glass reflections is an edge and shadow problem.
Use Automatic Cutout for Photos
Use an automatic background remover when the image has a real subject and a real scene: person, product, animal, plant, furniture, packaging, or object. These tools are good because they model subject boundaries instead of asking you to click every edge. Common browser tools such as remove.bg, Adobe Express, Photoroom, Pixelcut, Canva, Picsart, Erase.bg, and Removal.AI all sell speed, upload flow, and transparent download; your approval test still has to be the exported file.
For one-off work, the workflow is short:
- Upload the highest-resolution source you can legally use.
- Choose background removal, transparent background, or PNG maker mode.
- Export PNG or WebP with transparency, not JPG.
- Place the result over white, black, and the real target background.
- Fix edge artifacts before resizing or compressing.
Do not judge from the checkerboard preview alone. A checkerboard can hide gray halos and missing semi-transparent pixels. A white product can look perfect on a light preview and fail on a dark product card. A portrait can look fine at thumbnail size and show cut hair when used in a hero image.
Use Color-to-Alpha for Logos and Stamps
Automatic AI cutout is often the wrong first move for a logo, stamp, signature, QR-like mark, line drawing, or flat icon. Those files usually have a known background color. Removing that exact color is more predictable than asking a model to infer the object boundary.
For this route, use a magic-wand editor, transparent color tool, or color-to-alpha workflow. Tools such as ImageOnline, Rakko Tools, and simple browser-based transparent-color utilities make the pattern clear: click a background color, adjust tolerance, preview which pixels become transparent, and export PNG. This route gives you control over tolerance, which matters when the mark has anti-aliased edges.
Use low tolerance when the mark and background are high contrast. Increase tolerance only until the background disappears. If the mark starts thinning, undo and choose a smaller tolerance. For signatures and stamps, keep an untouched original because aggressive tolerance can remove light ink and damage legal or brand artifacts.
Verify the Alpha Channel
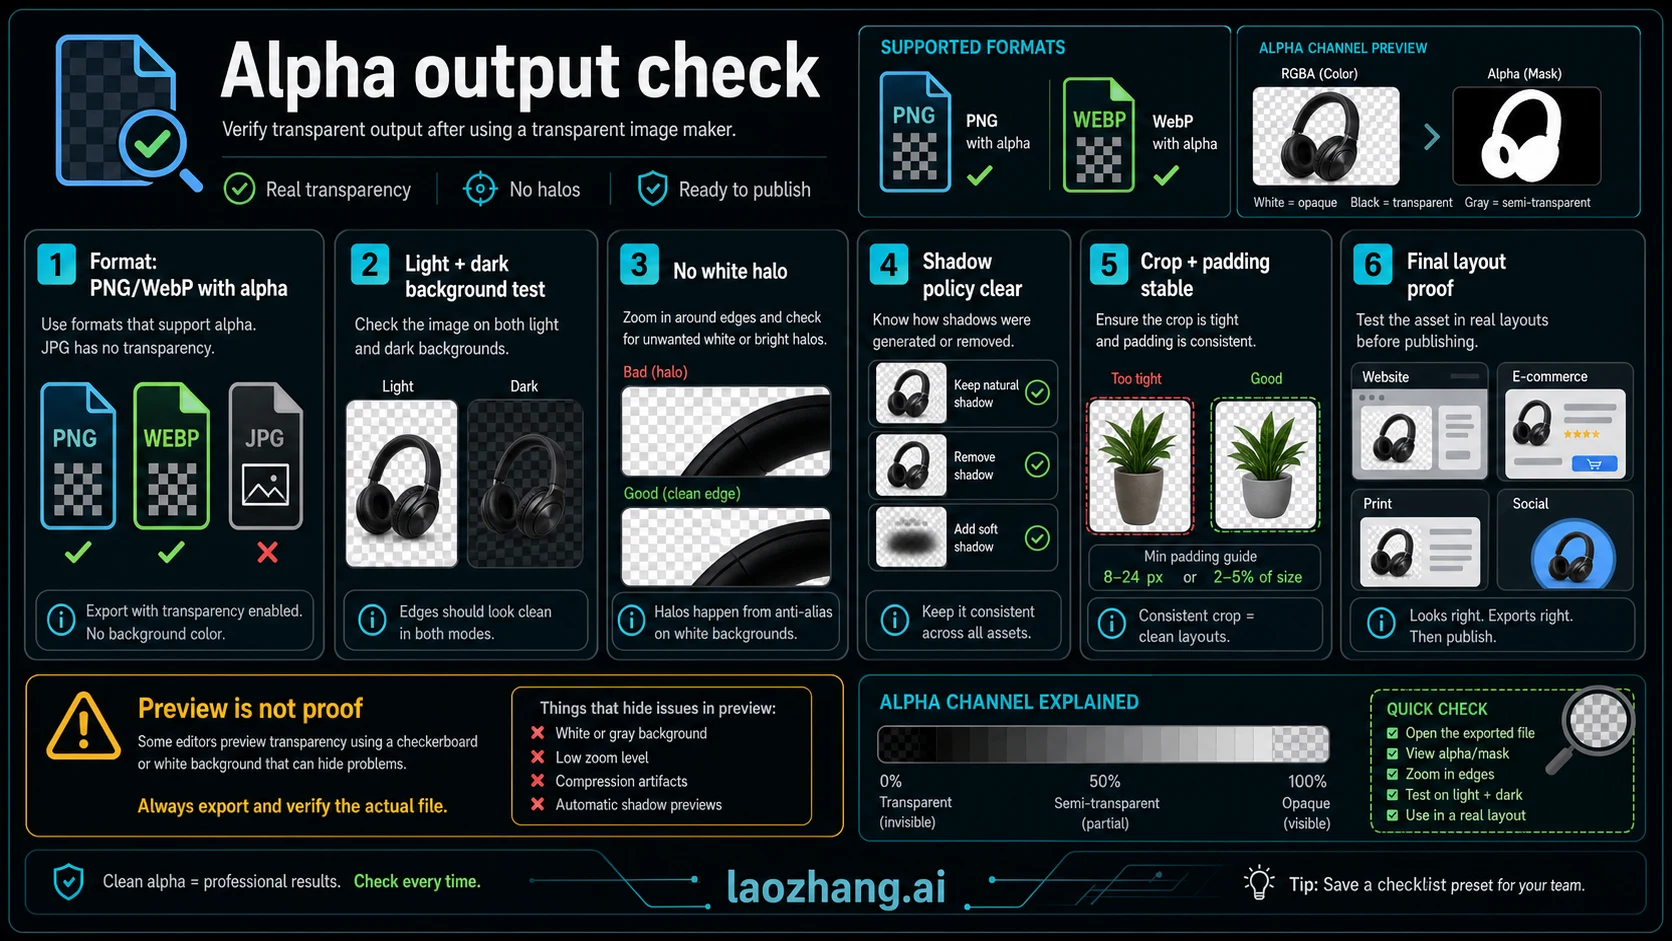
Transparent output needs a file-level check. A transparent-looking image inside a web editor can still download as JPG, as a PNG with a white background, or as a flattened design. Before approving the asset, run a simple visual and file check.
| Check | Pass signal | Fail signal |
|---|---|---|
| Format | PNG or WebP with alpha | JPG, flattened PNG, or white background |
| Light and dark preview | Edge looks clean on both | Gray halo, missing hair, stair-step edge |
| Shadow | Shadow is either intentionally kept or intentionally removed | Dirty rectangle, inconsistent shadow, cut shadow |
| Crop and padding | Subject has predictable bounds | Auto-crop cuts off product or leaves random whitespace |
| Reuse | Works in the final card, slide, or UI | Only looks good in the editor preview |
For developer workflows, make this check automatic. Use an image library to inspect whether an alpha channel exists and whether non-opaque pixels are present. Then render the output on a dark and light test background before saving it into production storage. The file should pass the same test a designer would run by eye.
Repair Edges Before You Resize
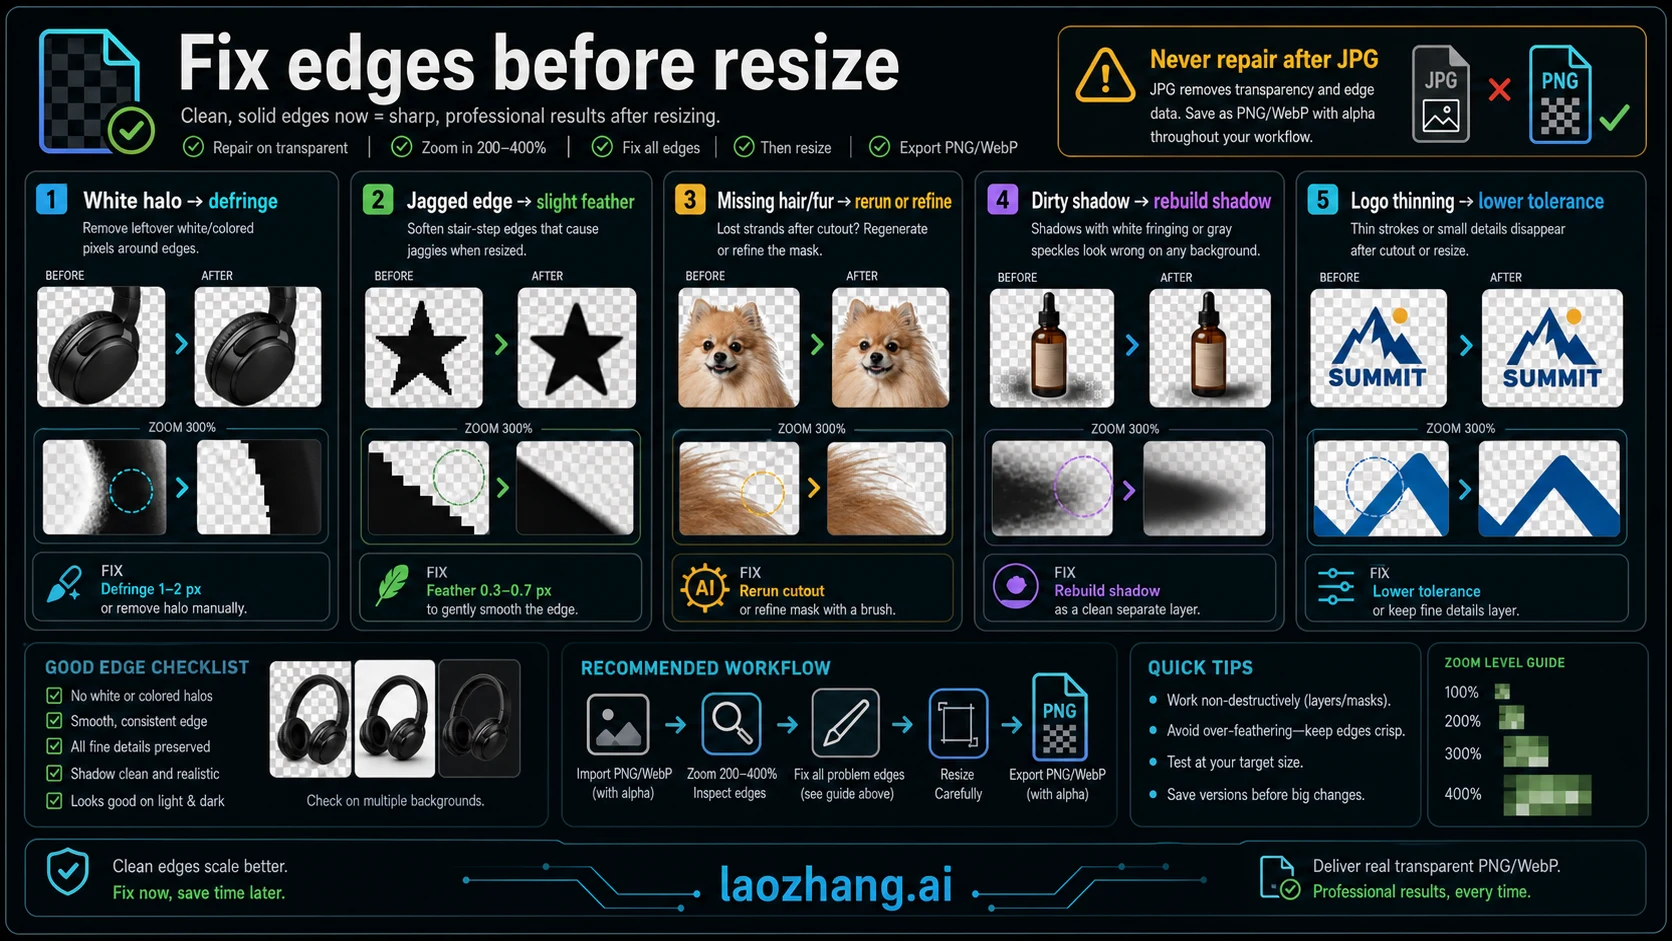
Edge repair is easier before compression and resizing. If the result has a halo, first decide what kind of halo it is. A light fringe usually means the original background color survived in semi-transparent pixels. A jagged edge means the mask is too hard. Missing hair or fur means the segmentation model was too aggressive. Dirty shadow blocks mean the model did not understand whether shadow should stay.
Use these fixes in order:
| Symptom | Likely cause | Best fix |
|---|---|---|
| White or gray fringe | Original background mixed into edge pixels | Defringe, contract mask slightly, or rerun with edge refinement |
| Jagged outline | Hard threshold mask | Feather by a tiny amount, then inspect at 100 percent |
| Missing hair or fur | Subject boundary guessed too tightly | Rerun with a better source or a tool with hair refinement |
| Dirty rectangle shadow | Shadow was flattened with old background | Remove shadow and rebuild it on the final canvas |
| Logo strokes get thinner | Tolerance too high | Lower tolerance and remove color in smaller steps |
Never fix these problems after converting to JPG. The alpha information is already gone. Keep a master transparent PNG or WebP, then create resized derivatives.
API and Model Stop Rules
The API path is different from a browser tool. A prompt that says "transparent background" is not enough; the endpoint and model must support an alpha-bearing output format. The current OpenAI Responses image generation tool options include background control, but OpenAI's docs state that gpt-image-2 currently does not support transparent backgrounds. Treat background: "transparent" with gpt-image-2 as a stop rule. Use a model or image API route that explicitly supports transparent output, or generate the subject on a flat key color and run a separate background-removal step.
For production systems, log four things for every transparent image job: source file, selected route, output format, and alpha verification result. If a customer reports a white background, you need to know whether the failure came from the generator, export format, CDN transformation, image optimizer, or frontend component.
The related background-editing workflow in Gemini Image Background Change is useful when the job is replacing a scene rather than producing a transparent asset. For direct image API routing and the current gpt-image-2 boundary, keep the GPT-Image-2 API Guide separate from transparent-background promises.
Privacy, Rights, and Commercial Use
Transparent image makers often ask you to upload product shots, people, logos, signatures, documents, or marketplace assets. Before uploading, check whether the tool stores files, trains on uploads, limits commercial use, or requires an account for high-resolution downloads. For brand assets, use a workspace-approved tool. For people, avoid uploading sensitive photos unless the tool's privacy and retention terms are acceptable for that use.
Commercial output also needs a rights check. Removing a background does not create ownership of a photo, logo, product image, or model likeness. If the source image is licensed only for a specific marketplace, changing the background does not automatically expand the license.
Quick Workflow
- Classify the asset: photo, logo, catalog item, design asset, or API job.
- Choose the route: automatic cutout, color-to-alpha, batch workflow, design suite, or documented API.
- Export PNG or WebP with alpha.
- Test on light, dark, and final backgrounds.
- Repair edges before resizing.
- Keep the master transparent file and generate derivatives from it.
FAQ
What is the best transparent image maker for most people?
For a single product photo or portrait, start with an automatic background remover such as remove.bg, Adobe Express, Photoroom, Pixelcut, Canva, Picsart, or Erase.bg. The best one is the tool that gives a clean edge and a real transparent PNG for your image, not the tool with the longest feature list.
Why did my transparent PNG still have a white background?
The export may have been JPG, a flattened PNG, or a design placed on a white canvas. Re-export as PNG or WebP with transparency enabled, then test the file on a dark background.
Should I use AI cutout for logos?
Usually no. Logos, stamps, signatures, and flat icons are often cleaner with magic-wand or color-to-alpha editing because the background color is known and the mark should not be reinterpreted by a segmentation model.
Can gpt-image-2 make transparent backgrounds?
Not through the current OpenAI image tool surface documented for gpt-image-2. The transparent-background option is not supported there, so use a different route or add a separate background-removal step.
What file should I keep as the master?
Keep the highest-resolution transparent PNG or WebP that passes edge checks. Make thumbnails, compressed WebP files, or marketplace-specific sizes from that master instead of repeatedly editing exported derivatives.