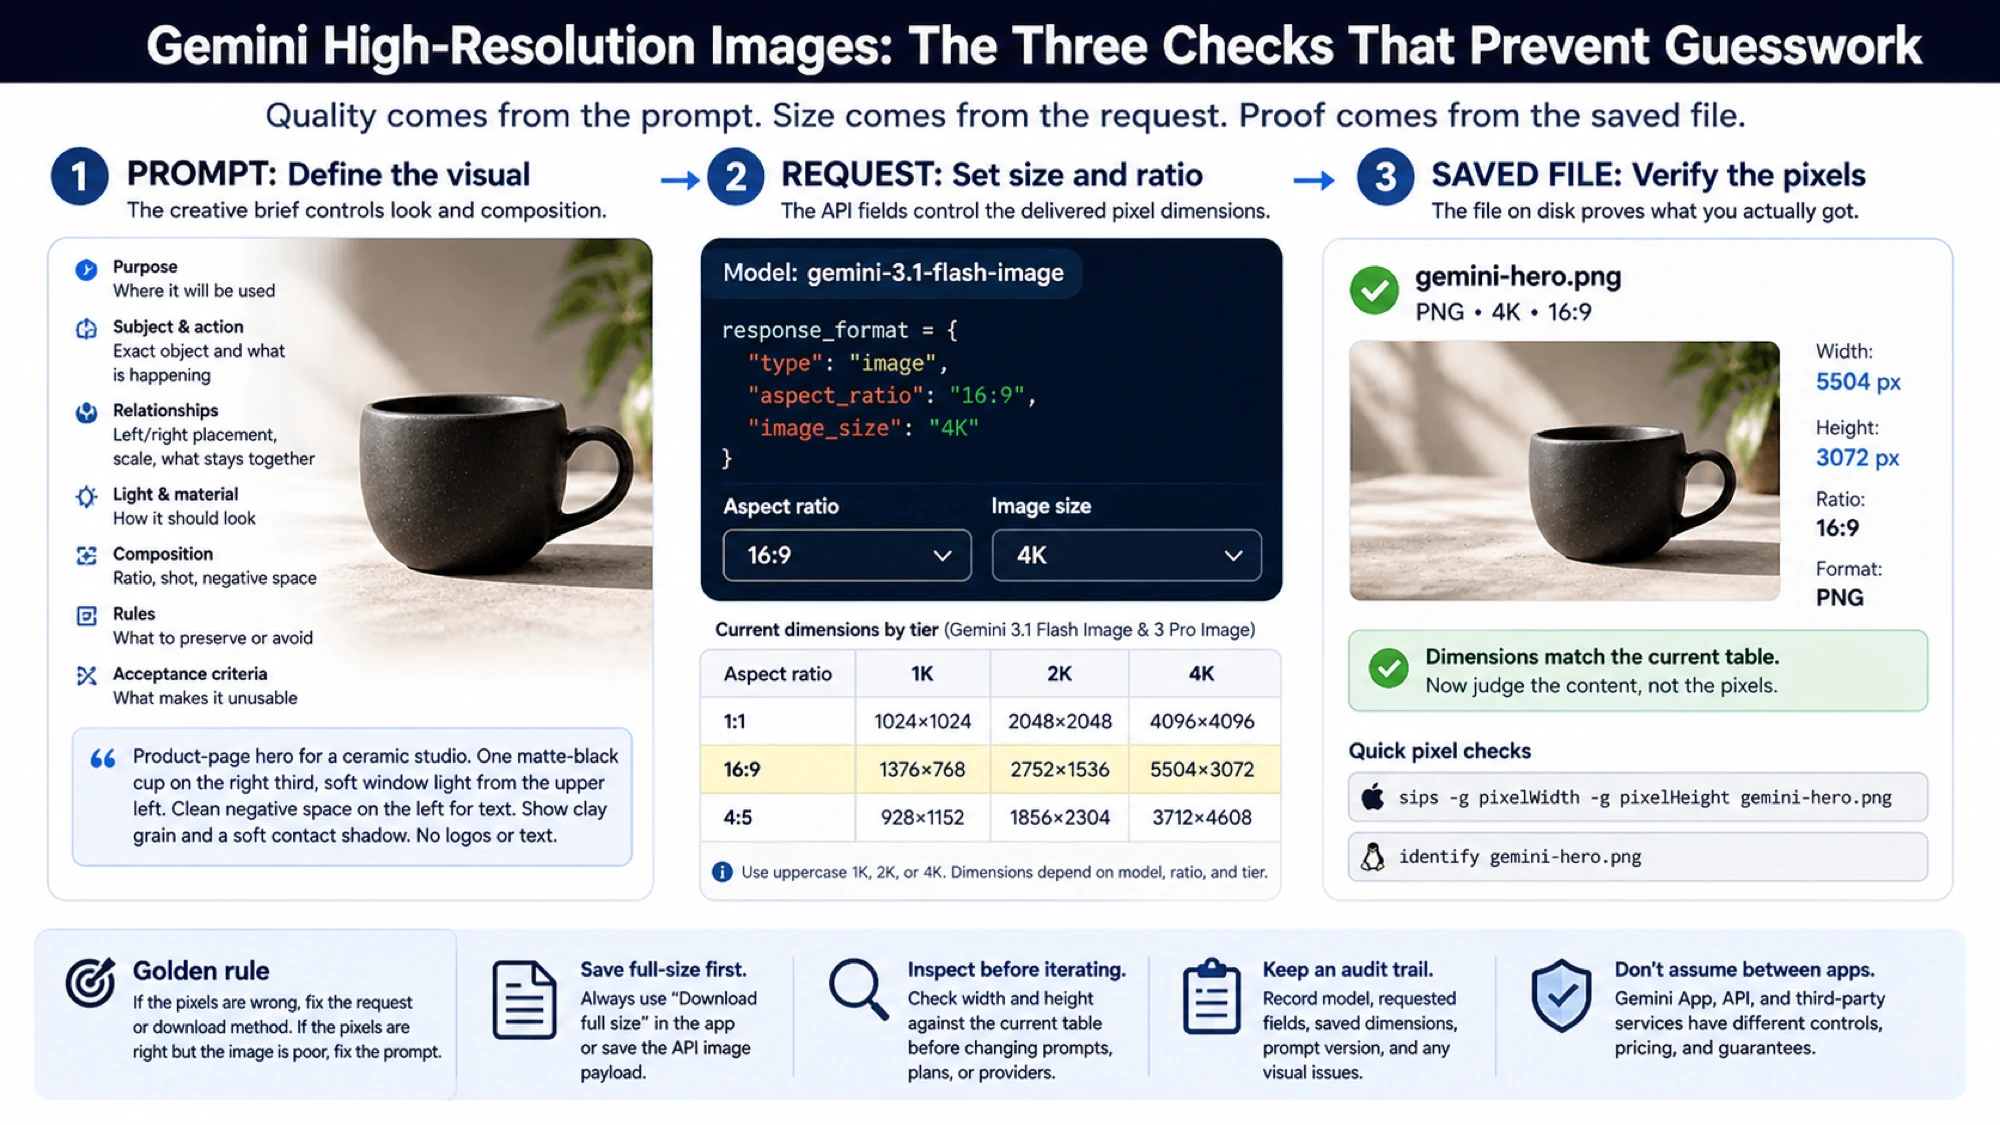
Generating high-resolution images with Google Gemini involves two distinct controls that most users conflate: prompt quality determines how detailed and sharp the image looks, while the resolution setting controls the actual pixel dimensions of your output. Writing "4K" or "HD" in your prompt does not change the pixel count; for API work you need to set image_size under the image response_format, and the value must use the exact uppercase format Google documents. This guide covers both dimensions, then adds the current Nano Banana 2 / Nano Banana Pro route choice so you can decide whether to use Google direct, Batch/Flex, or a lower-cost provider gateway such as laozhang.ai.
Direct Answer: HD Prompt vs 4K Setting
Gemini image quality has two levers. Prompt words such as "HD" and "4K" improve visual intent, but they do not increase pixels. For API output, set the image response format to image_size: "2K" or image_size: "4K"; older wrapper examples may expose camelCase names, but the current Google documentation places the control under response_format. As checked on June 30, 2026, Google lists Nano Banana 2 (gemini-3.1-flash-image) at $0.151 for 4K Standard output and Nano Banana Pro (gemini-3-pro-image) at $0.240 for 4K Standard output, with no free tier for those image rows. If cost, billing, or concurrency is the blocker, laozhang.ai's public docs list Banana2 at $0.055/image and Nano Banana Pro at $0.09/image; treat those as provider-route prices, not Google official pricing.
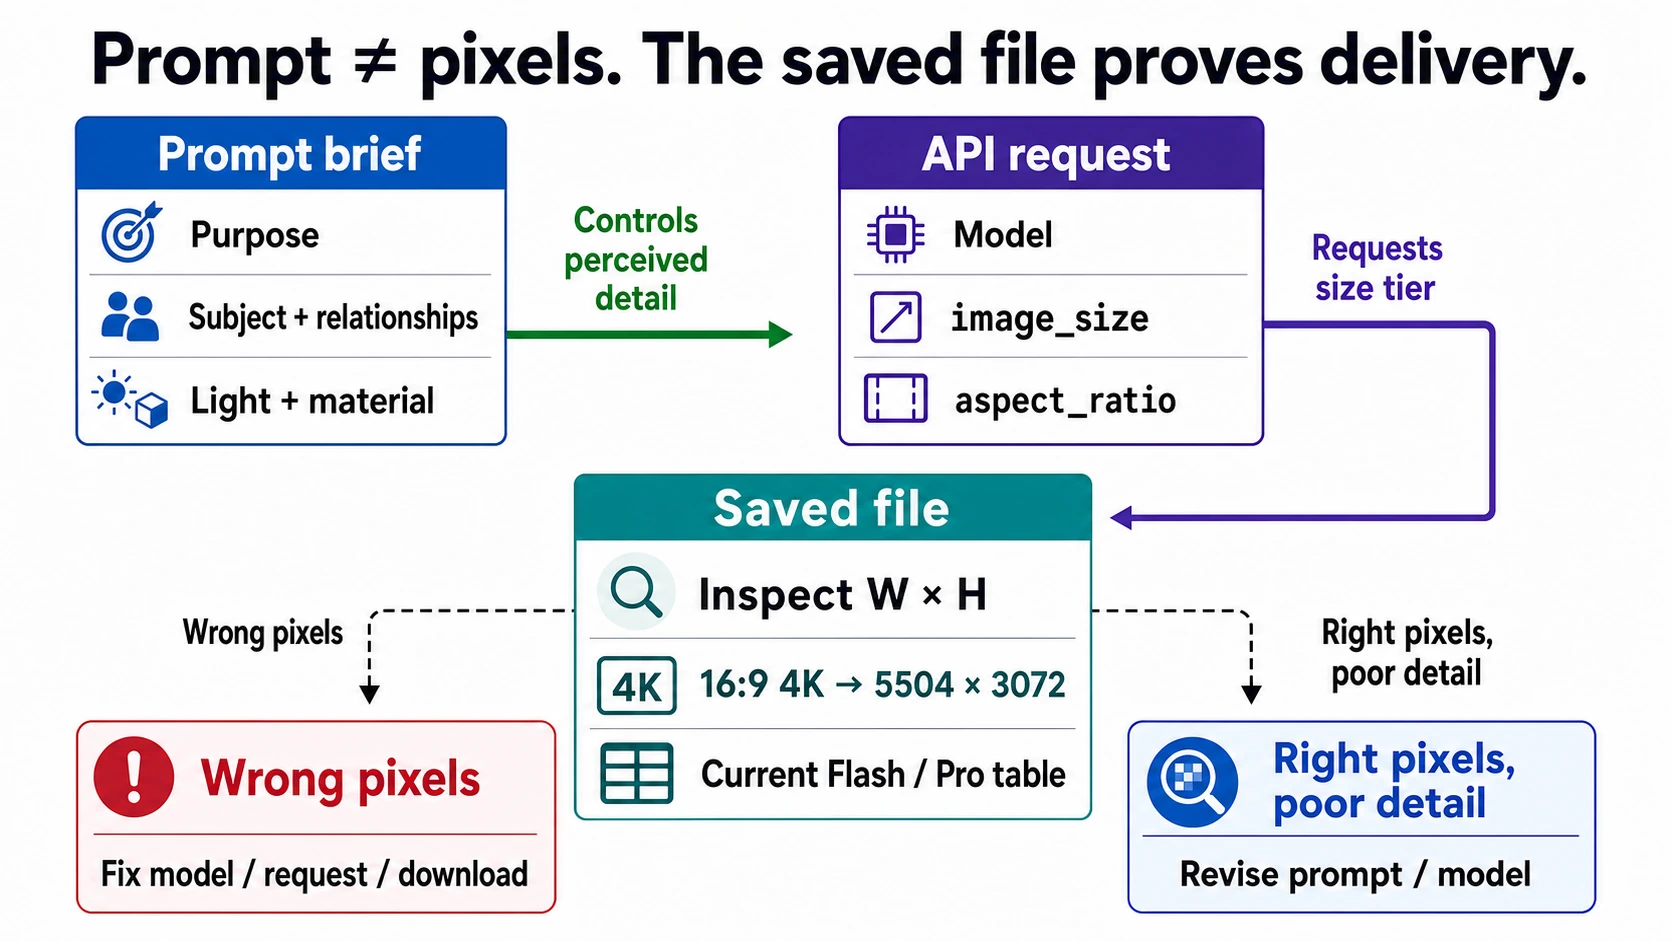
Stop rule: do not buy a higher-resolution route just because a prompt says "4K." First save the output, inspect the actual pixel dimensions, and decide whether the failure is prompt quality, model choice, resolution, or cost. When the bottleneck is API cost or concurrent image volume, run a small Banana2 / Nano Banana Pro test through laozhang.ai before moving production traffic.
What "High Resolution" Actually Means for Gemini Images

There is a fundamental misunderstanding that drives most complaints about Gemini image quality. When users search for "Gemini image high resolution" or "HD prompt," they typically assume that adding quality-related words to their prompt will increase the actual pixel dimensions of the generated image. This assumption is incorrect, and understanding why requires separating two completely independent dimensions of image quality.
Prompt quality controls the visual characteristics of your generated image—sharpness of details, accuracy of textures, richness of lighting, and overall aesthetic coherence. When you write a prompt like "a photorealistic portrait, sharp focus, 85mm lens, studio lighting," you are telling the model to generate an image that looks like a high-quality photograph. The model interprets these instructions and produces an image with fine details, realistic skin textures, and professional-looking lighting. However, the output image remains at the default resolution of 1024x1024 pixels (approximately 1 megapixel) regardless of how many quality-related keywords you include in your prompt.
Pixel resolution is an entirely separate setting that determines the actual width and height of the output image in pixels. Gemini image models currently expose 1K by default, 2K and 4K higher-resolution output, and a 0.5K option on Gemini 3.1 Flash Image for fast prototyping. Changing this setting is the only reliable way to increase the actual pixel count of your generated images. In consumer surfaces, the available download size depends on the product plan and account state. Through the API, the current Google documentation places the control in the image response_format as image_size.
The practical implication is straightforward: you need both a well-crafted prompt and the correct resolution setting to produce truly high-quality, high-resolution images. A detailed prompt at 1K resolution produces a beautiful but small image. A vague prompt at 4K resolution produces a large but mediocre image. The combination of descriptive prompting with an appropriate resolution setting is what delivers genuinely professional output.
One detail worth noting is that Gemini's 4K setting is not the same thing as asking the prompt to "look high resolution." The API request asks the model route for a higher output size, so you should judge the result by the returned file dimensions, not by the words in the prompt. Save the image, inspect its pixel dimensions, and only then decide whether you need a separate upscaling step.
Prompt Techniques That Actually Improve Image Quality
Before diving into specific techniques, it is worth understanding why prompt quality matters even at high resolutions. A 4K image with a poorly written prompt will simply be a larger version of a mediocre image—16 million pixels of bland, generic output. Conversely, a masterfully prompted 1K image can look more professional than a lazily prompted 4K image because the visual detail, lighting, and composition are what the human eye actually evaluates. This is why professional AI artists spend as much time refining their prompts as photographers spend setting up their shots.
The most effective way to improve Gemini image quality through prompting is to describe your desired scene as a narrative paragraph rather than listing disconnected keywords. Google's official prompt guide from DeepMind emphasizes this approach: the model excels at understanding natural language descriptions and translates them into visual output more accurately when given contextual, flowing descriptions rather than tag-like keyword lists.
Camera and lens specifications are among the most powerful prompt elements for photorealistic images. Instead of writing "sharp photo," specify the exact imaging characteristics you want. Mentioning "shot with an 85mm f/1.4 lens" tells the model to produce soft background bokeh with a sharp subject—a look that is immediately recognizable as professional portrait photography. Similarly, "wide-angle 24mm shot from a low angle" creates dramatic perspective distortion that communicates a specific visual mood. The model has been trained on millions of photographs with EXIF data, so it understands these technical specifications and translates them into appropriate visual characteristics with remarkable accuracy.
Lighting descriptions dramatically affect the perceived quality of generated images. Specifying "soft diffused window light from the left side" produces fundamentally different results than "harsh direct sunlight" or "neon-lit cyberpunk atmosphere." The model responds especially well to photography-specific lighting terminology: "Rembrandt lighting," "butterfly lighting," "golden hour backlight," and "high-key studio setup" all produce distinct and predictable results. When users complain about flat or lifeless Gemini images, the most common cause is the absence of any lighting specification in their prompt—the model defaults to neutral, even illumination that lacks visual interest.
Material and texture descriptions add the kind of micro-detail that makes images look genuinely high-quality even at standard resolution. Rather than simply requesting "a wooden table," describing "a weathered oak table with visible grain patterns and a matte finish" gives the model specific textural information to render. This is particularly important for product photography, fashion imagery, and any scene where surface quality matters. The model can render the difference between brushed aluminum and polished chrome, between matte cotton and glossy silk—but only when you provide these specifications in your prompt.
Composition and framing directives complete the quality picture. Professional photographs follow compositional rules that the model understands: "rule of thirds placement with the subject in the right third," "centered symmetrical composition," or "negative space on the left for text overlay" all produce predictable layouts. Including the shot type—close-up, medium shot, full body, aerial view—further constrains the output in useful ways. These compositional elements are what separate a "good" image from a "professional" image, and they cost nothing to include in your prompt.
The technique of contextual purpose—explaining why you need the image—also produces superior results. A prompt that includes "for a LinkedIn professional headshot" or "for a luxury watch advertisement in a glossy magazine" gives the model additional context that influences aesthetic choices in subtle but important ways. The model adjusts color grading, contrast, and overall mood based on the stated purpose, often producing output that is more immediately usable for the intended application.
One technique that many users overlook is iterative refinement through conversation. Gemini's multimodal models maintain context across turns in a conversation, which means you can generate an initial image and then refine it with follow-up instructions like "make the lighting warmer," "shift the subject slightly to the left," or "change the background to a coastal scene." This conversational approach often produces better results than trying to perfect a single prompt, because it lets you make targeted adjustments to specific aspects of the image without risking changes to elements you already like. For multi-reference work, confirm the current reference-image limits for your chosen model and route before building a workflow around a fixed count.
Another advanced technique involves negative prompting through positive description. Rather than listing what you do not want in the image (which Gemini does not support as explicit negative prompts), describe the desired scene so precisely that undesired elements are implicitly excluded. Instead of "no blur, no noise, no artifacts," write "crisp sharp focus throughout the frame, clean smooth rendering, pristine image quality." This positive framing gives the model constructive guidance rather than constraints to work against, and it consistently produces cleaner results.
How to Set Higher Resolution in Gemini (Step-by-Step)
Setting Resolution in the Gemini App
For users working through the Gemini web interface or mobile app, do not copy API pricing or API model rows into the product UI. Consumer surfaces can expose different plan rules, credits, download sizes, and rollout behavior from the developer API. Generate the image, check the download controls shown in your account, and confirm the actual saved file dimensions. If the UI only gives you 1K or 2K while your job requires deterministic 4K output, move the workload to an API route instead of trying to solve it with more prompt adjectives.
Setting Resolution via the Gemini API

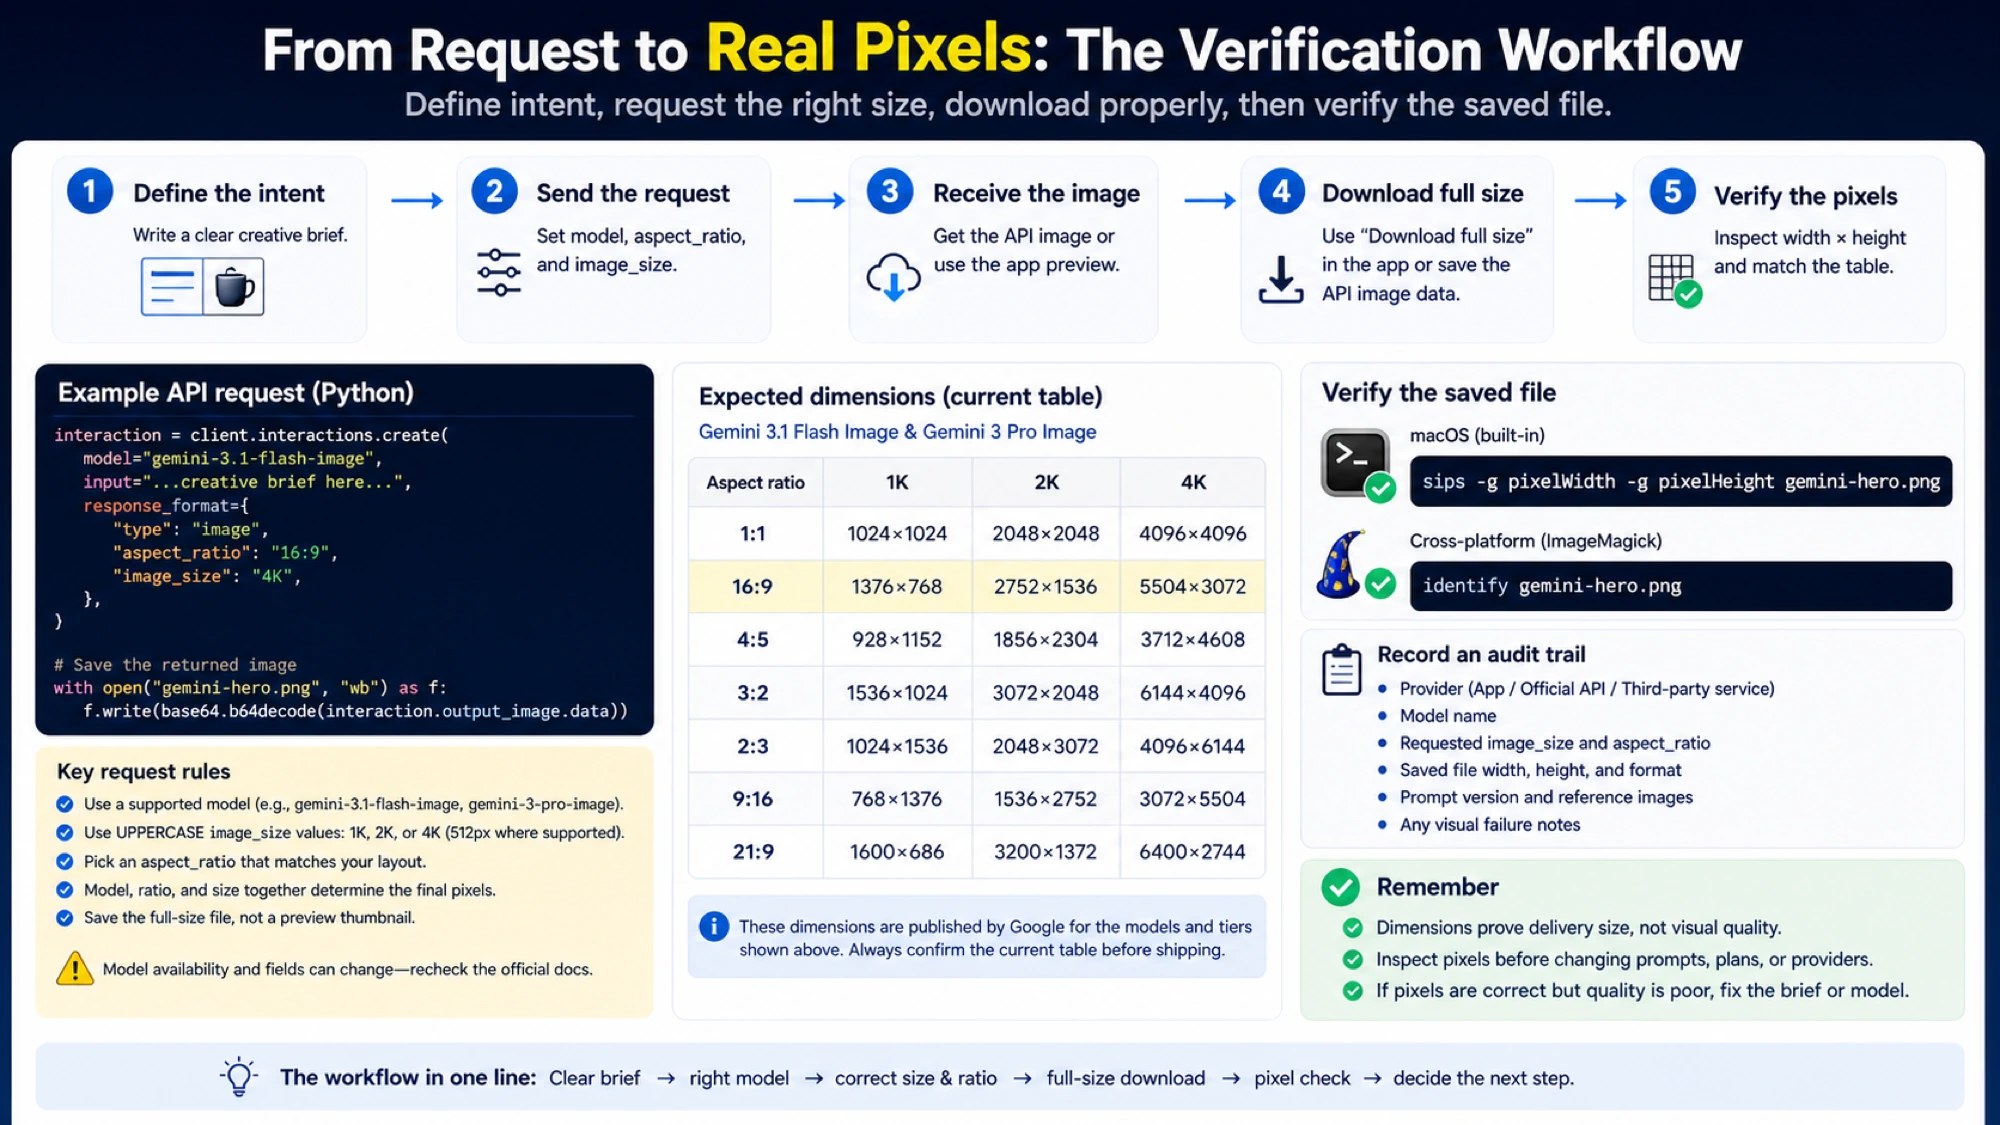
For developers using the Gemini API, resolution is controlled by the image response format. The current Google image-generation documentation uses the Interactions API as the default surface and places type: "image", image_size, and optional aspect_ratio inside response_format. Supported size strings include "512" for the 0.5K Gemini 3.1 Flash Image lane, plus "1K", "2K", and "4K". A critical detail that causes failed calls: the K must be uppercase. Sending "4k" is not the same value.
Here is the request shape to anchor your implementation:
json{ "model": "gemini-3.1-flash-image", "input": [ { "type": "text", "text": "A photorealistic mountain landscape at golden hour, shot with a 24mm wide-angle lens, dramatic clouds, warm sunlight casting long shadows across alpine meadows" } ], "response_format": { "type": "image", "mime_type": "image/png", "image_size": "4K", "aspect_ratio": "16:9" } }
In JavaScript with the current SDK, the same idea maps to interactions.create:
javascriptconst interaction = await ai.interactions.create({ model: "gemini-3.1-flash-image", input: "A photorealistic mountain landscape at golden hour...", response_format: { type: "image", mime_type: "image/png", image_size: "4K", // Use uppercase K aspect_ratio: "16:9" } });
The important nuance: API access is governed by the model route, pricing row, project quota, and billing state, not by the consumer subscription label shown in the Gemini app. If a developer needs 4K output for a product catalog or marketing workflow, the clean test is a small API request that saves the returned file and verifies dimensions. If the blocker is payment setup, regional billing, high concurrency, or gateway compatibility, evaluate a provider route after anchoring the official Google baseline.
Aspect Ratio Options
Current Gemini image routes document common production ratios such as 1:1, 16:9, 9:16, 4:3, 3:4, 3:2, 2:3, 5:4, 4:5, and 21:9. When combining aspect ratio with resolution, the specified size describes the target output tier rather than a magic prompt word. A 4K 16:9 image should be saved and inspected as a wide 4K-class file, while a 4K square image targets a much larger pixel area. If you do not specify an aspect ratio, expect square output unless the route or edit input preserves another ratio.
HD Prompt Templates You Can Copy Right Now
The following templates combine the prompt techniques discussed above into ready-to-use formats. Each template targets a specific use case and produces consistently high-quality results when paired with 2K or 4K resolution settings.
Professional Portrait Photography
This template produces LinkedIn-ready headshots and professional profile images with studio-quality lighting and natural skin rendering. The key elements are the lens specification (which controls depth of field), the lighting setup (which determines mood), and the background description (which provides context without distraction):
“A professional headshot portrait of a [man/woman] in their [30s/40s/50s], wearing a [dark navy suit/casual blazer], shot with an 85mm f/1.8 portrait lens. Soft Rembrandt lighting from the upper left with a subtle fill light. Clean, slightly blurred office background. Natural skin texture, confident expression, sharp focus on the eyes. Professional color grading with neutral tones.
Product Photography for Ecommerce
Product images require precise control over lighting, surface rendering, and background. This template works particularly well for small to medium products where surface texture and material quality are selling points. If you work extensively with product photography, our guide on Nano Banana Pro for ecommerce product photography covers advanced techniques in greater depth:
“A premium product photograph of a [product description] on a clean white surface with a pure white background. Studio three-point lighting setup: key light at 45 degrees from the upper right, fill light from the left, and a backlight creating a subtle rim highlight. Sharp focus throughout the product with visible material texture. Color-accurate rendering, no color cast. Shot with a 100mm macro lens for precise detail capture.
Cinematic Landscape Photography
Landscape prompts benefit from specific atmospheric and temporal descriptions. The time of day, weather conditions, and geographic details all contribute to the model generating a scene that feels authentic and visually striking rather than generic:
“A breathtaking cinematic landscape photograph of [location description] during golden hour. Wide-angle 16mm perspective capturing the vast scale of the scene. Dramatic cloud formations with warm orange and pink hues reflecting off [water/snow/terrain]. Rich foreground detail with [wildflowers/rocks/sand patterns] leading the eye toward the distant [mountains/ocean/forest]. Film-like color grading with slightly lifted shadows and rich midtones. Shot on medium format for maximum detail and dynamic range.
Text-Heavy Design and Infographics
When generating images that include readable text--menus, signs, infographics, or marketing materials--Gemini's advanced text rendering capabilities are best leveraged with explicit typography instructions. Use Nano Banana Pro when the text itself is the expensive failure point: menu prices, labels, UI mockups, diagram callouts, or client-facing social cards. The prompt should specify exact wording, typography hierarchy, background contrast, and where the text must appear:
“Create a modern minimalist restaurant menu design with the title "SEASONAL SPECIALS" in elegant serif font at the top. Background is deep navy blue (#1a1a2e). Three menu items listed vertically: "Truffle Risotto — $28", "Pan-Seared Salmon — $34", "Wagyu Steak — $52". Each item has a brief one-line description in a lighter weight font. Gold accent color for pricing. Clean typography with generous spacing. Restaurant logo placeholder at the bottom.
Resolution Pricing: How Much Does 4K Really Cost?

Understanding the cost structure of different resolutions is essential for making smart decisions about when to use each tier. As checked against Google's public Gemini API pricing page on June 30, 2026, the current Nano Banana image rows have no free tier and charge by model and output size. The official rows are the baseline; provider routes such as laozhang.ai can be cheaper, but they are separate contracts.
| Model route | Resolution | Google Standard price | Google Batch / Flex price | Free tier |
|---|---|---|---|---|
gemini-3.1-flash-image (Nano Banana 2) | 0.5K | $0.045 | $0.022 | Not available |
gemini-3.1-flash-image (Nano Banana 2) | 1K | $0.067 | $0.034 | Not available |
gemini-3.1-flash-image (Nano Banana 2) | 2K | $0.101 | $0.050 | Not available |
gemini-3.1-flash-image (Nano Banana 2) | 4K | $0.151 | $0.076 | Not available |
gemini-3-pro-image (Nano Banana Pro) | 1K / 2K | $0.134 | $0.067 | Not available |
gemini-3-pro-image (Nano Banana Pro) | 4K | $0.240 | $0.120 | Not available |
The first decision is whether the job actually needs 4K. Social images, thumbnails, and prompt exploration rarely do. Product catalog finals, dense technical diagrams, print assets, and hero images may. The second decision is whether the job can wait for Batch / Flex. If latency is flexible, the official Google route can cut the price roughly in half without changing provider ownership.
If the blocker is not only price but also payment setup, regional access, OpenAI-compatible integration, or high-concurrency image production, evaluate a gateway route after you understand the official baseline. laozhang.ai's public docs currently list Nano Banana2 at $0.055/image and Nano Banana Pro at $0.09/image. For a 4K Pro job, that provider price is about 37.5% of Google's $0.240 Standard row; for a 4K Nano Banana 2 job, $0.055 is about 36% of Google's $0.151 Standard row. That is the commercial reason to test laozhang.ai for Banana workloads: lower per-image cost, an API gateway route, and a simpler place to centralize image calls. Create a small test key, run 10 Banana2 and 10 Nano Banana Pro images, then compare saved dimensions, latency, retry behavior, and final usable-image rate before moving production traffic.
The smart decision framework for resolution selection depends on your output medium. Social media posts and web thumbnails are typically displayed at under 1000 pixels wide, making 1K resolution adequate. Blog headers and presentation slides often benefit from 2K. Print materials, large-format displays, and polished product imagery justify 4K. During prototyping and iterative prompt refinement, the 0.5K Nano Banana 2 lane is a useful way to evaluate composition and style before committing to a final high-resolution generation.
Which Gemini Model Produces the Best HD Images?
Google currently offers multiple image routes, each with different strengths in resolution support, quality characteristics, and pricing. Understanding the differences helps you choose the right model for your specific high-resolution needs.
Gemini 3.1 Flash Image (Nano Banana 2) is the default cost-conscious route for most API image work. Google's documentation positions it as the best balance of intelligence, cost, and latency. It supports the 0.5K prototyping lane plus 1K, 2K, and 4K output, so it is the right starting point for drafts, variants, ecommerce image batches, blog visuals, and jobs where another iteration is cheaper than starting on Pro.
Gemini 3 Pro Image (Nano Banana Pro) is the premium override for professional production work. Use it when text, diagrams, layout control, dense visual instructions, or final-client assets make failed generations expensive. The official Standard price is higher--$0.134 at 1K/2K and $0.240 at 4K--which is exactly why a gateway price such as laozhang.ai's $0.09/image Nano Banana Pro route is worth testing for teams that need Pro quality at volume. For a detailed comparison of these models against competitors like GPT Image and Flux, see our Gemini Flash Image vs GPT Image vs Flux comparison.
Imagen remains a separate Google image-model family. Treat it as a different route rather than a drop-in Nano Banana pricing row. If your real job is a Gemini / Nano Banana API integration, start with Nano Banana 2, escalate to Nano Banana Pro for the failure modes above, and compare Imagen only when its specific quality profile or Google Cloud route is part of the project requirement.
Here is a direct comparison to help with the decision:
| Feature | Nano Banana 2 | Nano Banana Pro | Imagen route |
|---|---|---|---|
| Resolutions | 0.5K, 1K, 2K, 4K | 1K, 2K, 4K | Varies by variant |
| Primary role | Default API image route | Premium override | Separate image-model family |
| Text/layout work | Good for many drafts | Better for text-heavy finals | Evaluate separately |
| Cost (1K) | $0.067 | $0.134 | Enterprise pricing |
| Cost (4K) | $0.151 | $0.240 | Enterprise pricing |
| laozhang.ai route checked June 30, 2026 | $0.055/image Banana2 | $0.09/image Banana Pro | Check route availability |
| Best for | General use, volume | Text-heavy, professional | Specialized Google image workflows |
| API access | Gemini API / gateway | Gemini API / gateway | Google image route |
The practical recommendation for most high-resolution work is to use Nano Banana 2 as your default, switching to Nano Banana Pro only when text, diagrams, or final-asset quality justify the premium. If your team needs that Pro lane often, a laozhang.ai test is not just a coupon hunt: it can reduce the per-image price while keeping one gateway route for Banana-family calls. Keep a small Google-direct fallback or verification lane if first-party ownership matters.
One strategy that experienced users employ is a two-stage workflow: generate initial concepts at 0.5K or 1K resolution to iterate quickly on prompt wording and composition, then produce the final version at 2K or 4K once the prompt is stable. For high-volume teams, run the same workflow through the cheapest route that still owns your requirements: Google Batch/Flex if official ownership matters, or a verified laozhang.ai Banana route if low price, compatibility, and throughput are the stronger constraints.
Fix Blurry Gemini Images: Common Problems and Solutions
Blurry or low-quality Gemini images are a frequent source of frustration because the same word--quality--gets used for prompt detail, output size, export compression, and model choice. The good news is that most quality issues have identifiable causes and straightforward fixes.
Problem: Images look soft or blurry despite using a paid subscription. The most common cause is that the user is generating or downloading at 1K and expecting 4K sharpness. Consumer products and API routes do not share one universal subscription table, so inspect the saved file dimensions instead of assuming the plan label solved the issue. In the API, verify that response_format.image_size is set to your desired resolution rather than relying on the default.
Problem: Downloaded images appear lower quality than the preview. A preview can look sharp while the exported file is smaller than expected. Save the file and check its width and height. If the app surface does not expose the download size your workflow needs, move that job to an API route where the requested image_size, billing state, and returned file dimensions can be logged.
Problem: The model seems to ignore quality-related prompt keywords. As explained in the resolution section above, keywords like "4K," "ultra-HD," "high resolution," or "8K" in your prompt influence the visual style of the image (encouraging sharper-looking details) but do not change the actual pixel dimensions. If you need more pixels, you must change the resolution setting separately. That said, including descriptive quality language in your prompt is still valuable for improving visual detail—just do not expect it to change the image dimensions.
Problem: Inconsistent quality across multiple generations. AI image generation involves randomness, and identical prompts can produce images of varying quality. The most effective mitigation strategy is to generate multiple candidates from the same prompt and select the best result. For expensive Pro or 4K work, iterate first at a lower size, freeze the winning prompt, then rerun at the final size. This is where a cheaper Banana route can materially change the workflow: lower iteration cost means you can test more prompt variants before committing to final assets.
Problem: Images have visible artifacts or unnatural elements at 4K. At 4K resolution, certain types of scenes can show artifacts that are not visible at lower resolutions—particularly in areas with repetitive patterns (brick walls, fabric weaves, foliage) or in fine text rendering. This happens because the model is generating more detail at higher resolution, which can occasionally produce patterns that were not present in the training data. The most effective fix is to add specific texture descriptions to your prompt for the areas where artifacts appear. For example, instead of "a brick wall," write "a weathered brick wall with irregular mortar joints and slightly varying brick tones" to guide the model toward realistic variation rather than repetitive patterns. If the issue persists, generating at 2K and using a dedicated upscaling tool for the final output can sometimes produce cleaner results than native 4K generation for artifact-prone scenes.
Problem: Color accuracy seems off at higher resolutions. Some users report that 4K images have slightly different color characteristics compared to the same prompt at 1K. Treat that as a workflow issue to test, not as proof that the resolution setting failed. The most reliable fix is to include explicit color guidance in your prompt: "accurate neutral white balance," "true-to-life colors without oversaturation," or "color-accurate product rendering for ecommerce" all help constrain the model's color decisions. For product photography where color accuracy is critical, generate a small comparison set at 2K and 4K before choosing the final route.
Problem: Getting 429 rate limit errors when trying to generate many images. If you are generating images at volume and hitting rate limits, first identify the surface: Google direct API, AI Studio UI, or a gateway provider. The owner changes by route. Google direct work should check project quota, billing state, Standard versus Batch/Flex, and request shape. Gateway work should check the provider's model route, account balance, concurrency policy, retry behavior, and dashboard logs. Our guide on fixing Gemini 429 rate limit errors covers the full range of rate-limit configurations and how to work around them. For information about free-tier limitations, see our Gemini image generation free limits guide.
Frequently Asked Questions
How do I make Gemini generate high-quality images? The key is combining two approaches: write detailed prompts with camera specifications, lighting descriptions, and material textures, then set the requested output size through response_format.image_size or the product surface's download controls. Simply adding words like "HD" or "4K" to your prompt will not change the output resolution; it only hints at visual style. Save the file and inspect its dimensions.
What is the maximum resolution Gemini can generate? Gemini 3 Pro Image and Gemini 3.1 Flash Image both support up to 4K-class output through the API. Gemini 3.1 Flash Image also supports a 0.5K option for fast prototyping. Through consumer products, your maximum download size depends on the product surface and account state, so verify the saved file dimensions before promising a client or production system true 4K assets.
Does writing "4K" or "HD" in my prompt actually increase the resolution? No. Including resolution-related keywords like "4K," "HD," "ultra-high resolution," or "8K" in your prompt may influence the visual style of the image, but it does not change the actual pixel dimensions of the output. The output remains at the route default unless you explicitly set response_format.image_size or use a product export control that actually changes the saved file size.
How much does 4K image generation cost? On Google's official Gemini API pricing page checked June 30, 2026, Nano Banana 2 4K Standard output is $0.151/image and Nano Banana Pro 4K Standard output is $0.240/image; Batch/Flex rows are lower for non-real-time jobs. laozhang.ai's public docs currently list Banana2 at $0.055/image and Nano Banana Pro at $0.09/image. That provider route is attractive for price-sensitive or high-volume Banana workloads, but it should be verified in the console before production use.
Which model should I use for high-resolution images? For most use cases, Gemini 3.1 Flash Image (Nano Banana 2) is the default because it balances quality, cost, and iteration speed. Switch to Gemini 3 Pro Image (Nano Banana Pro) when your images include readable text, diagrams, dense layout instructions, or final assets where failed generations are expensive. If you need Pro often, compare Google direct pricing with laozhang.ai's Nano Banana Pro route instead of paying the official Standard row by habit.
Start Creating Professional HD Images Today
Generating truly high-resolution, high-quality images with Gemini comes down to mastering two independent controls. First, craft detailed prompts that specify camera settings, lighting conditions, material textures, and composition--this determines how your image looks. Second, set the appropriate resolution through the API's response_format.image_size control or the product surface's download controls--this determines how large your image is in actual pixels.
For immediate next steps, start with these actions based on your situation. If you are using the Gemini App, save a file and inspect its dimensions instead of trusting prompt words. If you are working through the API, add image_size: "2K" or "4K" to the image response format and verify that the K is uppercase. If cost is the blocker, use 0.5K or 1K for prompt iteration, Batch/Flex for patient official workloads, and a verified laozhang.ai Banana route when you want lower per-image pricing plus gateway compatibility.
The combination of Gemini's high-resolution output, strong prompt understanding, and flexible routing makes it one of the most capable image generation stacks available in 2026. Whether you are creating content for social media, building product catalogs, or producing marketing assets, the best workflow is simple: prompt carefully, verify pixels, choose Nano Banana 2 by default, escalate to Nano Banana Pro when the asset deserves it, and route through laozhang.ai when lower Banana pricing and higher-throughput API operations matter more than first-party Google billing.