TL;DR
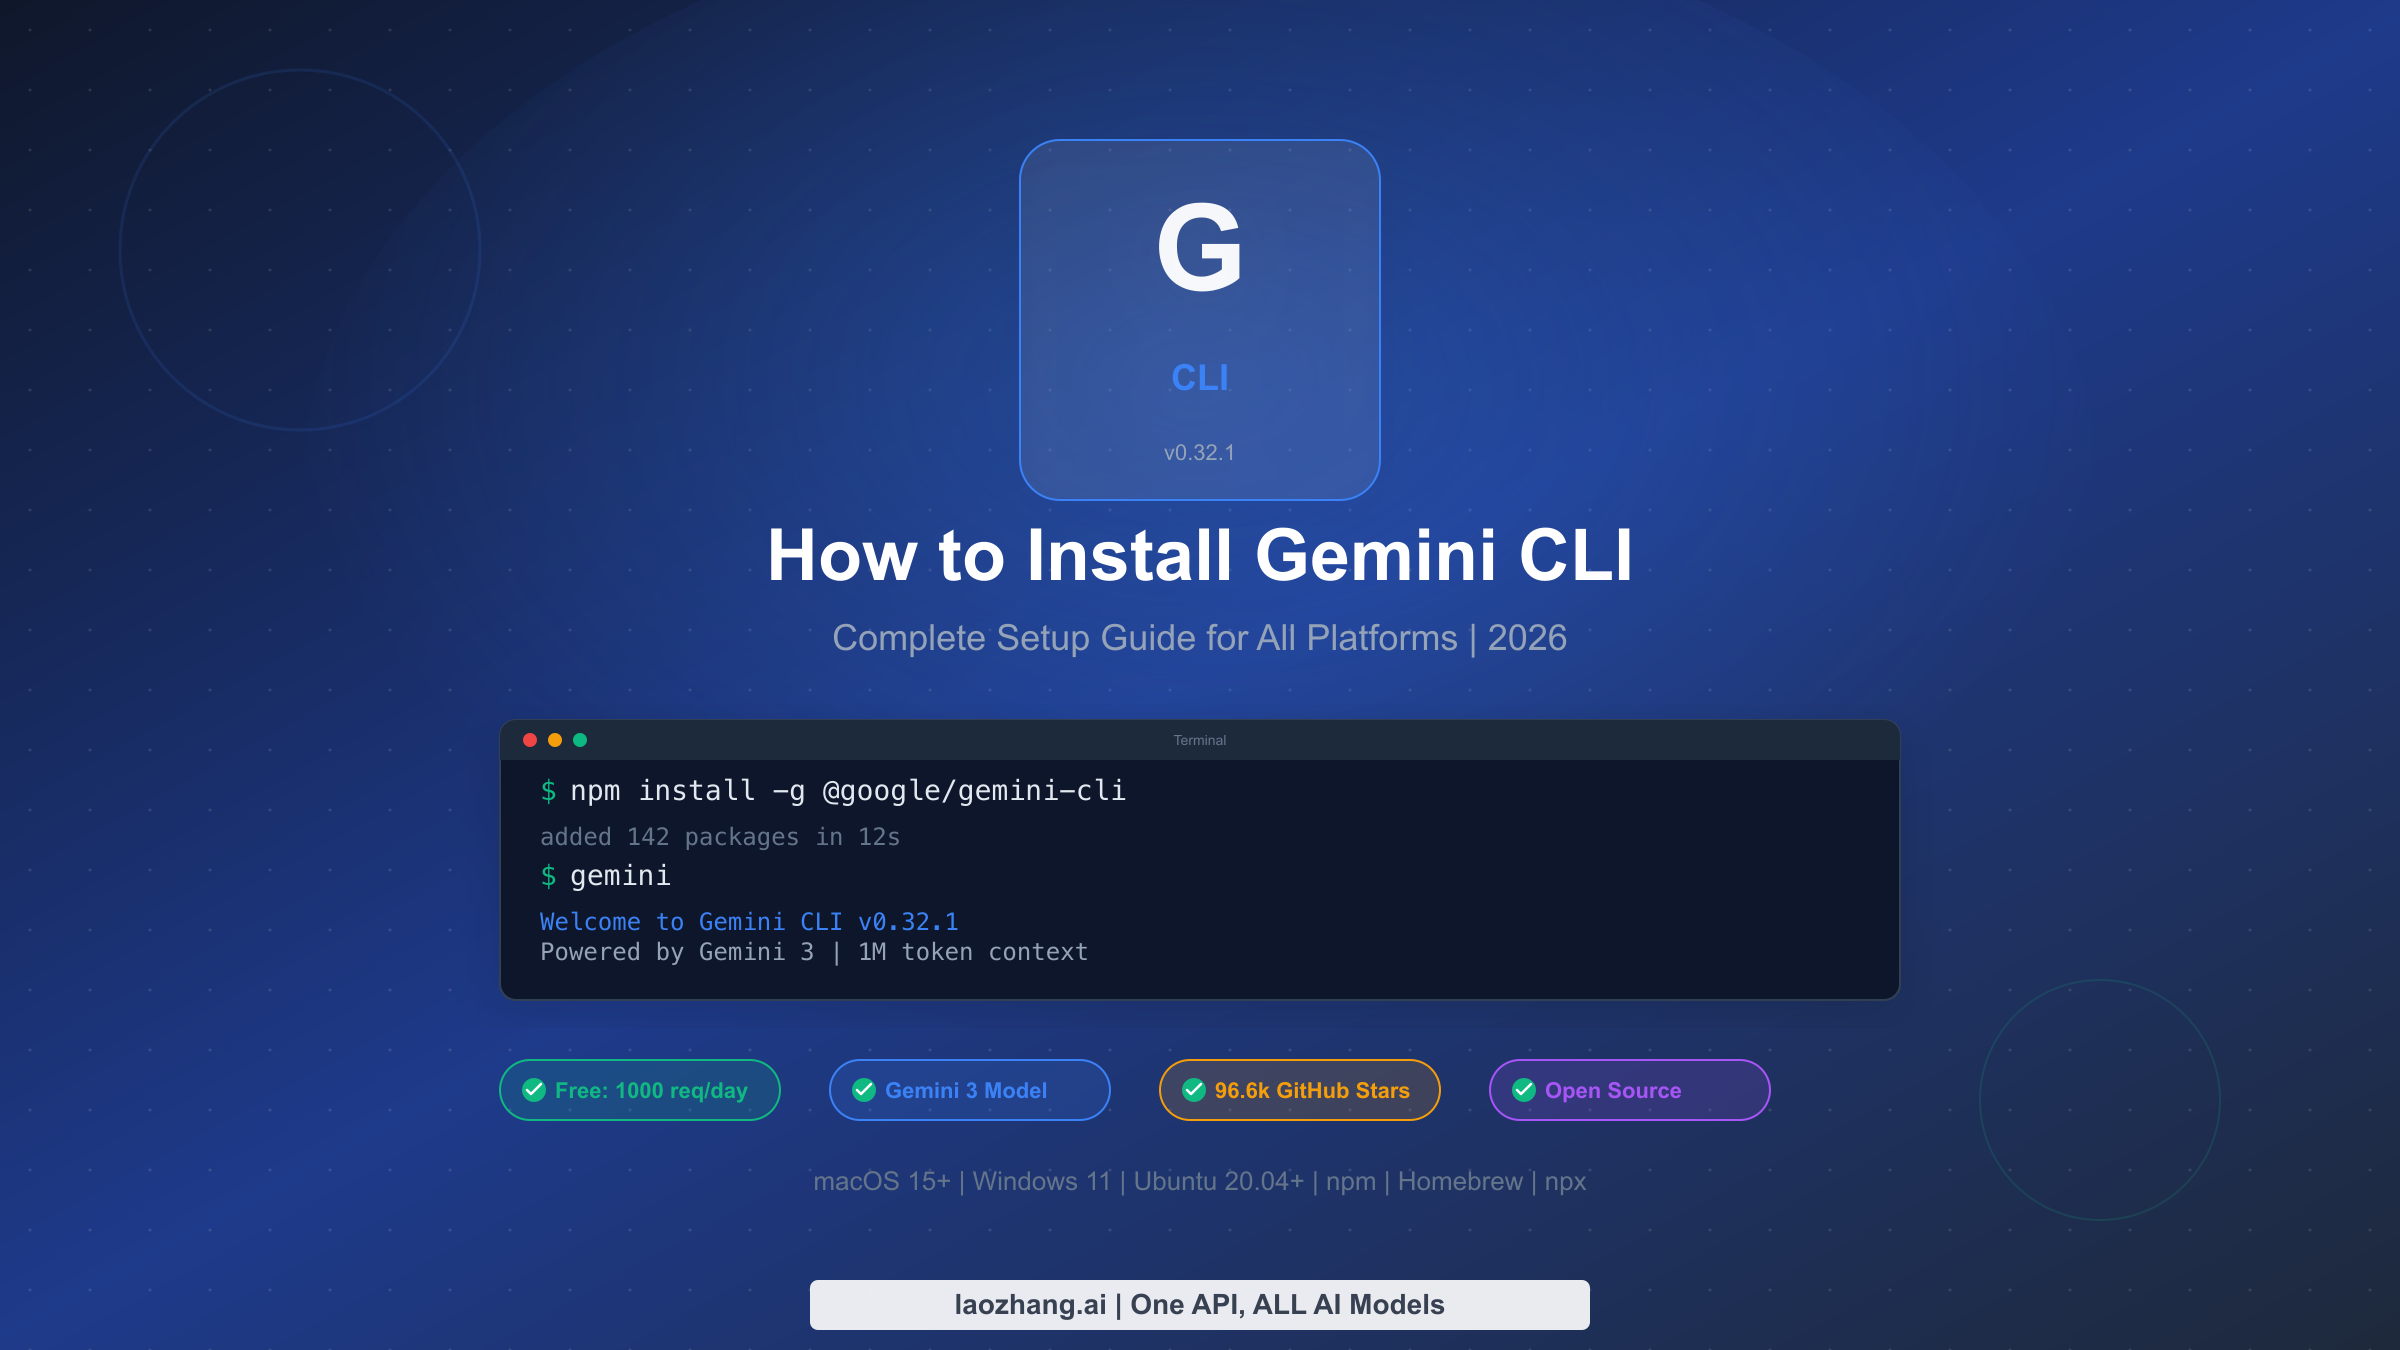
Install Gemini CLI with one command: npm install -g @google/gemini-cli. You need Node.js 20+ installed first. The latest stable version is v0.32.1 (March 2026), powered by Gemini 3 with a 1M token context window. The free tier via Google OAuth gives you 60 requests per minute and 1,000 requests per day with zero configuration beyond signing into your Google account. Gemini CLI is fully open-source (Apache 2.0, 96.6k GitHub stars) and works on macOS 15+, Windows 11, and Ubuntu 20.04+.
What Is Gemini CLI and Why Should You Use It?
Gemini CLI is Google's open-source AI coding agent that runs directly in your terminal. Released on GitHub under the Apache 2.0 license, it has quickly become one of the most popular developer tools in the AI ecosystem, accumulating over 96,600 stars as of March 2026. Unlike browser-based AI assistants that require you to copy and paste code back and forth, Gemini CLI operates natively in your development environment, reading your files, understanding your project structure, and executing commands with your explicit permission.
The tool is powered by Google's Gemini 3 model by default (with Gemini 3.1 Pro Preview available since v0.31.0), offering a massive 1 million token context window. This means Gemini CLI can analyze entire codebases, not just individual files, making it particularly effective for large-scale refactoring, debugging complex issues across multiple files, and understanding unfamiliar projects. When you run gemini in a project directory, it automatically scans your repository structure and uses that context to provide relevant, project-aware assistance.
What makes Gemini CLI stand out from alternatives like GitHub Copilot CLI is its generous free tier. With Google OAuth authentication, you get 60 requests per minute and 1,000 requests per day at no cost. There is no credit card required, no trial period, and no feature limitations on the free tier. The same Gemini 3 model that powers the paid API is available to every user who signs in with their Google account. For developers who want to explore AI-assisted coding without financial commitment, this represents one of the most accessible entry points available today.
Beyond basic code completion, Gemini CLI functions as a full coding agent capable of multi-step task execution. It can create files, run shell commands, manage git operations, and iterate on solutions based on test results. The tool supports customization through GEMINI.md project files (similar to a README but specifically for the AI agent), MCP (Model Context Protocol) server integration for extending its capabilities, and configurable safety settings through settings.json. Whether you are a solo developer working on personal projects or part of a team managing production infrastructure, Gemini CLI adapts to your workflow rather than forcing you into a specific paradigm.
One feature that distinguishes Gemini CLI from other AI coding tools is its built-in safety model. Every file modification and shell command requires explicit user approval before execution, and the tool provides a sandbox mode via Docker or Podman that isolates the AI agent in a container. This means you can confidently use Gemini CLI on production codebases without worrying about accidental modifications. The checkpointing system automatically creates restore points before multi-file operations, allowing you to roll back changes if the results are not what you expected. These safety features make it practical for everyday development use rather than just experimentation.
System Requirements and Prerequisites
Before installing Gemini CLI, verifying that your system meets the minimum requirements will save you from the most common installation errors. The single most important prerequisite is Node.js version 20.0.0 or higher, as Gemini CLI relies on modern JavaScript features and APIs that are not available in earlier Node.js releases. Running node -v in your terminal will show your current version. If you see anything below v20, you will need to upgrade before proceeding.
The operating system requirements are straightforward but worth confirming. On macOS, you need version 15 (Sequoia) or later. Windows users need Windows 11 with the 24H2 update or newer. Linux support covers Ubuntu 20.04 and later, along with most modern distributions that can run Node.js 20+. For memory, Google recommends at least 4GB of RAM for casual use, though 16GB or more is recommended for power users who plan to work with large codebases or run Gemini CLI alongside resource-intensive development tools.
Shell compatibility is another factor worth checking. Gemini CLI works with Bash, Zsh, and PowerShell out of the box. If you are using Fish or another alternative shell, you may encounter minor issues with command completion or environment variable handling, though the core functionality will still work. On Windows, running Gemini CLI through Windows Terminal with PowerShell provides the best experience, while WSL2 (Windows Subsystem for Linux) is a fully supported alternative that many developers prefer for its Unix-like environment.
The following table summarizes all system requirements verified from the official documentation (geminicli.com, March 2026):
| Requirement | Minimum | Recommended | Notes |
|---|---|---|---|
| Node.js | 20.0.0+ | 22 LTS | Check with node -v |
| macOS | 15 (Sequoia) | Latest | Apple Silicon and Intel supported |
| Windows | 11 24H2+ | Latest | PowerShell or WSL2 recommended |
| Linux | Ubuntu 20.04+ | Latest LTS | Most modern distros supported |
| RAM | 4GB | 16GB+ | For large codebases |
| Shell | Bash, Zsh, PowerShell | Zsh or PowerShell | Fish has limited support |
| Disk Space | ~200MB | ~500MB | Includes Node.js modules |
If Node.js is not installed or your version is outdated, the fastest way to get a current version is through Node Version Manager (nvm). On macOS and Linux, run curl -o- https://raw.githubusercontent.com/nvm-sh/nvm/v0.40.1/install.sh | bash followed by nvm install 22. On Windows, download the installer from nodejs.org or use winget install OpenJS.NodeJS.LTS through Windows Package Manager. Once Node.js 20+ is confirmed, you are ready to install Gemini CLI.
A common source of confusion for developers who have multiple versions of Node.js installed through different tools (Homebrew, nvm, system package manager) is that the node command might point to an older version even after installing a newer one. Running which node reveals which binary your shell is using, and if it is not the version you expect, check your PATH order. With nvm, running nvm alias default 22 ensures that version 22 is used by default in new terminal sessions, preventing version mismatch issues when you install Gemini CLI or update it later.
Installing Gemini CLI Step by Step
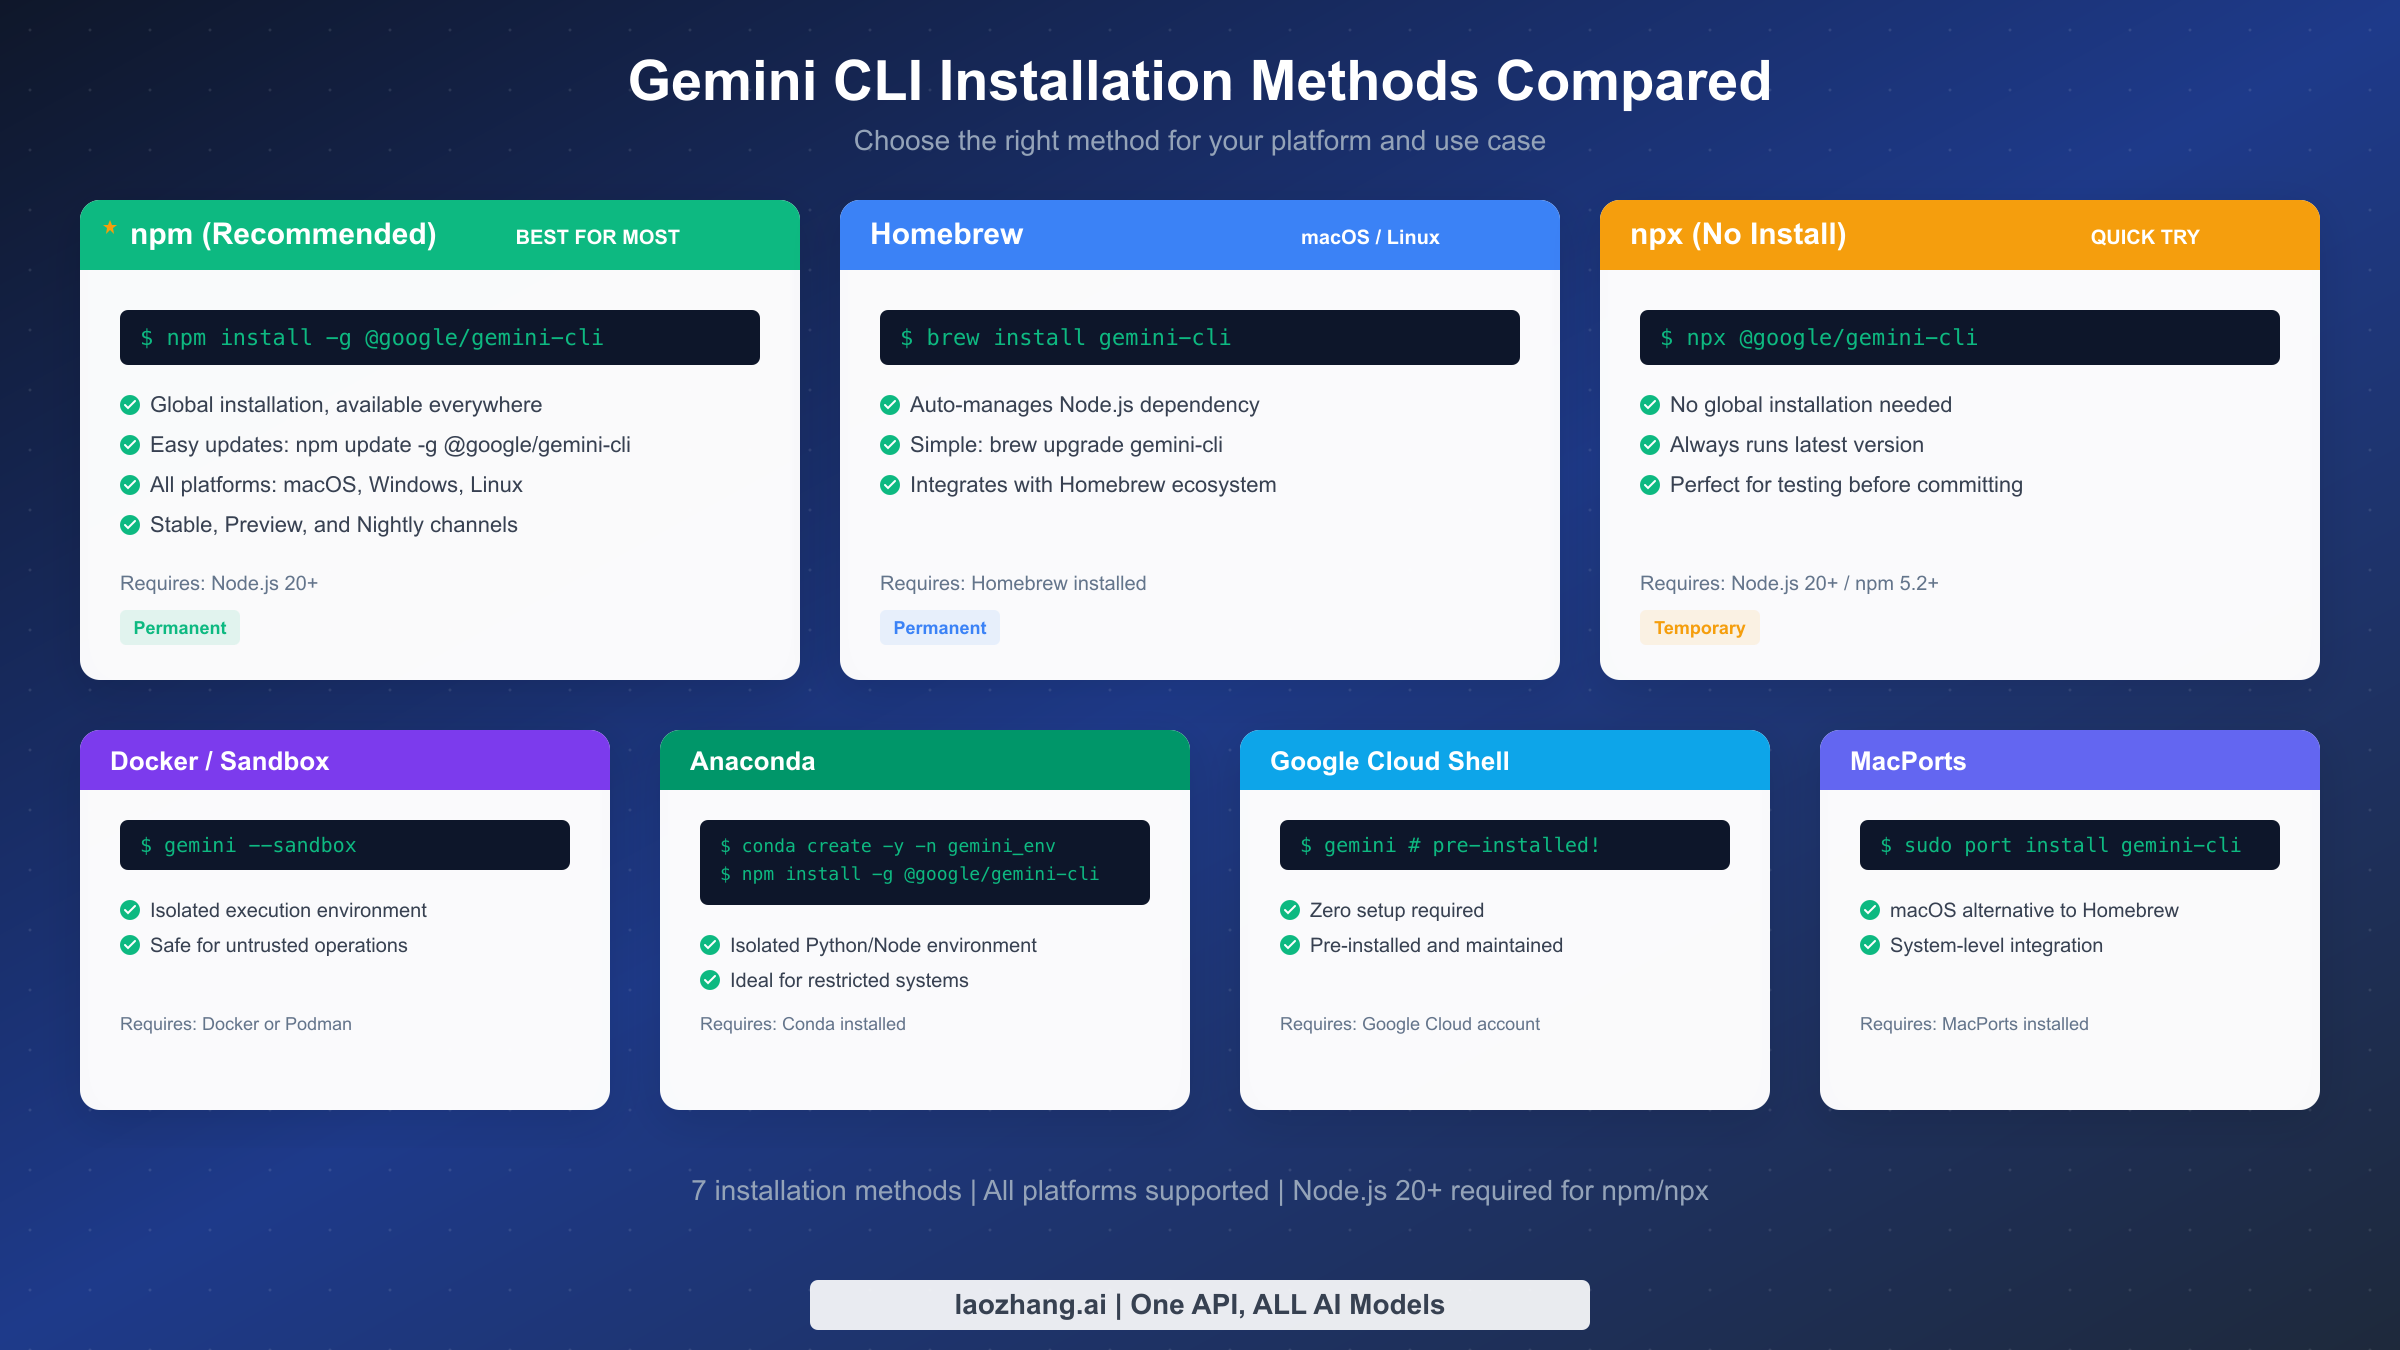
There are seven different ways to install Gemini CLI, each suited to different use cases and platforms. The recommended method for most developers is a global npm installation, which makes the gemini command available system-wide and enables easy updates. However, if you prefer not to install Node.js manually, Homebrew on macOS handles the dependency automatically, and if you just want to try the tool without committing to a full installation, npx lets you run it directly.
npm Global Install (Recommended for Most Users)
The npm global install is the method Google recommends and the one that gives you the most control over your installation. Run the following command in your terminal:
bashnpm install -g @google/gemini-cli
This downloads the latest stable version (v0.32.1 as of March 2026) and installs the gemini binary in your global npm directory. The installation typically takes 10-15 seconds on a broadband connection and adds approximately 150MB to your system. Once complete, verify the installation by running gemini --version, which should output the version number. To update later, simply run npm update -g @google/gemini-cli. If you want to try preview features before they reach stable, you can install from the preview channel with npm install -g @google/gemini-cli@preview, or the nightly channel with npm install -g @google/gemini-cli@nightly for the absolute latest builds.
Homebrew (macOS and Linux)
For macOS and Linux users who already have Homebrew installed, this method is particularly convenient because it automatically manages the Node.js dependency. You do not need to install Node.js separately:
bashbrew install gemini-cli
Homebrew will pull in the required Node.js version as a dependency and configure everything for you. Updates are handled through the standard Homebrew workflow with brew upgrade gemini-cli. This method integrates cleanly with your existing Homebrew ecosystem and makes uninstallation straightforward with brew uninstall gemini-cli. One advantage of Homebrew over npm is that it handles Node.js version management automatically, so you do not need to worry about having the right Node.js version installed or dealing with nvm configurations.
npx (No Installation Required)
If you want to test Gemini CLI without installing anything globally, npx runs the latest version directly from the npm registry:
bashnpx @google/gemini-cli
This approach downloads and executes Gemini CLI in a temporary location, always using the latest version. It is perfect for trying the tool before committing to a full installation, or for running it in one-off scenarios. The downside is a slight startup delay each time as npx fetches the package, and you cannot customize the installation with persistent configuration files.
Other installation methods include MacPorts (sudo port install gemini-cli) for macOS users who prefer it over Homebrew, Anaconda environments for users working in isolated Python/Node setups, Docker/Podman for sandboxed execution with the gemini --sandbox flag, and Google Cloud Shell where Gemini CLI comes pre-installed. Each method has its niche, but for the vast majority of developers, the npm global install or Homebrew approach provides the best balance of simplicity, control, and update convenience.
After installation through any method, run gemini --version to confirm success. The output should show the version number (v0.32.1 for the current stable release). If you want to verify that all dependencies are properly configured, gemini --help displays the full command reference including available flags, subcommands, and configuration options. At this point, the gemini binary is installed and ready to use, but you will need to complete the authentication step before you can start asking questions or running tasks.
Setting Up Authentication
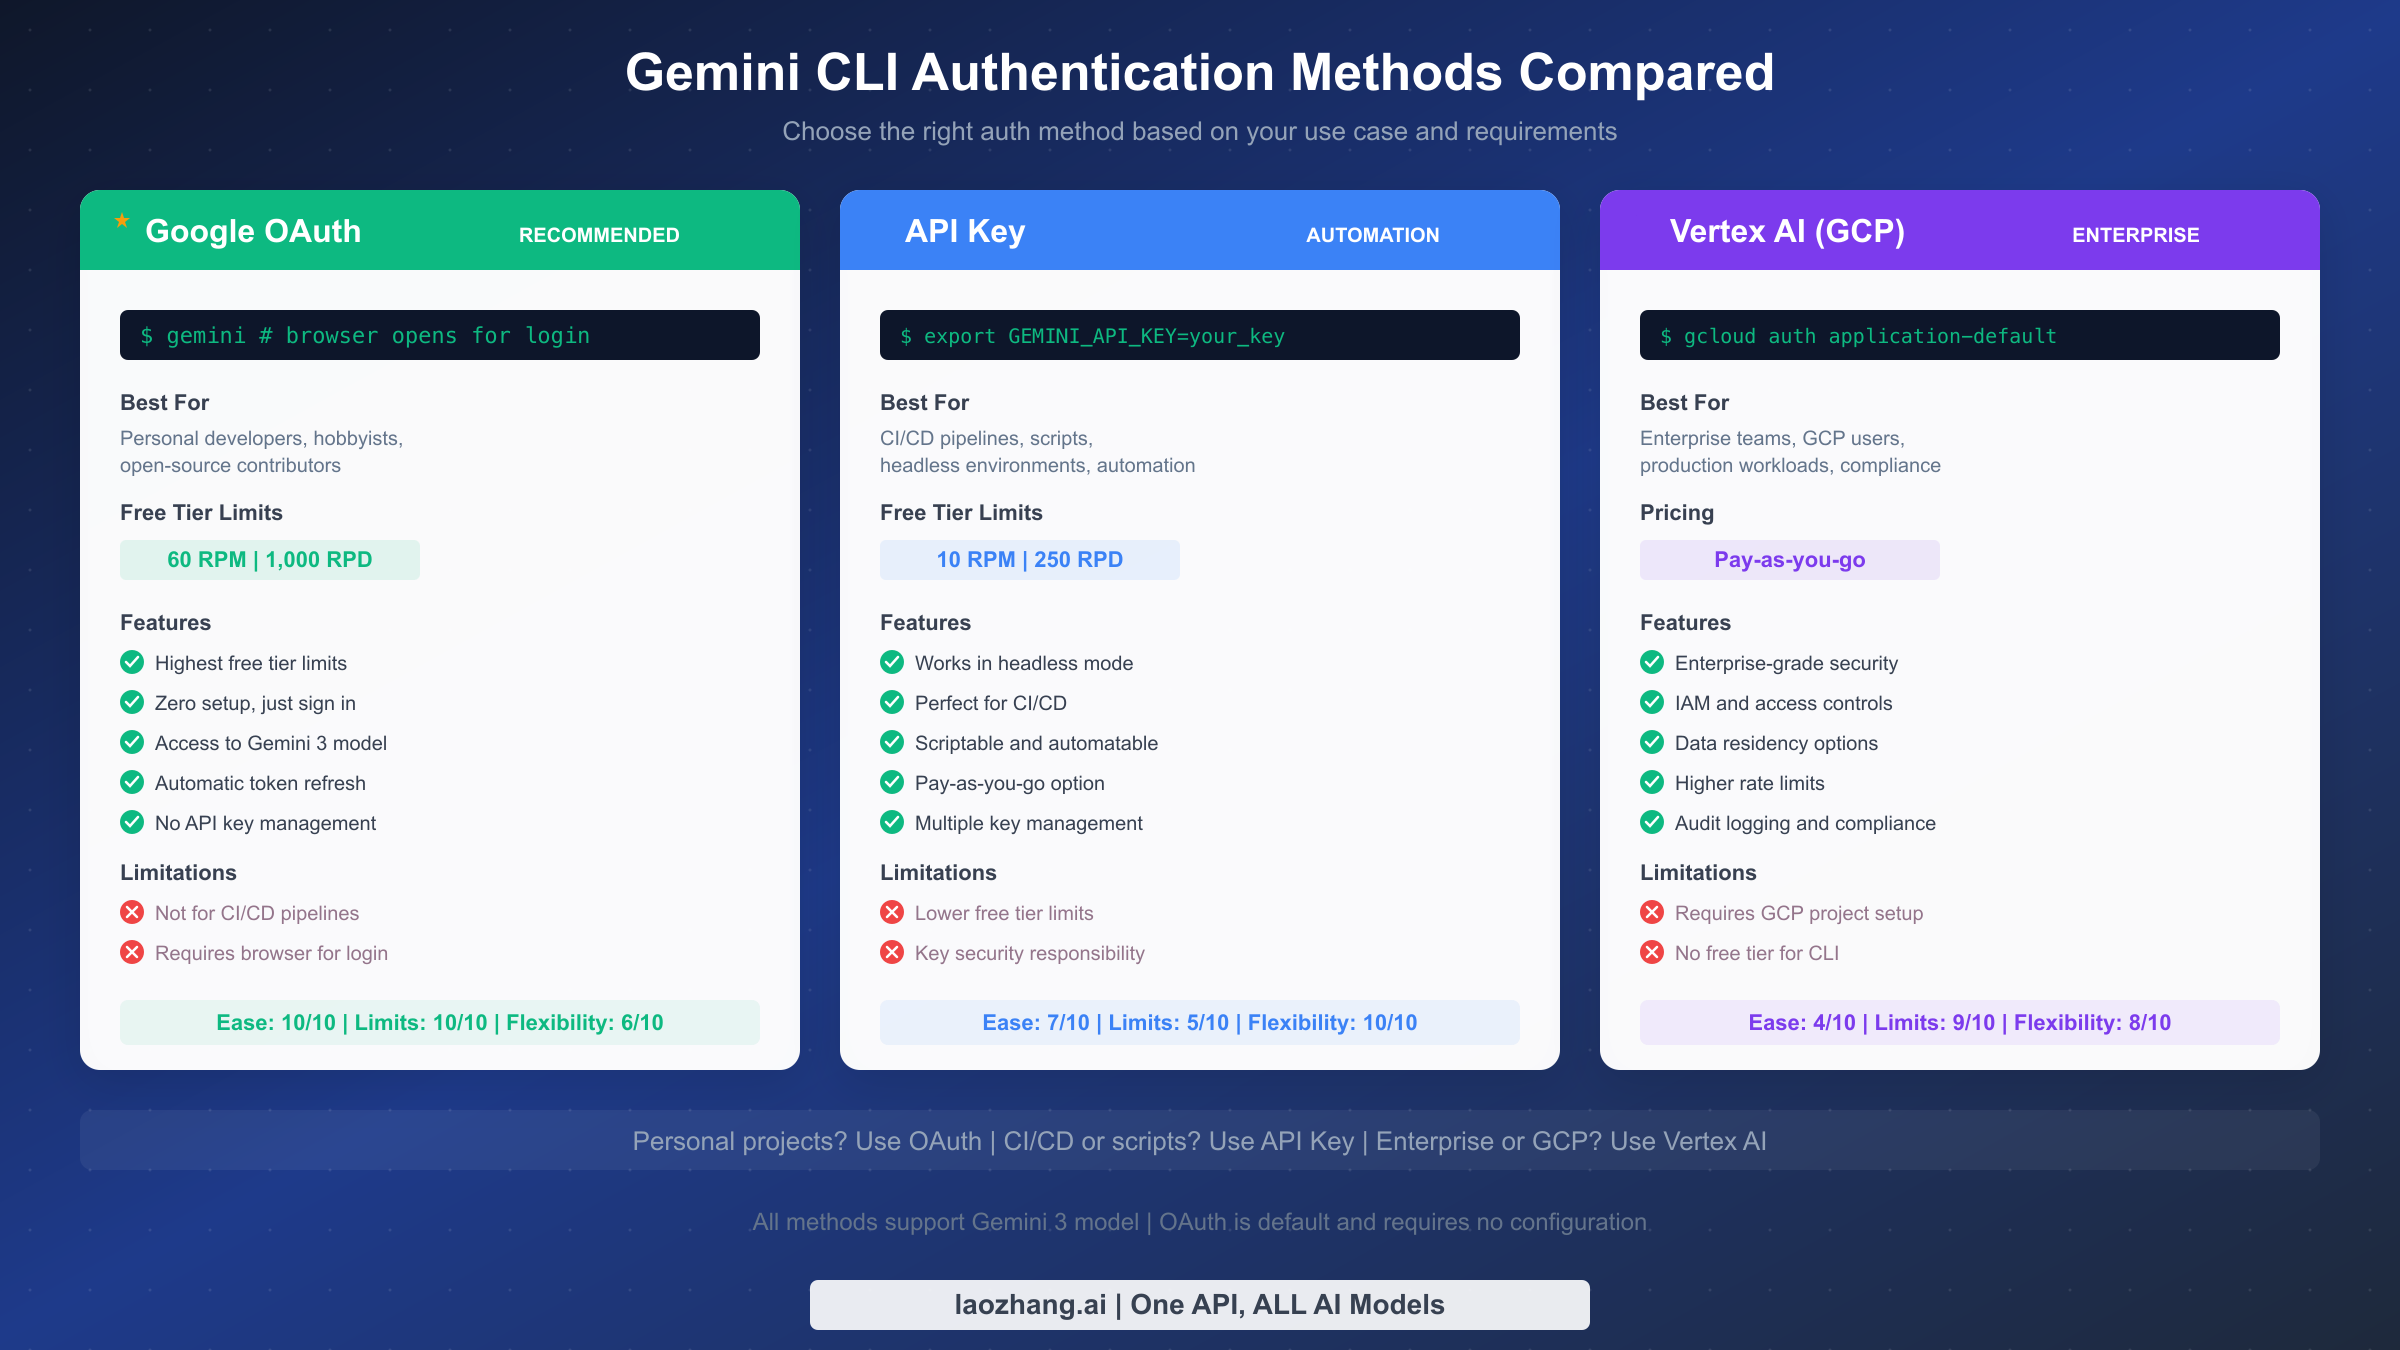
Authentication is the step that trips up the most users after installation, primarily because there are three distinct methods with different trade-offs, and most guides do not clearly explain when to use each one. The method you choose directly affects your rate limits, available features, and how you interact with the tool on a daily basis. Here is a clear breakdown to help you make the right choice based on your specific situation.
Google OAuth (Recommended for Personal Use)
Google OAuth is the default and easiest authentication method. When you run gemini for the first time, it automatically opens your browser and prompts you to sign in with your Google account. After granting permission, the CLI stores an OAuth token locally and refreshes it automatically. You never need to manage API keys, set environment variables, or configure project files. This method provides the highest free tier limits at 60 requests per minute (RPM) and 1,000 requests per day (RPD), as verified from the official Gemini CLI GitHub documentation (March 2026).
The OAuth flow works seamlessly on any system with a browser. On headless servers or containers where no browser is available, OAuth will not work, and you should use an API key instead. If your token expires or you encounter authentication issues, running gemini --reauth forces a fresh login and resolves most problems. OAuth is ideal for personal development, open-source contributions, and any scenario where you are working interactively at your terminal.
Gemini API Key (Best for Automation)
For CI/CD pipelines, scripts, and headless environments where browser-based OAuth is not possible, the API key method is the right choice. First, generate a key from Google AI Studio, then set it as an environment variable:
bashexport GEMINI_API_KEY=your_api_key_here
With the API key set, Gemini CLI will use it automatically instead of OAuth. The trade-off is a lower free tier: 10 RPM and 250 RPD compared to OAuth's 60 RPM and 1,000 RPD. However, you can increase these limits by enabling billing on your Google AI Studio account for pay-as-you-go pricing. API keys are essential for automation scenarios, GitHub Actions workflows, and any non-interactive usage. Store your API key securely using environment variables or a secrets manager rather than hardcoding it in scripts.
Vertex AI (Enterprise and GCP Users)
For enterprise teams already using Google Cloud Platform, Vertex AI authentication integrates with your existing GCP project and IAM permissions. This method requires a GCP project with the Vertex AI API enabled and Application Default Credentials configured:
bashgcloud auth application-default login
Vertex AI provides enterprise-grade features including IAM access controls, data residency options, audit logging, and higher rate limits based on your GCP quota. There is no free tier for CLI usage through Vertex AI; it operates on pay-as-you-go pricing. This method is best suited for organizations that need compliance controls, centralized billing, and integration with their broader GCP infrastructure. If you are unsure whether you need Vertex AI, you almost certainly do not and should start with OAuth instead. The additional complexity of setting up a GCP project, enabling APIs, and configuring service accounts is only justified when your organization requires the enterprise features that Vertex AI provides, such as VPC Service Controls or Customer-Managed Encryption Keys (CMEK).
For a deeper understanding of how rate limits work across these methods, check out our comprehensive guide to Gemini API rate limits which covers quota management strategies in detail.
Understanding Free Tier Limits and Pricing
One of the most common questions about Gemini CLI is whether it is truly free, and the answer depends on which authentication method you use. The confusion arises because different sources report different numbers, but the reality is straightforward once you understand that OAuth and API key have separate quotas with distinct limits.
With Google OAuth authentication (the default method), you receive 60 requests per minute and 1,000 requests per day at absolutely zero cost. These limits apply to each individual Google account, meaning each team member gets their own allocation. There is no credit card required to use the free tier, no trial period that expires, and no feature limitations. You get full access to the Gemini 3 model with its 1 million token context window, the same model available through the paid API. For most individual developers, 1,000 requests per day is more than enough for a full day of productive coding, especially since each request can process substantial amounts of code thanks to the large context window.
The API key method offers a smaller but still useful free tier of 10 requests per minute and 250 requests per day. These lower limits reflect the fact that API keys are designed for automated and programmatic access rather than interactive use. If you need higher limits with an API key, you can enable billing in Google AI Studio and pay per request. For detailed pricing on the paid API tier, our Gemini API pricing breakdown covers all current rates and cost optimization strategies.
The following table summarizes the free tier comparison verified from official sources (Google AI Studio and geminicli.com, March 2026):
| Feature | Google OAuth (Free) | API Key (Free) | Vertex AI |
|---|---|---|---|
| Rate Limit | 60 RPM | 10 RPM | Quota-based |
| Daily Limit | 1,000 RPD | 250 RPD | Quota-based |
| Model Access | Gemini 3 | Gemini 3 | Gemini 3 + more |
| Context Window | 1M tokens | 1M tokens | 1M tokens |
| Cost | Free | Free | Pay-as-you-go |
| Credit Card | Not required | Not required | Required |
| Best For | Interactive use | CI/CD, scripts | Enterprise |
It is worth understanding what counts as a "request" in Gemini CLI's context. Each message you send to the AI constitutes one request, regardless of how much code or text it processes. Long, detailed prompts that include entire files do not count as multiple requests. This means you can optimize your usage by writing comprehensive prompts that include all necessary context upfront rather than splitting your work across many small exchanges. A single well-crafted prompt that says "refactor this file, add tests, and update the documentation" uses one request instead of three separate ones.
If you find yourself consistently hitting the free tier limits, you have several options beyond upgrading to a paid plan. First, check whether you are making redundant requests by reviewing your conversation history. Second, consider using the GEMINI.md file to provide project context upfront, reducing the number of back-and-forth exchanges needed. Third, for teams, each member's OAuth credentials provide independent quotas, so there is no shared pool to worry about. For a complete guide to maximizing your free allocation, see our Gemini API free tier guide.
If you need access to multiple AI models beyond Gemini for API-based workflows, platforms like laozhang.ai aggregate models from OpenAI, Anthropic, Google, and others through a single API endpoint, which can be useful for comparing outputs or building applications that leverage different model strengths.
Troubleshooting Common Installation Issues
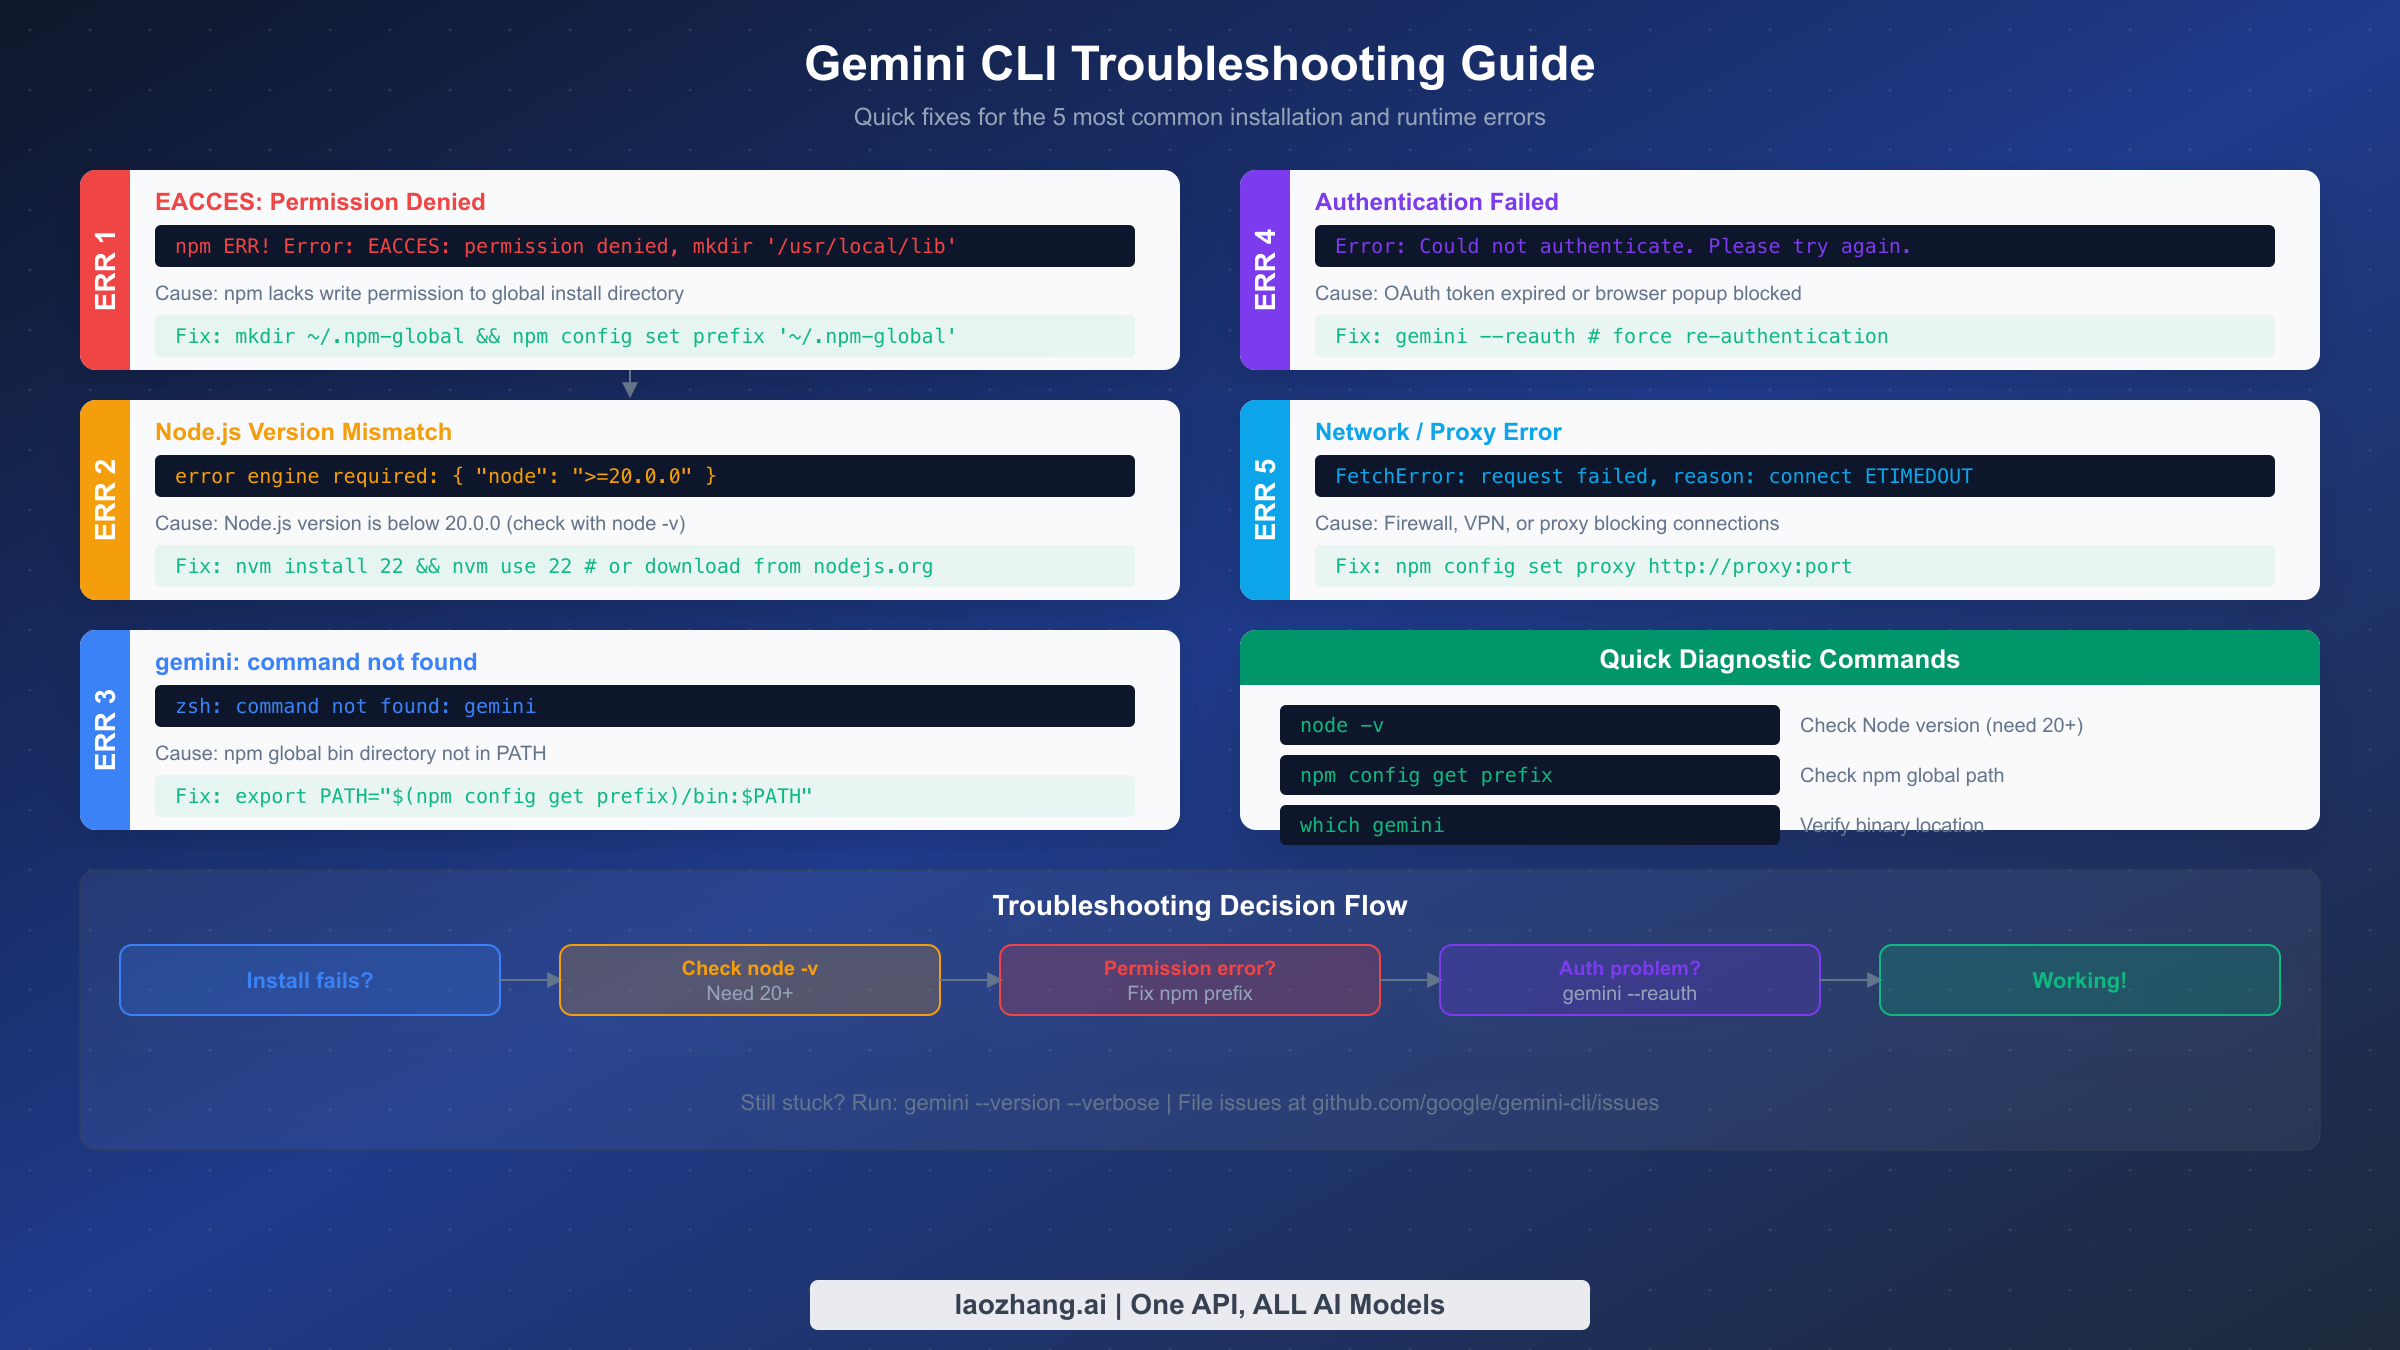
Most Gemini CLI installation problems fall into five categories, and each has a straightforward fix. The official documentation assumes installation will work perfectly, so when something goes wrong, users are often left searching for answers. This section provides the exact error messages you will see and the precise commands to resolve each issue, based on real-world reports from the Gemini CLI GitHub repository and developer forums.
Permission Errors (EACCES)
The most common installation failure on macOS and Linux is an npm permission error that looks like this:
npm ERR! Error: EACCES: permission denied, mkdir '/usr/local/lib/node_modules'
This happens because npm tries to write to a system directory that requires root access. While you could fix it with sudo npm install -g, this approach creates files owned by root in your global node_modules directory, which causes permission conflicts for future updates and other global packages. The safer and recommended approach is to reconfigure npm to use a directory you own, which permanently solves the problem for all future global installs. Run these three commands in sequence:
bashmkdir -p ~/.npm-global
npm config set prefix '~/.npm-global'
echo 'export PATH="$HOME/.npm-global/bin:$PATH"' >> ~/.bashrc
source ~/.bashrc
If you are using Zsh (the default on modern macOS), replace .bashrc with .zshrc. After this change, npm install -g commands will write to your home directory instead of requiring elevated permissions, and you can install Gemini CLI without any permission issues.
Node.js Version Mismatch
If you see an error mentioning engine required: { "node": ">=20.0.0" } or if Gemini CLI fails with unexpected syntax errors, your Node.js version is too old. Check your current version with node -v. The fastest way to upgrade is through nvm (Node Version Manager). If you do not have nvm installed, install it first, then get Node.js 22:
bashcurl -o- https://raw.githubusercontent.com/nvm-sh/nvm/v0.40.1/install.sh | bash
nvm install 22
nvm use 22
On Windows, download the latest LTS installer from nodejs.org or run winget install OpenJS.NodeJS.LTS from a PowerShell terminal. If you are using nvm-windows (the Windows equivalent of nvm), the commands are nvm install 22 and nvm use 22, identical to the Unix version. After upgrading, close and reopen your terminal to ensure the new Node.js version is picked up, then run the npm install command again and it should complete successfully.
Command Not Found After Installation
After a successful npm install, some users find that typing gemini produces a "command not found" error. This means the npm global binary directory is not in your system PATH. First, find where npm installs global binaries by running npm config get prefix, then add that path to your shell configuration:
bashexport PATH="$(npm config get prefix)/bin:$PATH"
Add this line to your .bashrc, .zshrc, or PowerShell profile to make it permanent. On Windows, you may need to add the npm global path to your system environment variables through the System Properties dialog (search "Environment Variables" in the Start menu). After updating your PATH, open a new terminal window and try gemini --version again. If you installed via Homebrew, this issue does not occur because Homebrew automatically manages the PATH for its binaries.
Network and proxy issues are the fourth common error category. If you see FetchError: request failed, reason: connect ETIMEDOUT, your network, VPN, or corporate firewall may be blocking connections to Google's servers. Configure npm and Gemini CLI to use your proxy with npm config set proxy http://your-proxy:port and set the HTTPS_PROXY environment variable. On corporate networks, you may also need to add Google's API domains to your firewall allowlist. The fifth error, authentication failures after a previously working setup, is almost always resolved by running gemini --reauth to force a fresh OAuth token.
For additional troubleshooting of API-related errors you might encounter after installation, our Gemini API error troubleshooting guide covers authentication failures, rate limit errors, and network connectivity issues in detail.
Essential Configuration and Customization
Once Gemini CLI is installed and authenticated, a few minutes of configuration can dramatically improve your daily experience. The most impactful configuration is the GEMINI.md file, which acts as persistent context that Gemini CLI reads at the start of every conversation. Place this file in your project root directory, and it will inform the AI about your project structure, coding conventions, preferred technologies, and any specific instructions you want the agent to follow.
A practical GEMINI.md file does not need to be complex. Start with a few essential sections: what the project does, which commands to use for building and testing, and any coding standards the team follows. Here is an example that works well for most projects:
markdownThis is a Next.js 14 application using TypeScript and Tailwind CSS. ## Commands - `npm run dev` - Start development server - `npm run build` - Production build - `npm run test` - Run tests with Jest ## Code Standards - Use TypeScript strict mode - Prefer Server Components - Follow existing patterns in /components/
Beyond GEMINI.md, the global configuration file at ~/.gemini/settings.json lets you customize Gemini CLI's behavior across all projects. You can set your preferred model, adjust safety settings, configure sandbox mode as the default for untrusted projects, and define custom slash commands for frequently used prompts. The settings file uses a straightforward JSON structure, and changes take effect the next time you start a Gemini CLI session.
Another powerful feature is MCP (Model Context Protocol) server integration, which extends Gemini CLI's capabilities by connecting it to external tools and data sources. For example, you can configure an MCP server for your database, allowing Gemini CLI to query schema information and generate accurate SQL. MCP servers for GitHub, Jira, Confluence, and other development tools are available in the community ecosystem, turning Gemini CLI from a code assistant into a comprehensive development hub that understands your entire workflow context.
For teams, creating a shared GEMINI.md in the repository ensures consistent AI behavior across all developers. You can include team-specific rules like "always write unit tests for new functions" or "use the repository's custom logger instead of console.log," and every team member's Gemini CLI session will follow these guidelines automatically. This shared configuration approach is one of Gemini CLI's most underappreciated features, providing a lightweight way to enforce coding standards without additional tooling.
Your First Real Task with Gemini CLI
Now that installation, authentication, and configuration are complete, let us walk through a practical first task that demonstrates what Gemini CLI can actually do. Navigate to any project directory in your terminal and type gemini to start a session. The welcome message confirms your model (Gemini 3) and shows your remaining quota.
Start with something concrete rather than abstract. A great first prompt is asking Gemini CLI to analyze your project and suggest improvements. Try typing: "Review this project's structure and identify potential issues or improvements." Gemini CLI will scan your files, understand the project layout, and provide specific, actionable suggestions. Unlike browser-based AI tools, it has direct access to your code, so its recommendations reference actual files and line numbers in your project.
For a more hands-on demonstration, ask Gemini CLI to perform a real refactoring task. For example: "Find all components in this project that use class components and convert them to functional components with hooks." The agent will identify the relevant files, propose the changes, and ask for your approval before modifying anything. You can review each change, accept or reject it, and iterate with follow-up instructions. This approve-before-apply workflow gives you the benefits of AI-assisted coding while maintaining full control over what actually changes in your codebase.
Gemini CLI really shines when you give it multi-step tasks that would be tedious to do manually. Try something like: "Add comprehensive error handling to all API routes, including proper HTTP status codes and error logging." The agent will work through each API route file, understand the existing patterns, and apply consistent error handling that matches your project's style. After each file modification, it pauses for your approval, then continues to the next file. Tasks that might take an hour of manual work can be completed in minutes with this workflow.
As you become more comfortable, explore advanced features like using /save to bookmark useful prompts, connecting MCP servers for external tool integration, and leveraging the @ mention syntax to reference specific files in your prompts. The key insight is that Gemini CLI becomes more useful over time as you refine your GEMINI.md and develop an intuition for which tasks benefit most from AI assistance. Most developers find that code review, test generation, documentation updates, and cross-file refactoring are where the tool delivers the highest return on the time invested in learning it.
One particularly effective pattern for new users is to start each session with a scoping prompt that establishes context. Before diving into a task, tell Gemini CLI what you are working on: "I'm fixing a bug where user authentication fails after password reset. The relevant files are in /src/auth/ and the tests are in /tests/auth/." This kind of focused context helps the agent zero in on the right files and avoids wasting requests on exploration. Over time, moving this context into your GEMINI.md file means you do not have to repeat it in every session, and the AI can jump straight into productive work from the first prompt.
Summary and Next Steps
Installing Gemini CLI takes under two minutes with npm install -g @google/gemini-cli, and the free tier via Google OAuth provides 1,000 requests per day with the full Gemini 3 model. The three key decisions are choosing your installation method (npm for most, Homebrew for macOS simplicity, npx for quick testing), selecting your authentication approach (OAuth for personal use, API key for automation, Vertex AI for enterprise), and configuring your GEMINI.md to give the AI the context it needs to be genuinely useful in your specific projects.
If you encounter issues during installation, the troubleshooting section above covers the five most common errors with exact commands to resolve them. For ongoing usage, keep your installation updated with npm update -g @google/gemini-cli to access new features and model improvements, as Google releases updates frequently through stable, preview, and nightly channels.
Your next steps should be to create a GEMINI.md file in your most active project, experiment with multi-step coding tasks to understand the agent's capabilities, and explore MCP server integrations for the tools your team uses daily. The Gemini CLI ecosystem is growing rapidly, and the community at github.com/google-gemini/gemini-cli is an excellent resource for advanced tips, custom configurations, and troubleshooting help. With v0.32.1 and Gemini 3 powering the tool, there has never been a better time to integrate AI assistance directly into your terminal workflow.
For developers who work with multiple AI models across different providers, consider exploring API aggregation services like laozhang.ai that let you access Gemini, GPT, Claude, and other models through a single endpoint. This can be particularly useful when you want to compare outputs across models or when different tasks benefit from different model strengths. Combined with Gemini CLI for interactive terminal work, a multi-model approach gives you the most flexibility in your AI-assisted development toolkit.