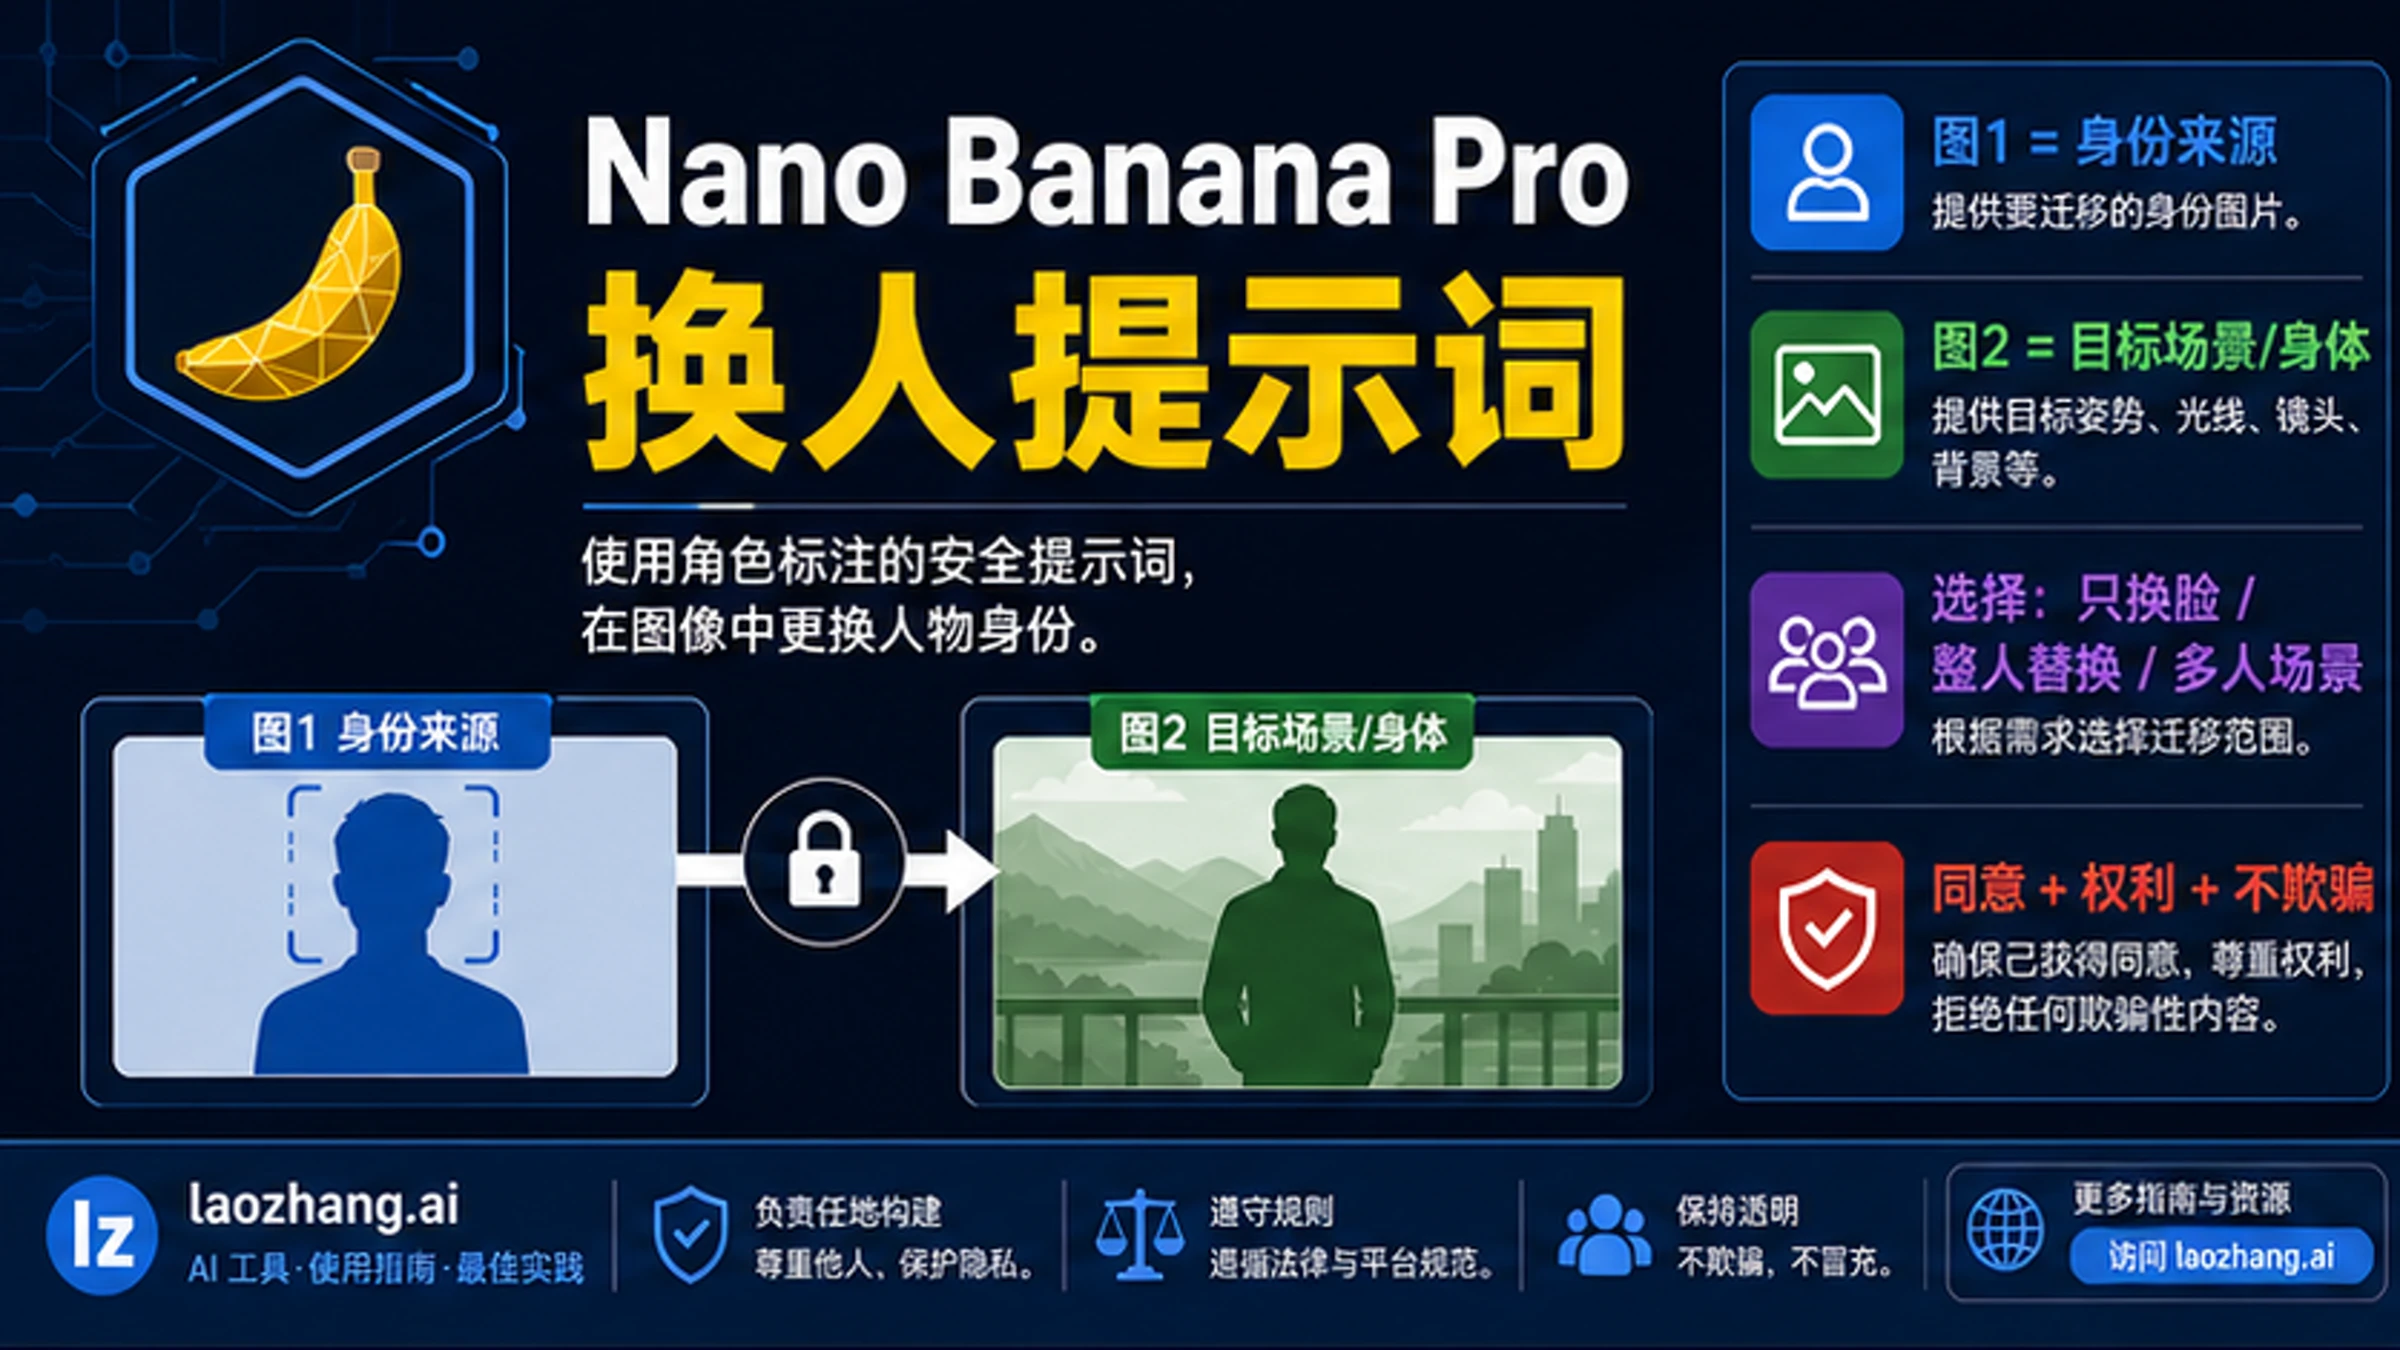
To swap a person with Nano Banana Pro, make the prompt assign jobs to your references: Image 1 is the identity source, Image 2 is the target scene or body, and the prompt says what should transfer and what must stay locked. Use this workflow only with images you have the right to edit, and do not use it for non-consensual intimate content, deceptive impersonation, or misleading provenance.
Copy this base prompt first:
textUse Image 1 as the identity source. Use Image 2 as the target scene and body reference. Transfer the identity from Image 1 into the target person in Image 2 while preserving the target pose, clothing, lighting, camera angle, background, and composition. Match skin texture, shadows, perspective, and white balance so the edit looks natural. Do not change the target scene, add new people, sexualize anyone, or create a deceptive impersonation.
Choose the branch before you run it:
| Job | Use this when | Add this line |
|---|---|---|
| Face-only swap | The target body, clothing, pose, and background should stay from Image 2. | Replace only the face and facial identity; keep the body, hair outline, clothing, pose, and background from Image 2. |
| Full-person replacement | The person from Image 1 should replace the visible person in Image 2. | Replace the target person with the person from Image 1, but keep the target scene, camera, lighting, scale, and composition unchanged. |
| Multi-person or same-gender scene | The model may confuse who should move. | Label every visible person first, then say exactly which labeled person is the source and which labeled person is the target. |
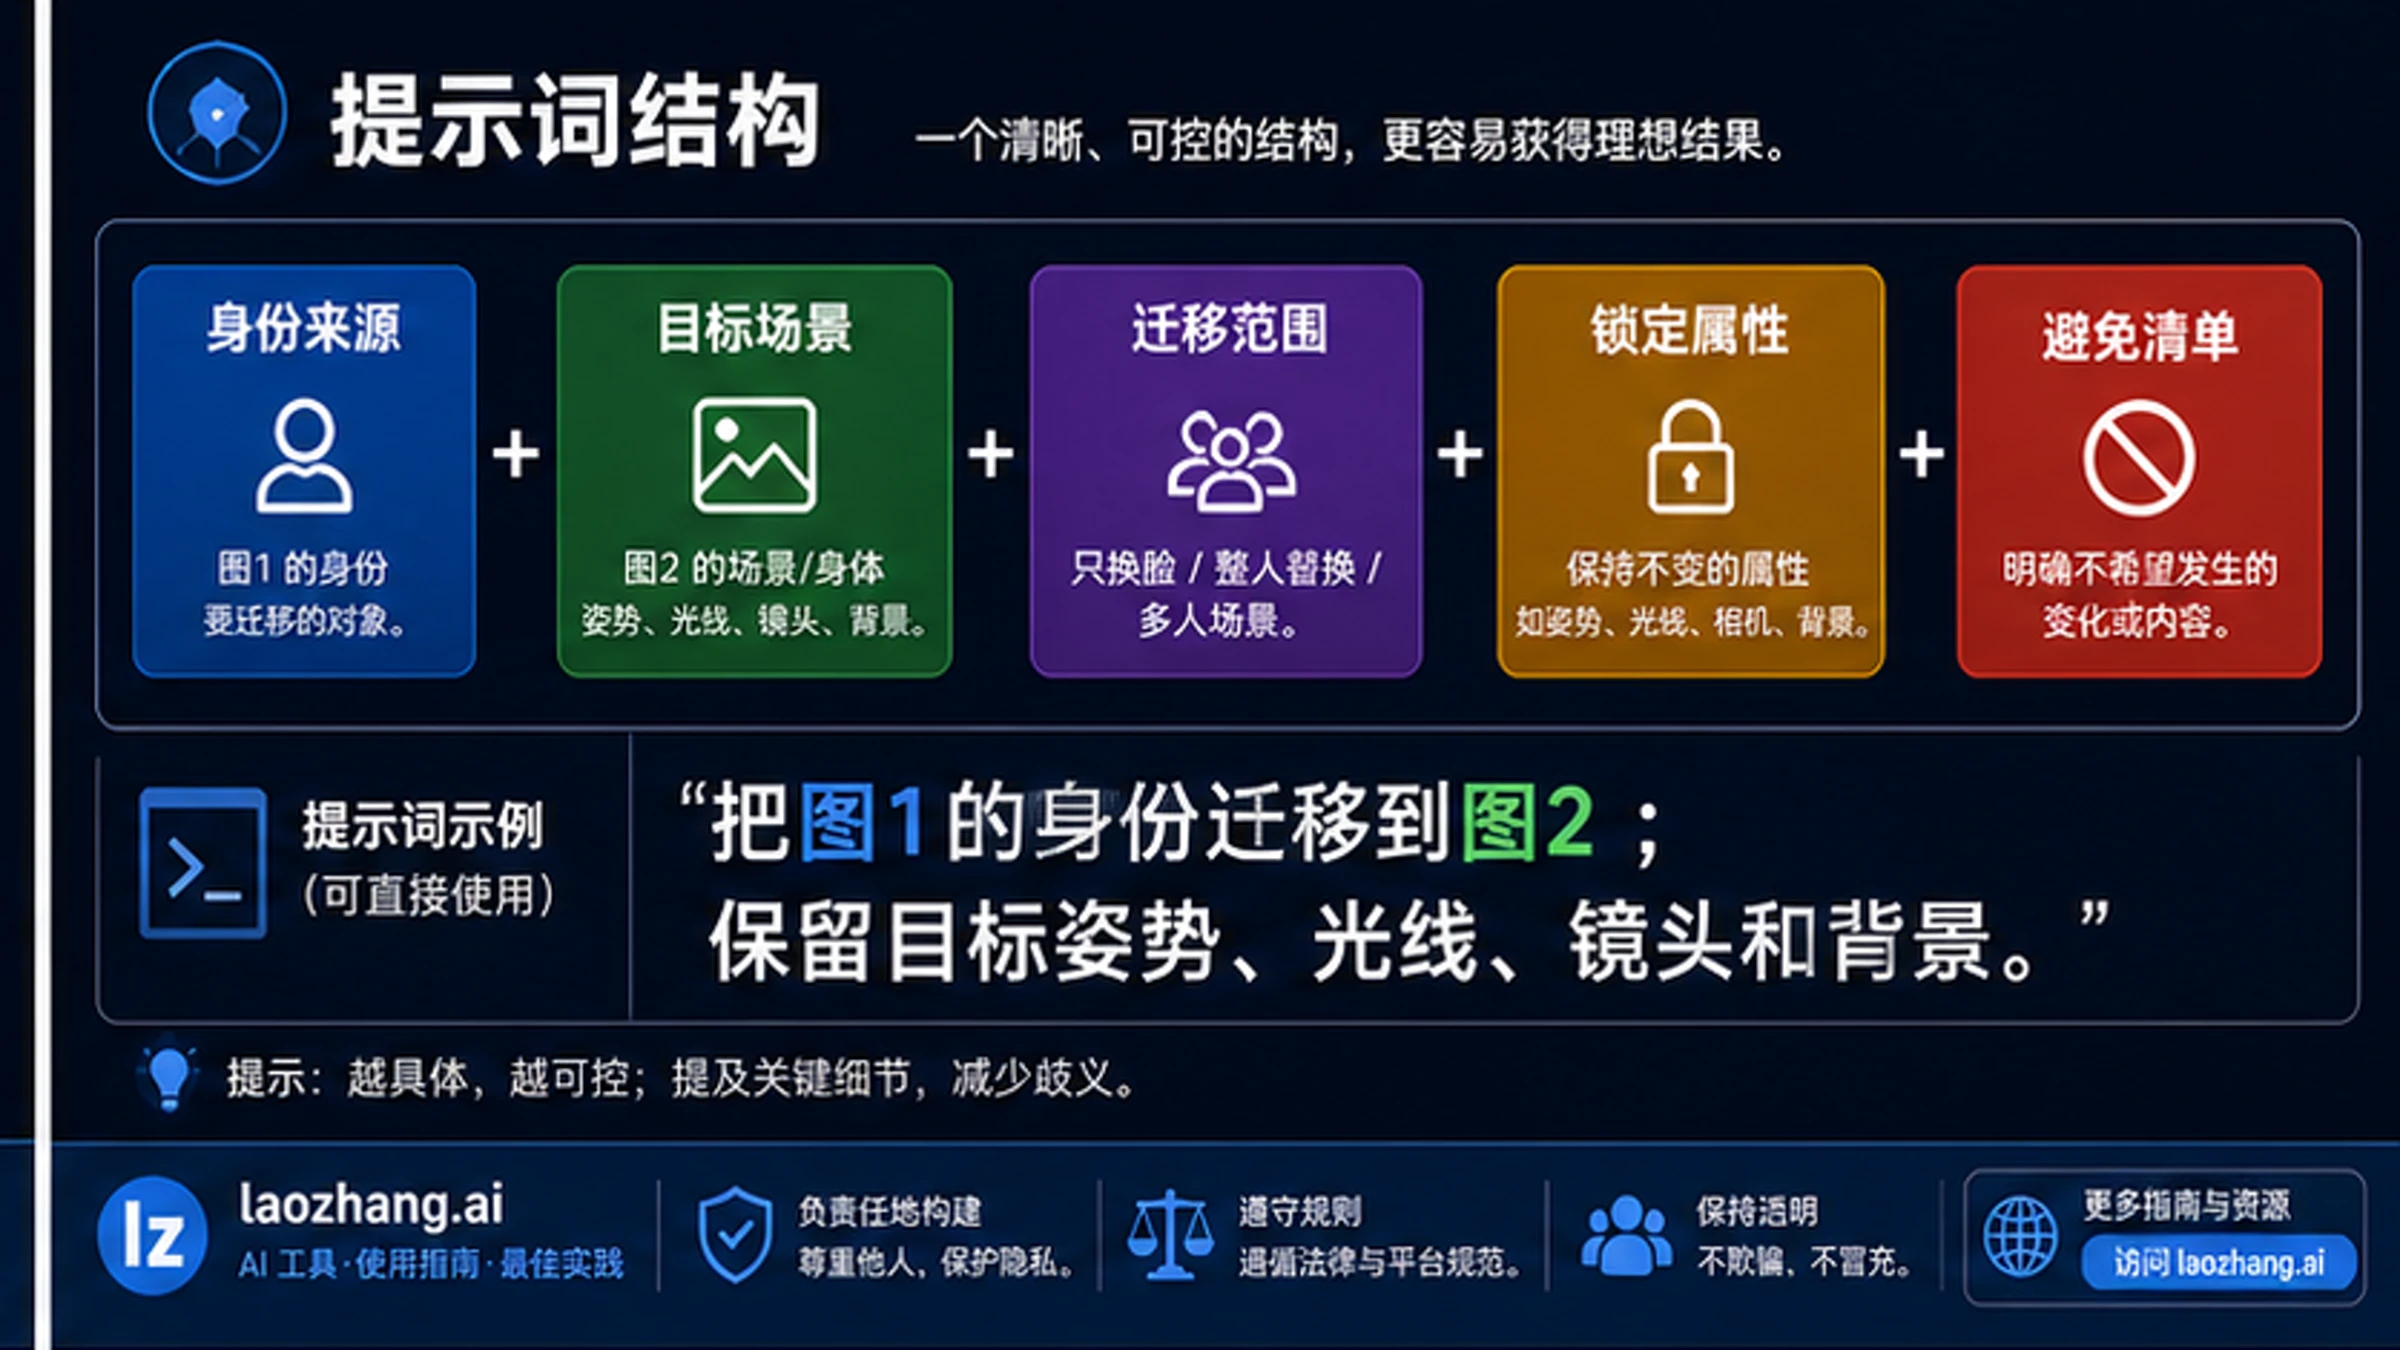
How the Prompt Works
The prompt works because it separates identity from context. A weak instruction such as "swap this person into this photo" asks the model to infer too many things at once: which image owns the face, which body should stay, whether clothing should transfer, whether the background is allowed to change, and whether the result is allowed at all. A stronger prompt turns those assumptions into explicit roles.
Use these five parts every time:
| Prompt part | What it controls | Example wording |
|---|---|---|
| Identity source | Whose likeness should appear | Use Image 1 as the identity source. |
| Target scene/body | Which image controls pose, body, lighting, and background | Use Image 2 as the target scene and body reference. |
| Transfer scope | What should move from source to target | Transfer facial identity only or replace the target person. |
| Locked attributes | What must not change | Preserve target pose, clothing, lighting, camera angle, and background. |
| Avoid list | What would make the edit unsafe or wrong | Do not add people, sexualize anyone, or create a deceptive impersonation. |
Nano Banana Pro is capable of complex reference-image edits, but it is still interpreting your request. Google's own prompt guidance emphasizes direct editing instructions and clear roles for uploaded images, and it also notes that advanced blending and character consistency can vary. That means the correct goal is not a magic phrase that guarantees a perfect swap. The goal is a prompt that reduces ambiguity, makes failure easier to diagnose, and keeps the edit inside a safe use boundary.
If you need the same person to stay stable across many new scenes rather than just one target edit, use the deeper Nano Banana Pro face consistency workflow next. Person swap is about one transfer into a target image; face consistency is about keeping identity stable across a sequence.
Prepare the Reference Images
Good reference preparation matters more than adding adjectives. Before you write a longer prompt, check whether the two images give the model enough clean information to perform the edit.
For Image 1, choose a source photo where the face is clear, the person is not heavily occluded, and the image represents the identity you actually want to transfer. If the source image has strong shadows, extreme angles, sunglasses, motion blur, or heavy filters, the model has to guess facial structure and color. That guess is where wrong-person or plastic-face results start.
For Image 2, decide what it owns. In a face-only swap, Image 2 owns the body, hair outline, clothing, pose, background, lighting, and camera. In a full-person replacement, Image 2 owns the scene, camera, lighting, scale, and composition, but the visible target person can be replaced. If you do not say that distinction, the model may blend the source person into the target body halfway or rebuild the scene around the source image.
When either image contains more than one person, label visible people before asking for the edit:
textIn Image 1, Person A is the identity source. In Image 2, Person B is the target person to replace. Keep Person C unchanged. Transfer only Person A's identity into Person B's position.
This line feels mechanical, but it prevents the most common multi-person failure: the model changes the wrong person or keeps the original target because both images contain similar faces. If the target scene is crowded, write a one-sentence inventory before the edit instruction. The model needs the inventory before it can follow the transfer.
Face-Only Swap Prompt
Use face-only swap when the target body, clothing, pose, and background should remain from Image 2. This is the narrowest and usually most controllable branch.
textUse Image 1 as the identity source and Image 2 as the target photo. Replace only the target person's face and facial identity in Image 2 with the person from Image 1. Keep the target body, hair silhouette, clothing, pose, hands, background, camera angle, lighting direction, depth of field, and composition exactly from Image 2. Match skin texture, facial shadows, perspective, white balance, and image grain so the face belongs naturally in the target photo. Do not change the target scene or add new people.
The key phrase is "replace only the face and facial identity." Without that scope limit, the model may borrow hair, clothes, or body proportions from Image 1. That can be useful for a full-person replacement, but it is the wrong behavior when your target image already has the pose and wardrobe you need.
Use this branch for headshots, social profile mockups, hairstyle previews, family-photo restoration with consent, and controlled portrait edits. For polished portrait or beauty work, pair the role labels here with the lighting discipline from the Nano Banana Pro beauty headshot workflow.
Full-Person Replacement Prompt
Use full-person replacement when the source person should replace the visible person in the target scene. This is harder because the model must decide which body, scale, clothing, and pose survive.
textUse Image 1 as the identity and person reference. Use Image 2 as the target scene reference. Replace the target person in Image 2 with the person from Image 1 while preserving the target scene, camera position, lighting, background, scale, perspective, and composition. Keep the replacement person aligned to the same location and natural body scale as the target person. If clothing should come from Image 2, preserve the target clothing. If clothing should come from Image 1, transfer the source clothing and keep the target lighting and pose natural. Do not change unrelated people, objects, text, or background details.
Before you run this version, make a body-owner decision. If Image 2 owns body and clothes, say so. If Image 1 owns the full person and outfit, say so. If the source face should be placed onto the target body, do not call it full-person replacement; use the face-only branch. Most strange outputs come from mixing these three jobs.
For hard scenes, split the work into two steps. First ask Nano Banana Pro to mark or isolate the target person without changing the image: "Identify the person in the red jacket as the target and keep all other people unchanged." Then run the replacement prompt with the same labels. The first step gives you a clearer role map and helps you catch ambiguity before the edit spends a full attempt.
Safety Check Before Examples
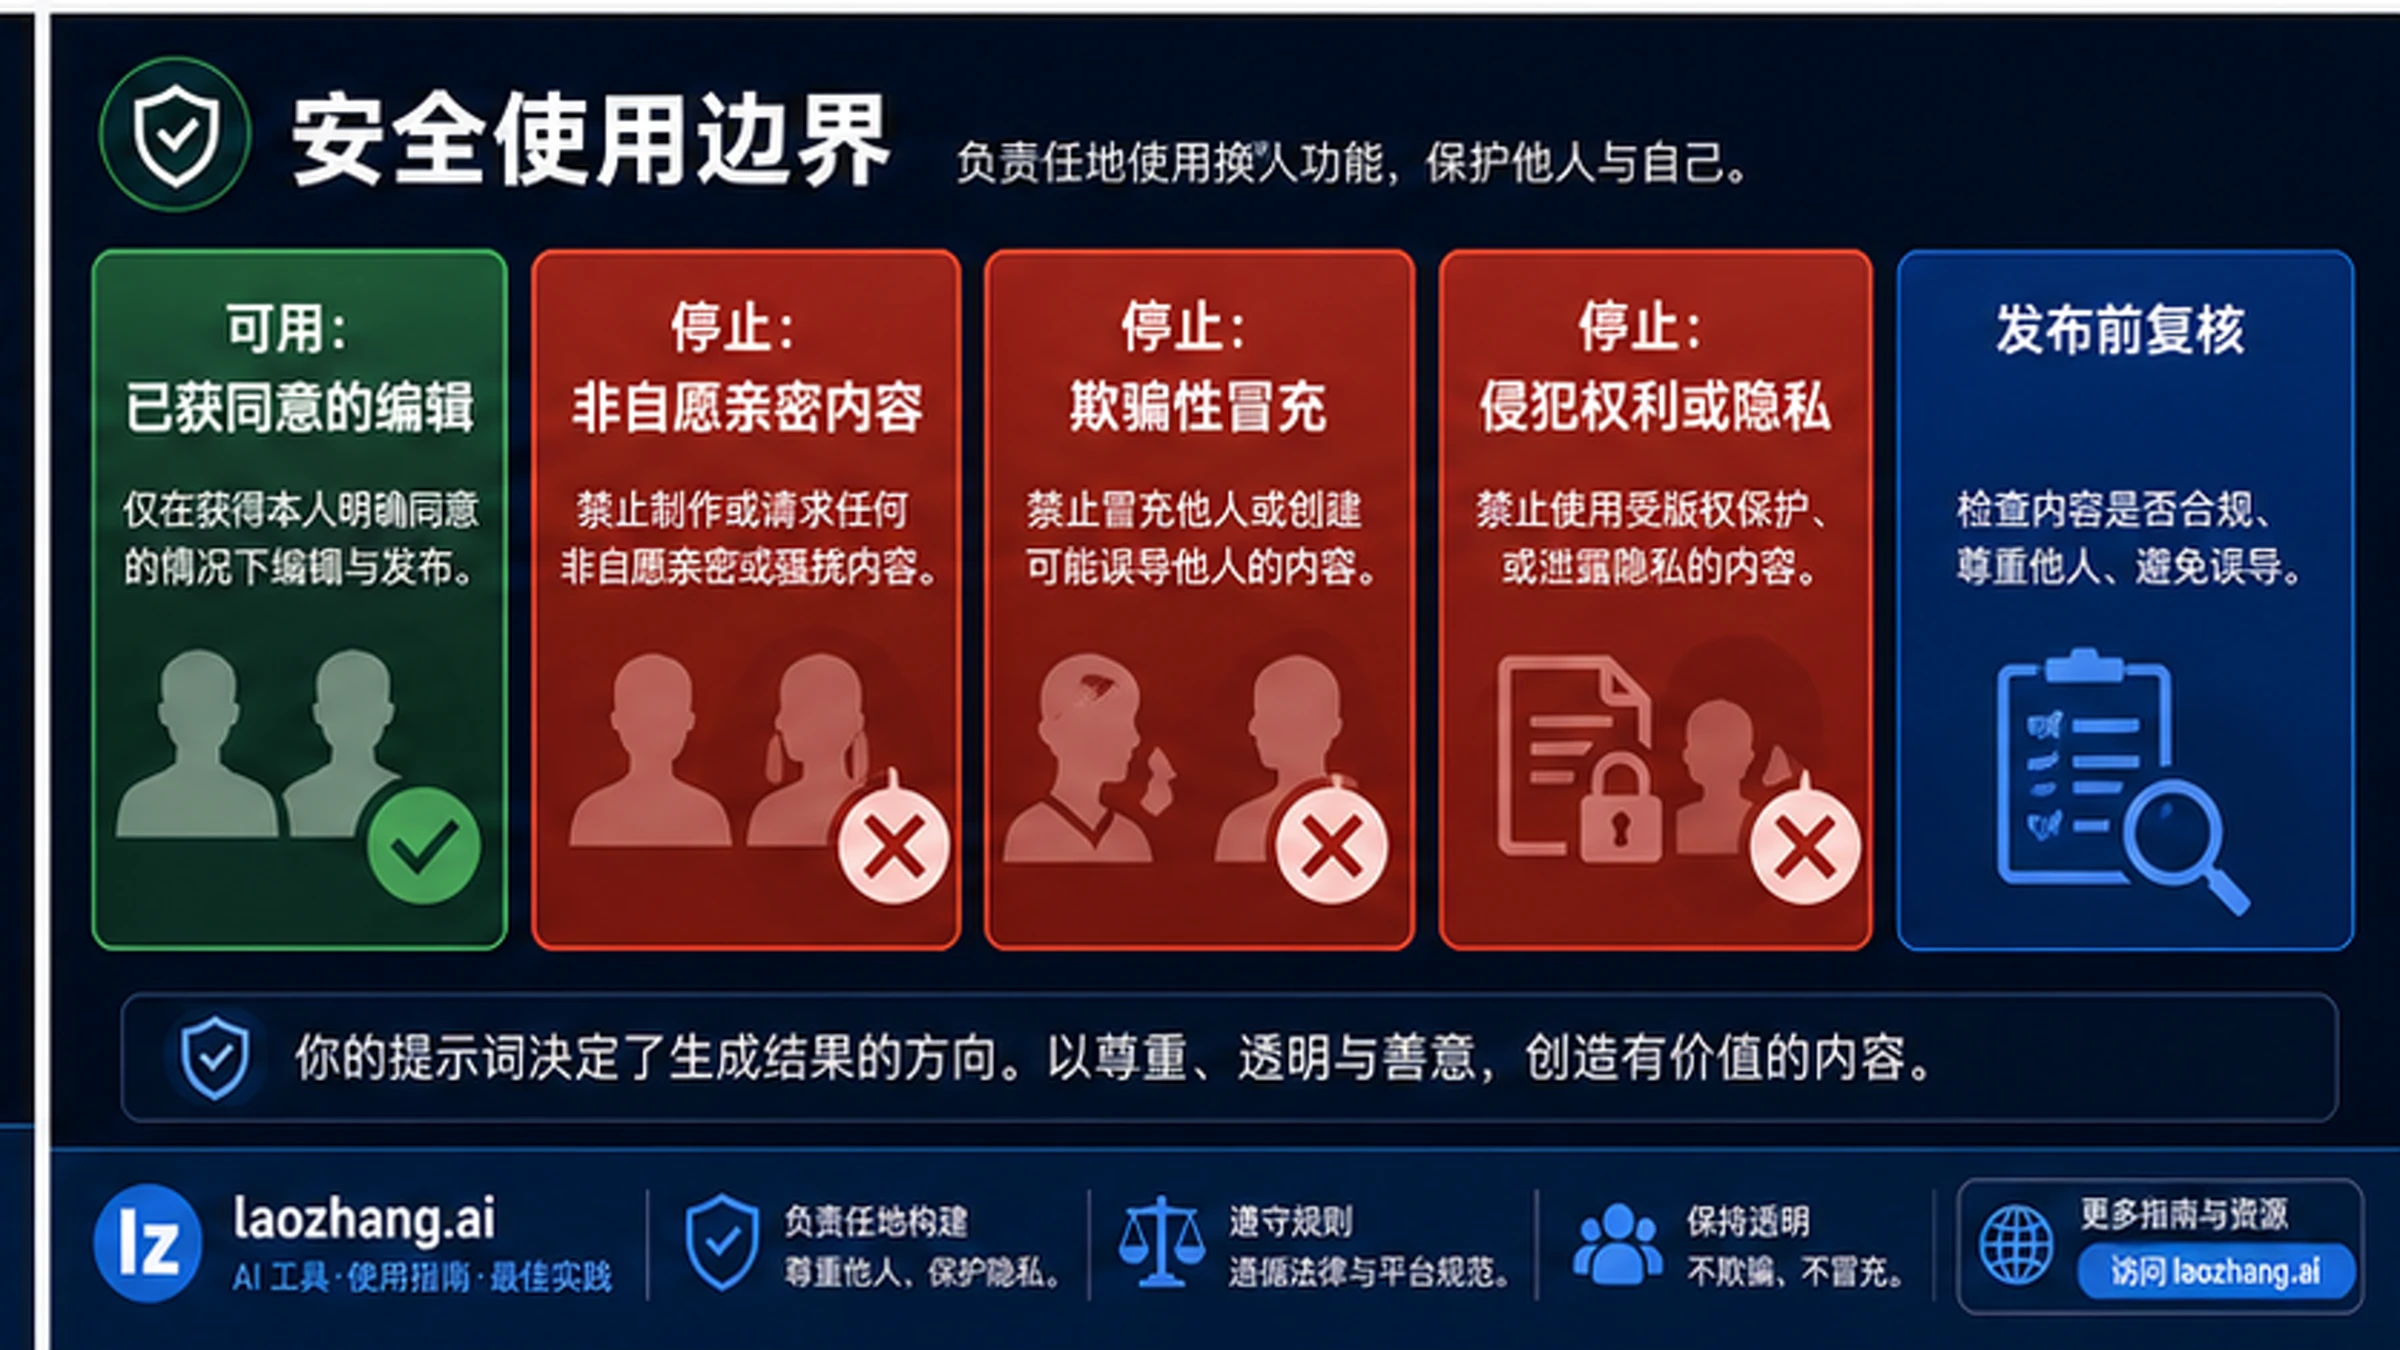
Person-swap prompting is a likeness workflow, so the safety rule is part of the edit, not a footnote. Use images you own or have permission to edit. Do not use this workflow to create non-consensual intimate images, deceptive impersonation, fake evidence, harassment, or edits that misrepresent provenance. If the output could make a reasonable viewer believe a real person did something they did not do, disclose the edit or do not publish it.
Write the boundary into your prompt when the image is for public use:
textCreate a clearly non-deceptive, consented edit. Do not create sexualized, humiliating, or misleading content. Preserve a natural result, and avoid implying the person performed an action that is not part of the permitted edit.
This is not just legal caution. It also improves the prompt by telling the model what kind of output should be rejected. If the intended use cannot survive that sentence, the image should not be generated.
Fix Common Failures
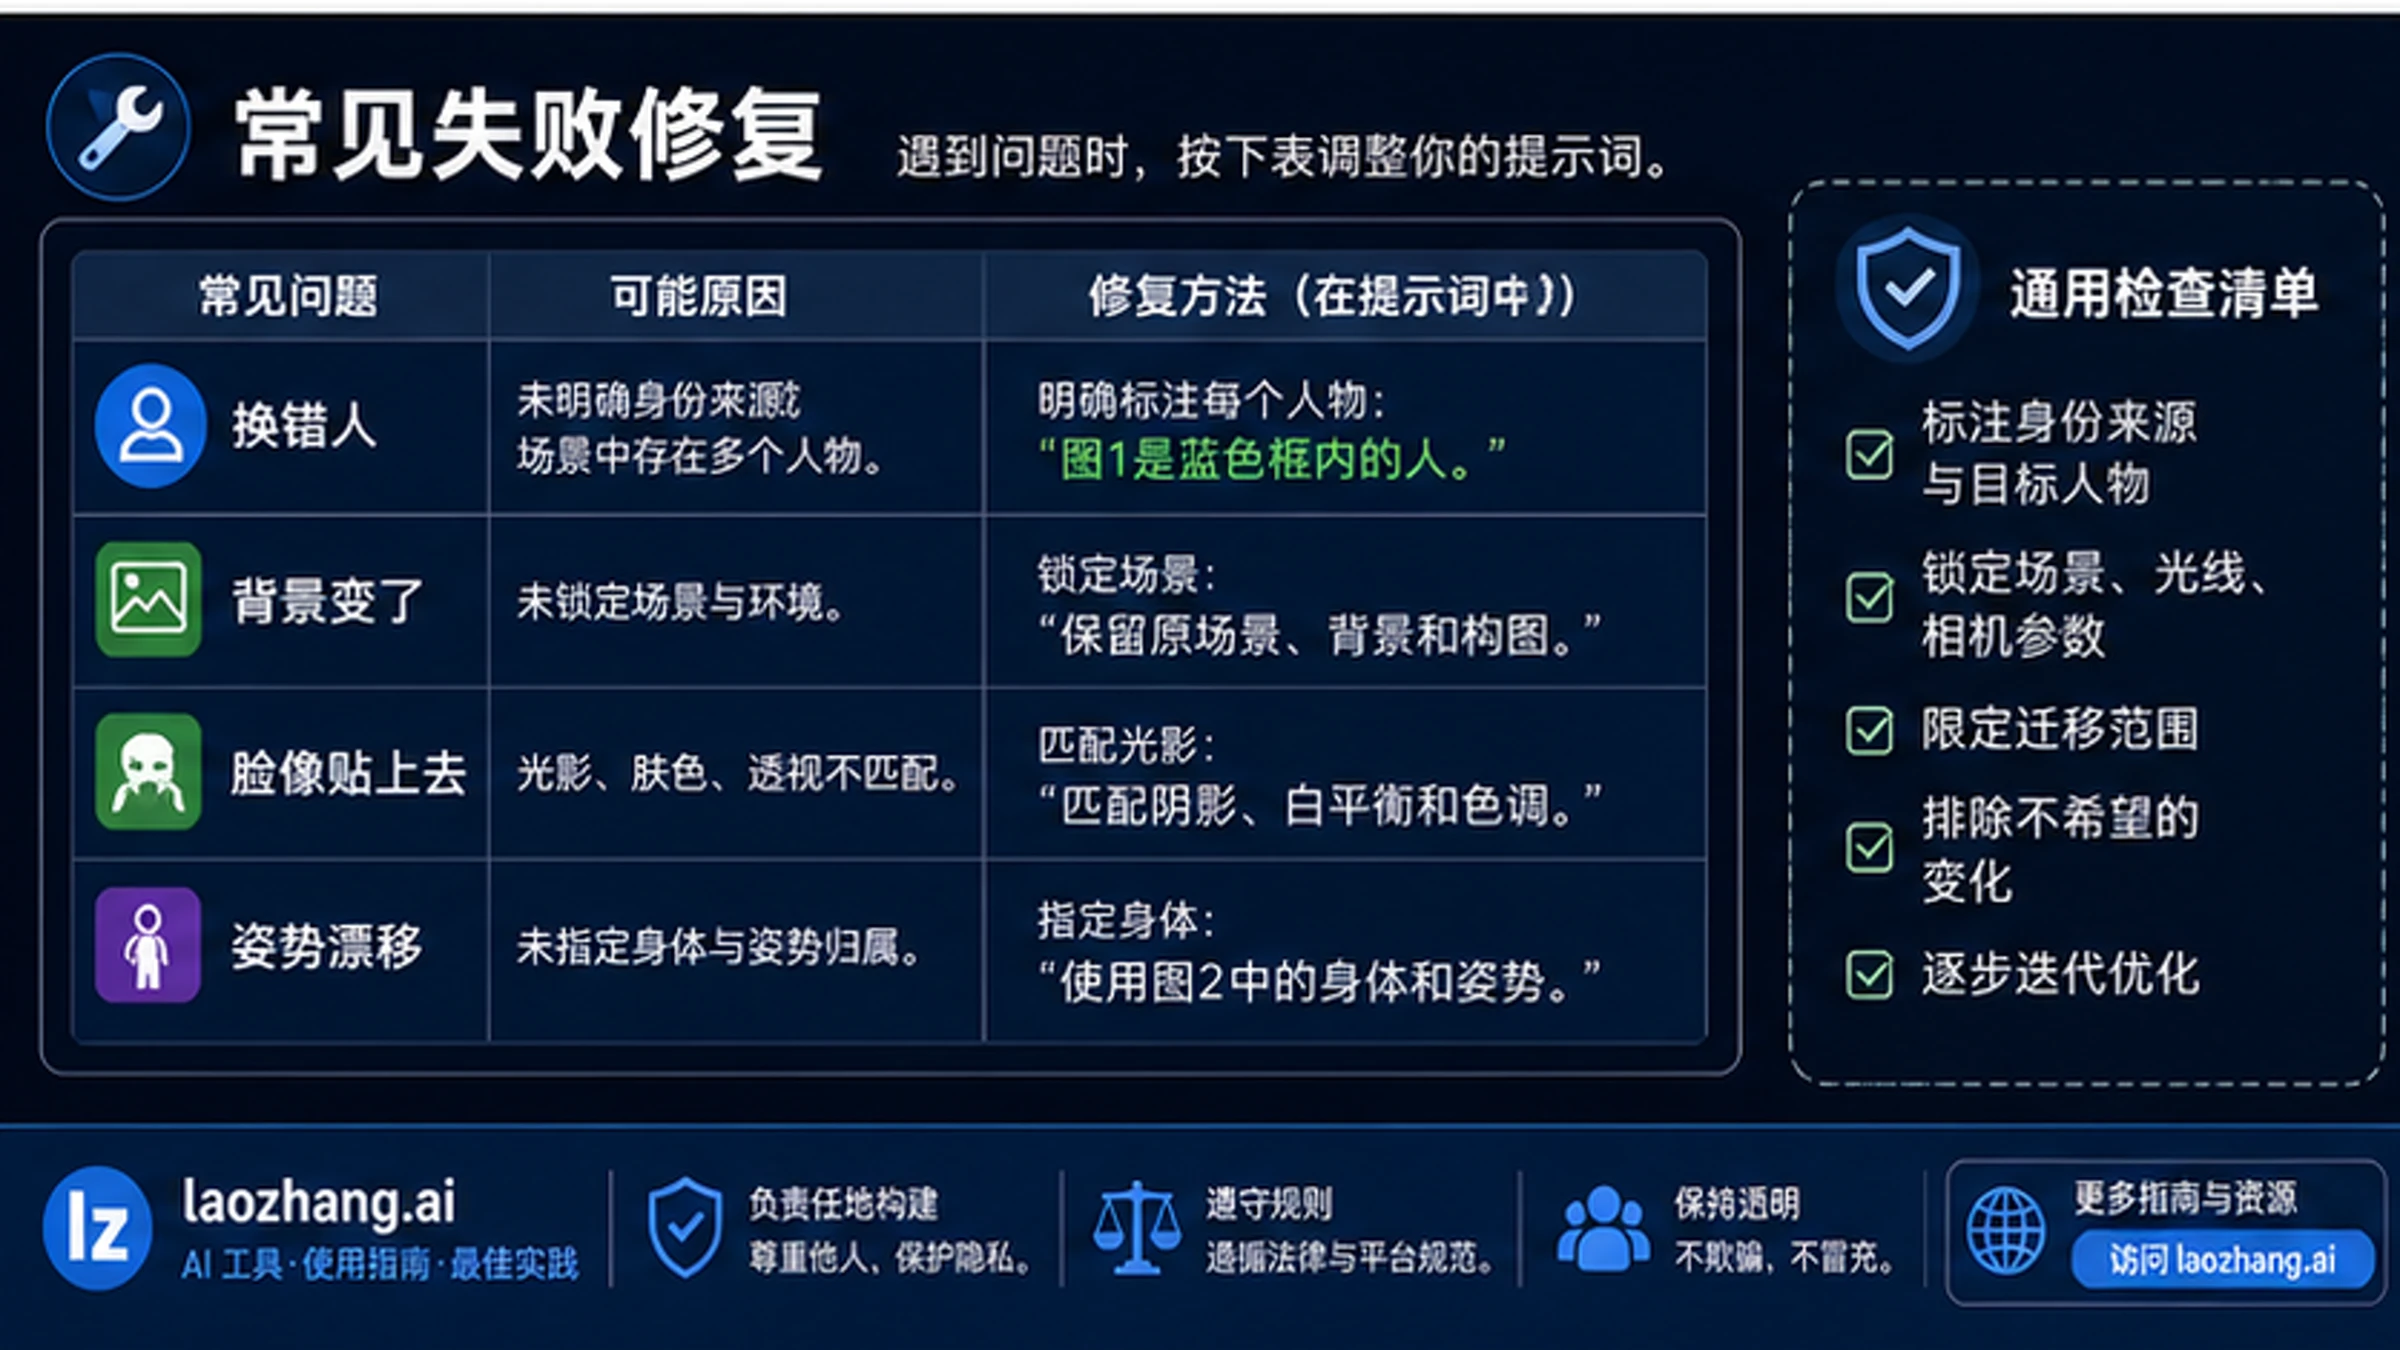
When the result is wrong, do not add more style words first. Find the failure type, then revise the role contract.
| Failure | Likely cause | Prompt revision |
|---|---|---|
| Wrong person was changed | The visible people were not labeled. | Label every visible person first. Person A is the source identity. Person B is the only target to replace. Keep all other people unchanged. |
| Source face appears but target background changes | Target scene was not locked. | Keep Image 2 background, camera angle, lighting, object placement, and composition unchanged. |
| Face looks pasted on | Blending constraints are too weak. | Match skin texture, facial shadows, perspective, edge blending, white balance, and image grain. |
| Body or clothing changes unexpectedly | Body owner was unclear. | Keep body, clothing, pose, and hair outline from Image 2; transfer facial identity only. |
| Full-person replacement changes scale | The target location and perspective were not locked. | Place the replacement person in the same location, scale, depth, and perspective as the original target person. |
| Refusal or no useful output | The request may cross a safety or rights boundary, or the prompt is too ambiguous. | Rewrite as a consented, non-deceptive edit, remove intimate or impersonation intent, and use clearer reference labels. |
If two failures appear at once, fix role ownership before realism. A pasted-looking face can often be improved with shadow and color instructions, but a face on the wrong person means the model never understood the assignment. Labels come first; blending comes second.
Current Route Notes for Nano Banana Pro
Nano Banana Pro is the market name readers use, while Google's developer docs map the API branch to gemini-3-pro-image-preview. As of May 7, 2026, Google's image-generation docs describe Nano Banana Pro as the higher-fidelity Gemini 3 Pro Image Preview route, and Gemini Apps Help documents Nano Banana 2 as the default image generation and editing flow with a separate paid-user "Redo with Pro" behavior.
That route split matters because the same prompt can be used in different surfaces, but the availability and quota behavior may not be the same:
| Route | What it is good for | Boundary |
|---|---|---|
| Gemini App | Manual image edits and quick retries. | The app may start from Nano Banana 2 and expose Pro as a redo path for eligible paid users. |
| AI Studio / Gemini API | Controlled testing, repeatable prompts, developer workflows. | API use maps to gemini-3-pro-image-preview; official pricing and preview limits are date-sensitive. |
| Vertex AI | Cloud projects that need enterprise controls. | Availability, region, and quota depend on the project setup. |
If your problem is "I cannot find Nano Banana Pro," read the current Nano Banana Pro how-to-use route map. If your problem is API access or whether an API key has a free tier, use the Nano Banana Pro API key free-tier explainer rather than turning a prompt task into a billing investigation.
A Practical QA Checklist
Before you publish or send the output to someone else, inspect it against the same contract you used in the prompt:
- Identity: does the result preserve the intended person's recognizable features without drifting into another person?
- Target ownership: did the scene, body, pose, clothing, background, camera angle, and lighting follow the branch you chose?
- Blending: do skin texture, edge transitions, shadows, white balance, and grain belong to the target image?
- Unrelated content: did the model change other people, text, objects, logos, or background details?
- Safety: do you have consent and rights, and would the result mislead a viewer without disclosure?
If the image fails the safety check, stop. If it fails an ownership check, revise the role labels. If it fails only realism, revise the blending line and rerun. That order keeps the workflow efficient: safety, ownership, realism.
FAQ
Is Nano Banana Pro better than Nano Banana 2 for person swaps?
Nano Banana Pro is the better route for harder reference-image edits, dense instructions, and final assets where higher fidelity matters. Nano Banana 2 may still be faster or more available in consumer surfaces. For one-off manual edits, start with the surface you can access; for repeatable prompt testing, use a route where you can control references and prompts consistently.
Can the prompt guarantee the same identity every time?
No. A prompt can reduce ambiguity and make identity preservation more likely, but it cannot guarantee a perfect outcome. Image quality, pose similarity, lighting, reference clarity, and model limitations all matter. Keep a review pass in the workflow, especially for public or client-facing images.
Should I use one step or two steps?
Use one step for clear face-only swaps with one source person and one target person. Use two steps when the target image contains multiple people, the people are visually similar, the model keeps changing the wrong person, or full-person replacement changes the scene too much. The first step should label roles; the second step should perform the edit.
Can I use a public figure or someone else's photo?
Only if you have the right to use and edit the image and the result will not deceive, impersonate, harass, sexualize, or misrepresent the person. If you cannot explain the edit as consented and non-deceptive, do not generate or publish it.
Why does the model change the background?
The prompt probably did not lock Image 2 strongly enough. Add: "Keep the target background, camera angle, lighting direction, object placement, text, and composition unchanged." If the source image has a very strong style, also say that style should not transfer.
What if the API call fails before the image is edited?
That is no longer a prompt problem. Check file type, upload path, quota, request size, and model availability. The Gemini image common errors checklist is the better next step for transport, quota, and model-call failures.