Nano Banana API Key Guide 2026: Official Gemini Models, Pricing, and Code
A Nano Banana API key is a Gemini API key managed through Google AI Studio. Create the key there, but keep it separate from billing, project limits, free-tier claims, and provider gateway keys before you call Nano Banana 2, Lite, or Pro.
On this page
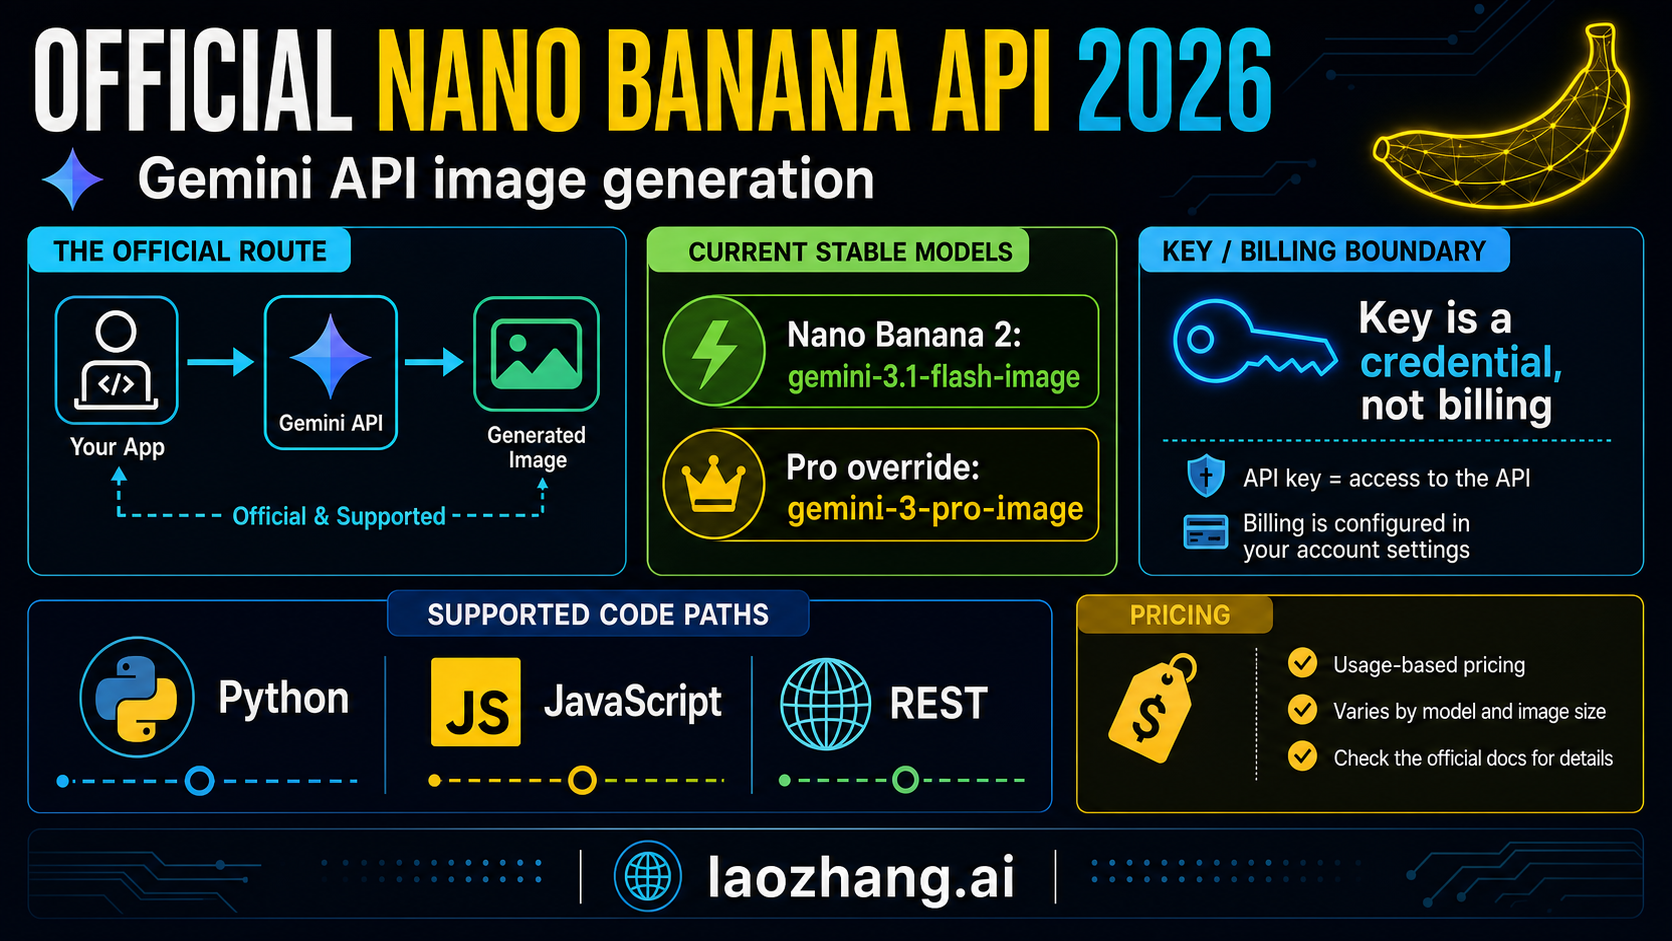
The official way to get a Nano Banana API key is to create a Gemini API key in Google AI Studio. That key authenticates requests to the Gemini API; it is not a separate Nano Banana account, not a free image-output allowance, and not the same contract as a third-party gateway key.
For new image work, Google now recommends the generally available Interactions API for the latest Nano Banana features, while the image-generation page still exposes a generateContent version. The same key, billing, project-limit, and model-selection rules apply either way. On July 1, 2026, the current Nano Banana family in Gemini API includes gemini-3.1-flash-lite-image, gemini-3.1-flash-image, gemini-3-pro-image, and the legacy gemini-2.5-flash-image.
Create the key in Google AI Studio, then separate the credential from billing, live project limits, consumer app quotas, and provider credits before you copy code. The current official price rows below were checked against Google docs on July 1, 2026, and the image-output rows this setup path uses still do not show a free tier.
Before choosing a service for production, compare Google and LaoZhang on Nano Banana API costs, image delivery, and recovery.
Start Here: The Official Route And Current Model IDs
Nano Banana is the reader-facing name people use for Google's native image models, but the implementation path is not a separate Nano Banana developer console. The official path is the Gemini API image-generation documentation, with Google AI Studio as the key-management and testing surface.
That distinction matters because the wrong surface changes the answer. Gemini Apps and AI Mode are consumer products with their own quotas and interface rules. Provider gateways can be useful infrastructure, but they own their own endpoints, pricing, and terms. The official setup starts with Gemini API, then decides model, key, billing, and code.
| Reader job | Start here | Why it is the right first move | Stop rule |
|---|---|---|---|
| Build a product integration | Gemini API | It is the official programmatic route for Interactions API or generateContent image output | Do not treat consumer app limits as API quota |
| Test prompts before wiring code | Google AI Studio | It uses Google's official developer stack and helps inspect output fast | Do not treat key creation as free paid usage |
| Use an everyday UI | Gemini Apps or AI Mode | It is a consumer workflow, not a developer integration | Do not copy consumer quotas into API math |
| Centralize vendors or billing | Provider or gateway | It may simplify multi-model infrastructure | Do not call provider pricing official Google pricing |
The current model mapping is now a four-model family:
| Model family | Current model ID | Best first use |
|---|---|---|
| Nano Banana 2 Lite | gemini-3.1-flash-lite-image | Cheapest and fastest 1K image path when speed and cost matter more than multi-reference or multi-turn editing |
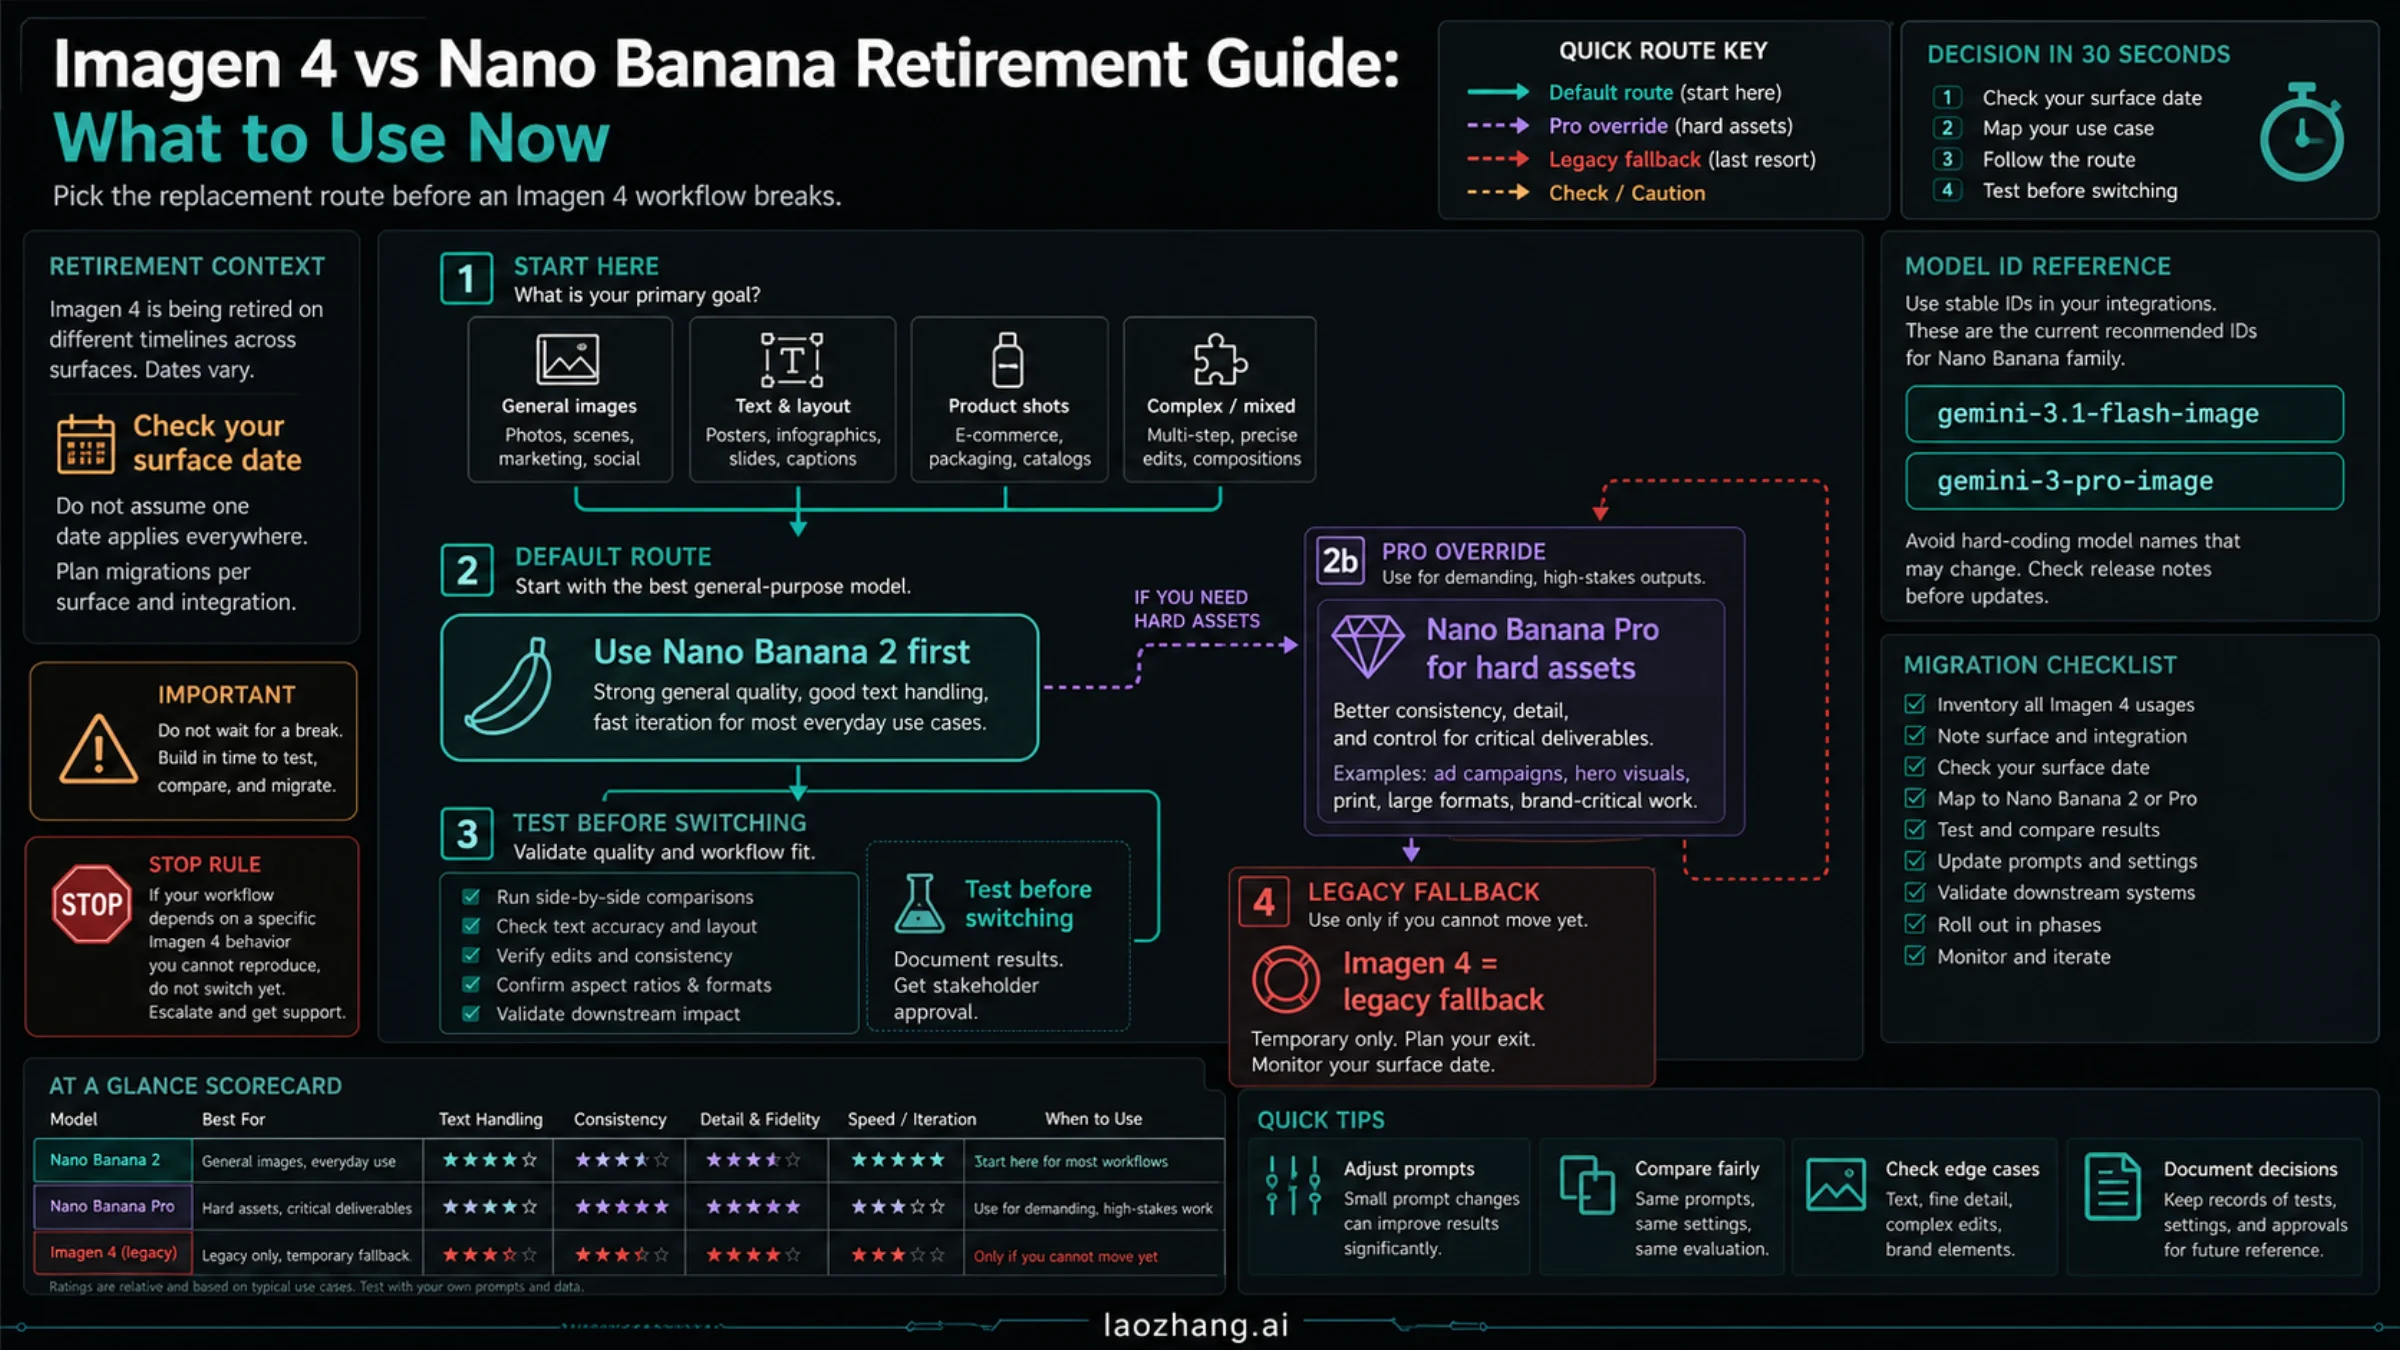
| Nano Banana 2 | gemini-3.1-flash-image | Default generalist image generation and editing for quality, 4K support, text rendering, and volume |
| Nano Banana Pro | gemini-3-pro-image | Professional assets, stronger text rendering, 4K output, and complex layout reasoning |
| Legacy Nano Banana | gemini-2.5-flash-image | Existing workflows already tuned for the older Gemini 2.5 Flash Image route |
Older code and older posts may still use gemini-3.1-flash-image-preview or gemini-3-pro-image-preview. Do not use those as the current default IDs in a new integration unless you are intentionally maintaining an older compatibility path.
Model Choice And Current Official Pricing
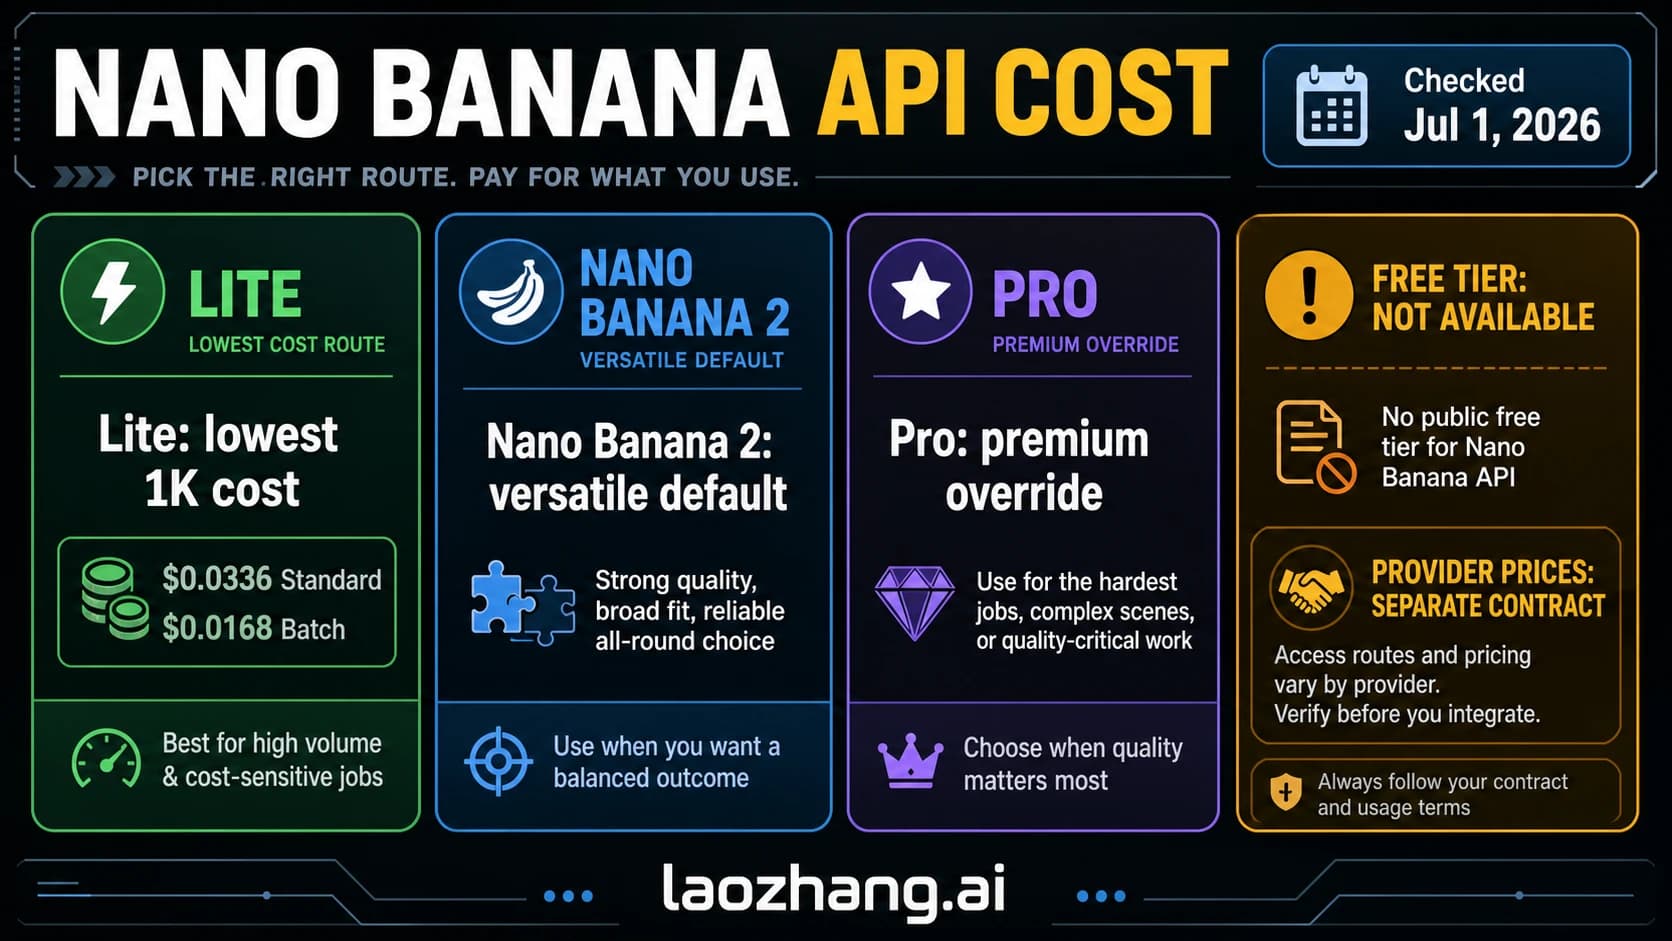
Start with Nano Banana 2 unless you can name a reason to go cheaper or more expensive. Use Lite only when the job is genuinely speed-and-cost constrained at 1K. Use Pro only when output quality, rendered text, complex visual instructions, or 4K/professional asset production is the real bottleneck.
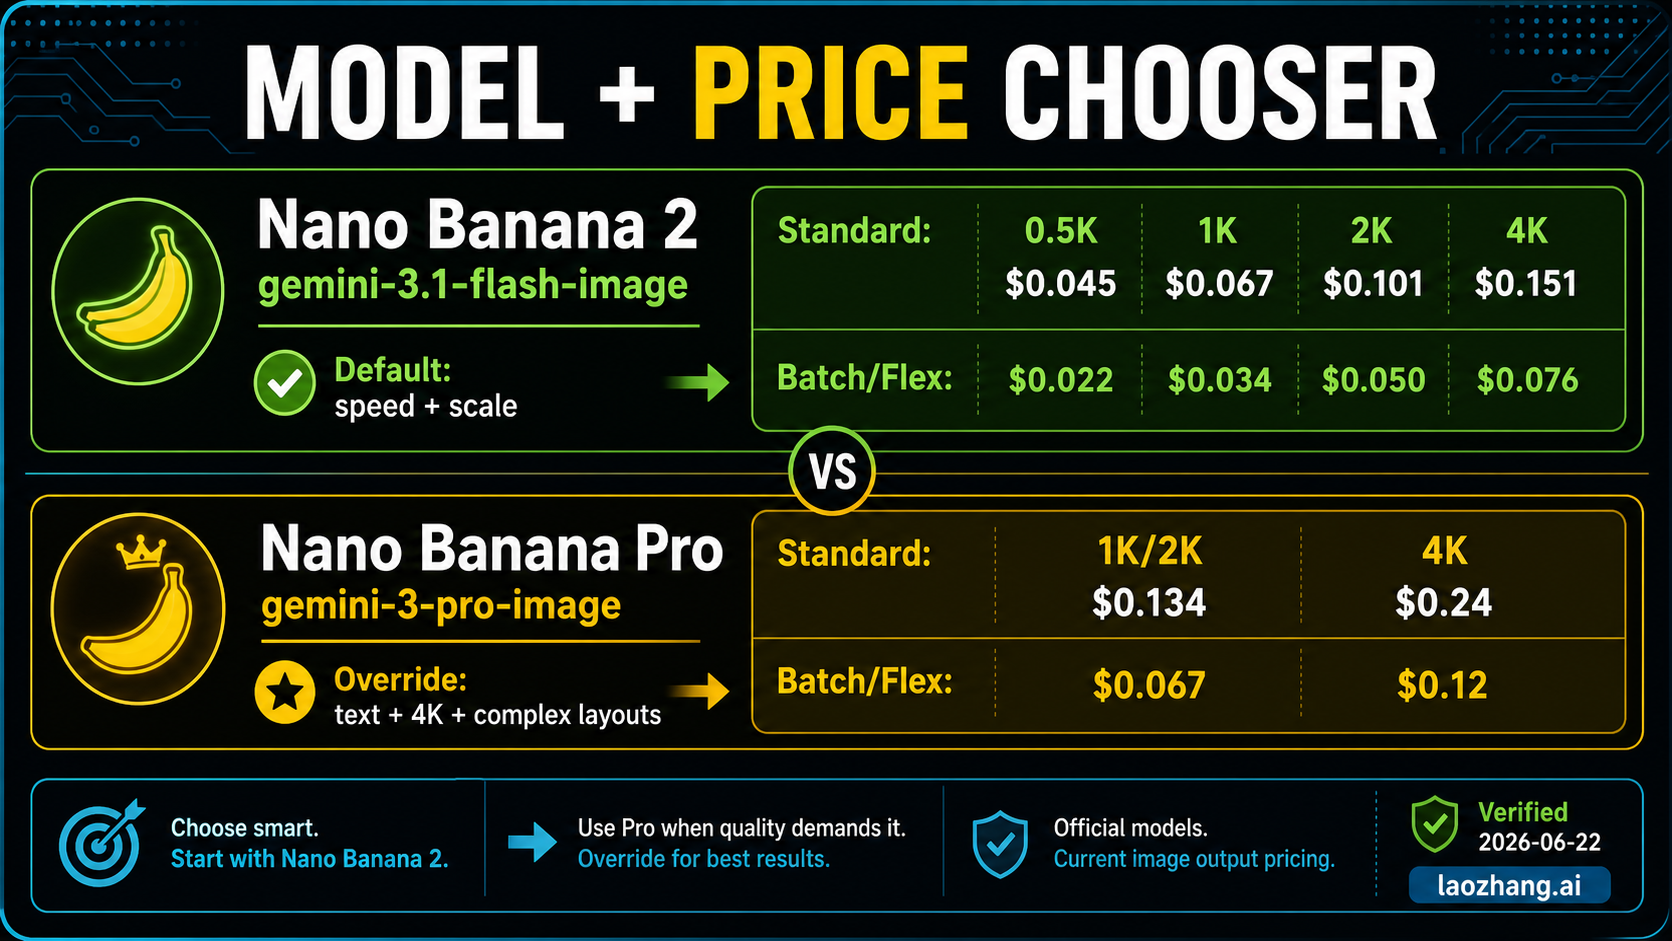
The model choice and cost choice should be made together. As of July 1, 2026, the Gemini Developer API pricing page lists these image-output rows for the models used in this setup path:
| Model | Standard image output | Batch or Batch/Flex image output | Default decision |
|---|---|---|---|
Nano Banana 2 Lite (gemini-3.1-flash-lite-image) | 1K $0.0336 | 1K $0.0168 Batch | Use only when 1K speed/cost is the real constraint |
Nano Banana 2 (gemini-3.1-flash-image) | 0.5K $0.045, 1K $0.067, 2K $0.101, 4K $0.151 | 0.5K $0.022, 1K $0.034, 2K $0.050, 4K $0.076 | Use first for most integrations |
Nano Banana Pro (gemini-3-pro-image) | 1K/2K $0.134, 4K $0.24 | 1K/2K $0.067, 4K $0.12 | Use when the workload justifies Pro |
The useful interpretation is not "Pro is better, so start there." A better rule is:
- Start with
gemini-3.1-flash-imagewhen you need a strong default for generation, editing, text rendering, 4K, or meaningful volume. - Drop to
gemini-3.1-flash-lite-imagewhen you can accept the Lite constraints and the target is cost-effective 1K output. - Move to
gemini-3-pro-imagewhen the extra cost is tied to a real output requirement: text, layout, 4K, or professional fidelity. - Use Batch or Flex only when the job can tolerate that execution mode. It lowers official cost, but it is not a drop-in answer for every real-time product path.
For a deeper cost-only breakdown, use the sibling Nano Banana 2 pricing guide, Nano Banana Pro pricing guide, or Gemini 3 Pro Image pricing guide. Keep pricing tied to the setup path so the first request uses the right model from the start.
API Key, Billing, And Live Limits Before Code
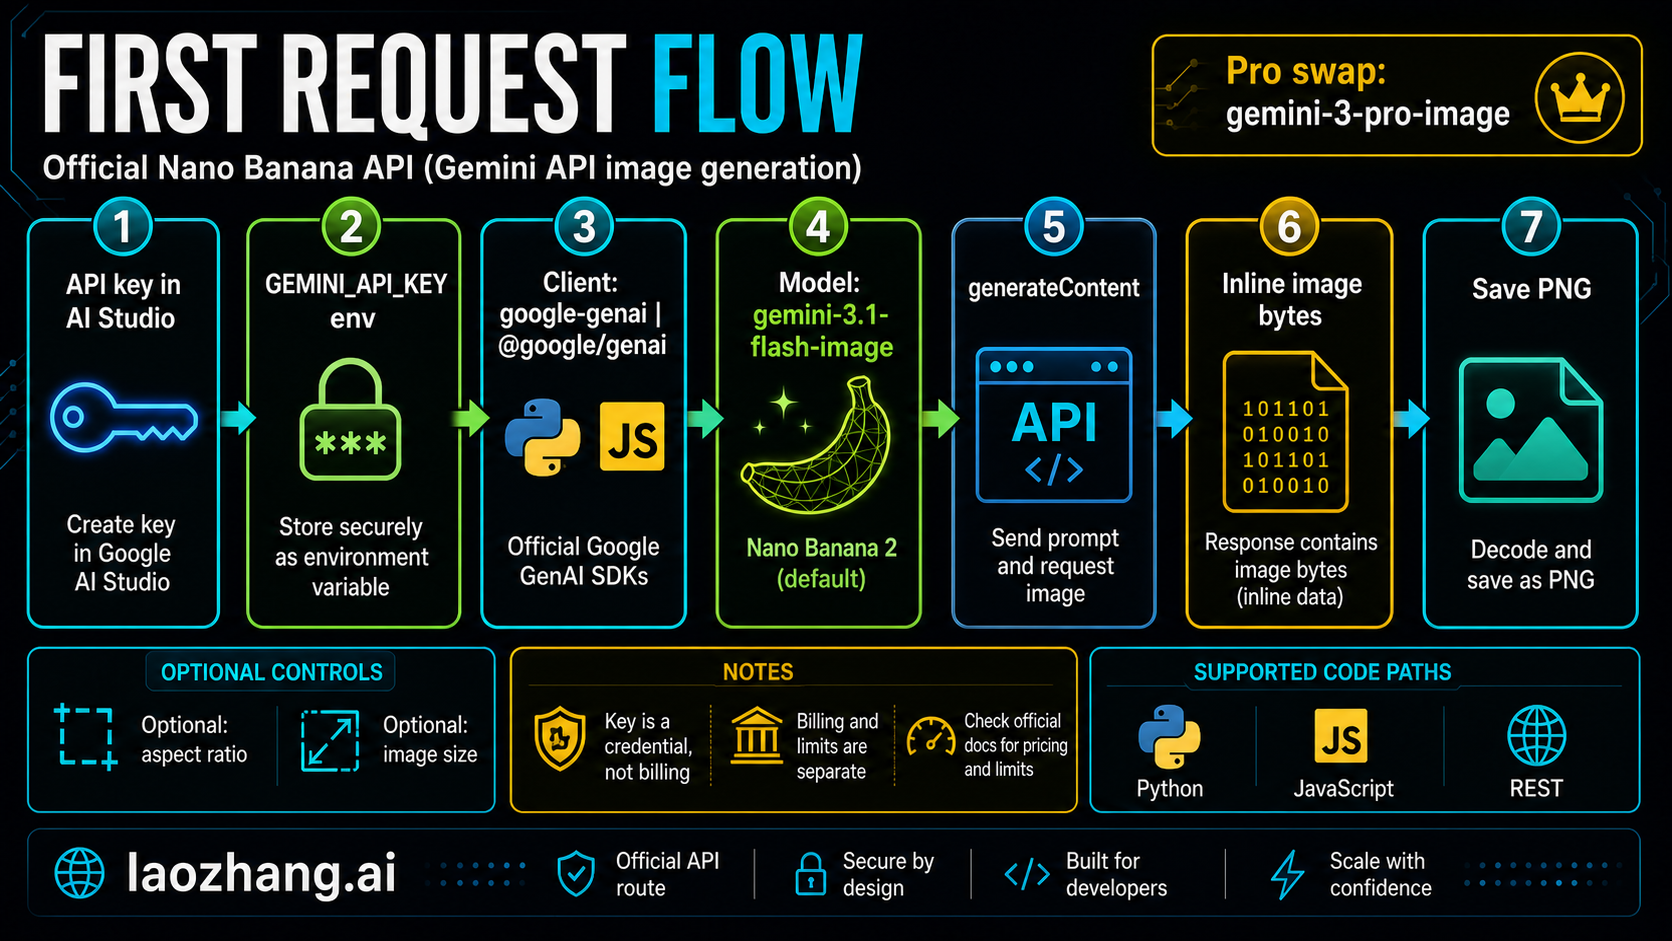
Create the API key in Google AI Studio, then store it as an environment variable. The quickstart path is simple, but the operating boundary is not optional:
- The API key authenticates your request.
- The Google Cloud project and billing account own cost.
- Live limits are project-level, not independent properties of a copied key.
- Region and eligibility rules still apply.
- Provider credits or consumer app quotas do not prove official API entitlement.
Google's API key documentation also adds a 2026 key-management caveat: every Gemini API key is associated with a Google Cloud project, dormant unrestricted keys can be blocked, and new AI Studio keys are created as auth keys. Treat that as a reason to restrict keys and keep them out of source code, not as a reason to bury key setup under wrapper advice.
Use a local .env or your deployment platform's secret manager:
export GEMINI_API_KEY="YOUR_KEY_HERE"For production, keep three checks next to the key:
| Check | Where to verify | Why it matters |
|---|---|---|
| Billing | Google billing / Gemini billing docs | A working key can still fail or cost differently if the project billing contract is wrong |
| Rate limits | AI Studio or the rate-limit docs | Limits are project-level and can vary by tier and model |
| Region / eligibility | Gemini available regions and terms | Availability is not universal across every country, account, or user profile |
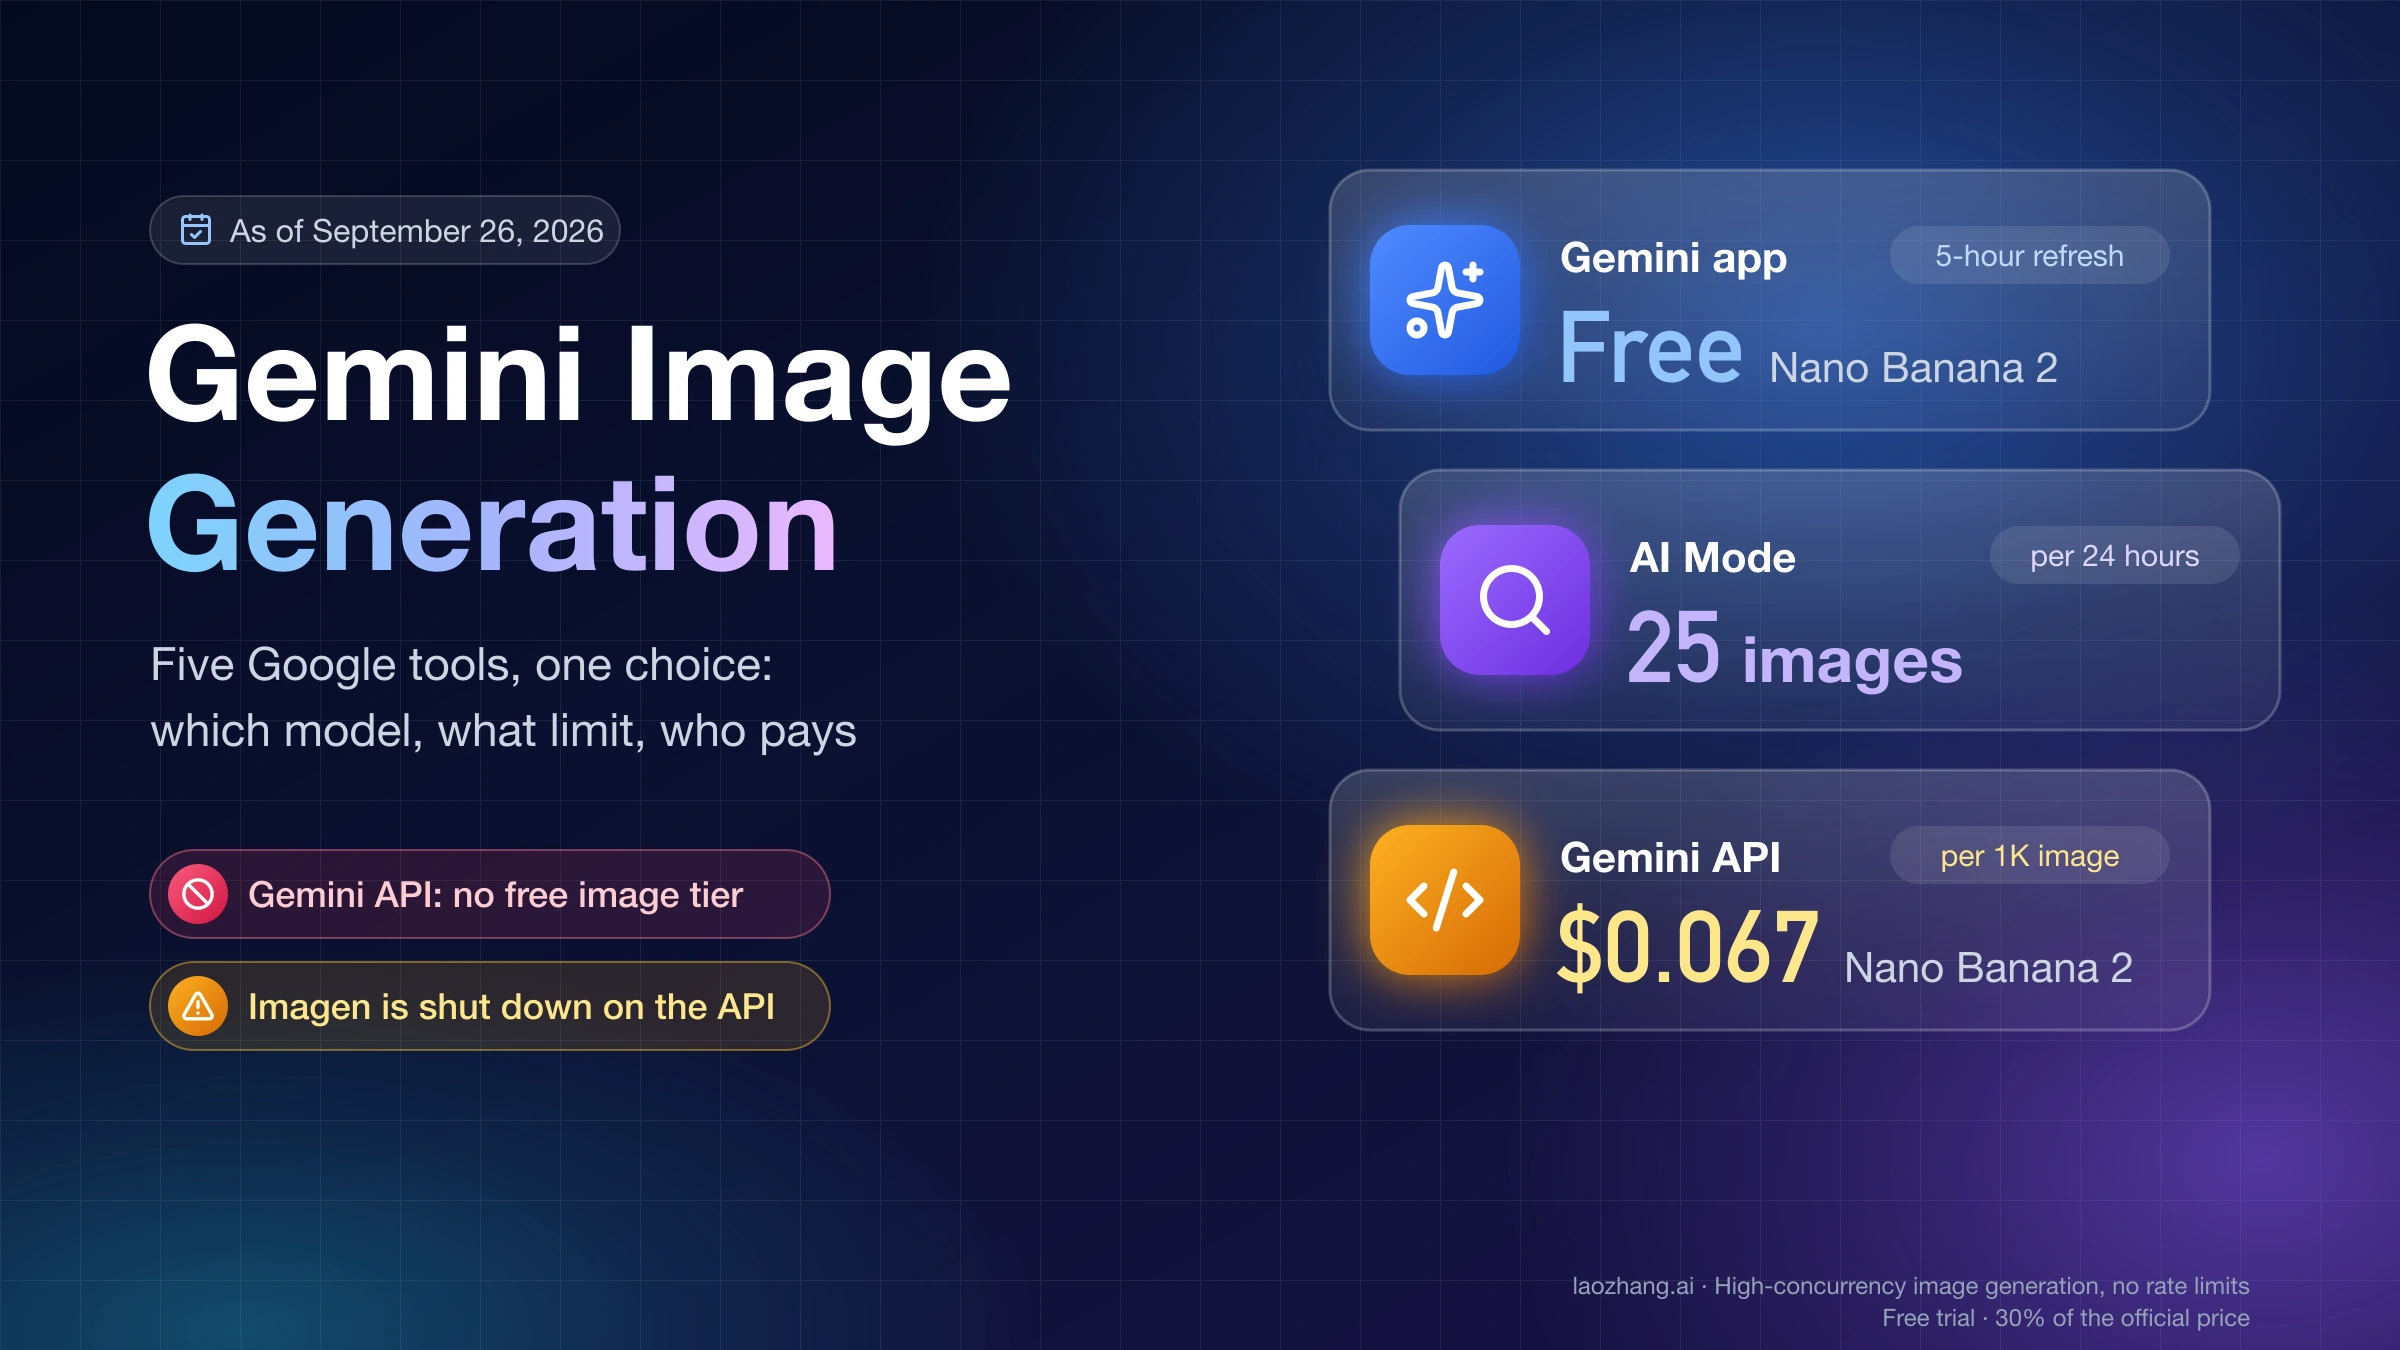
This is also where many "free API key" claims break down. A low-friction key creation flow is not the same as free image output. For current Nano Banana image API work, use the official pricing row as the cost owner and treat consumer quotas, Google account perks, and provider credits as different product surfaces.
Interactions API Or generateContent?
For a fresh integration, prefer the Interactions API path on Google's current Nano Banana image-generation page because Google marks it generally available and recommends it for the latest models and features. The core setup still looks familiar: load GEMINI_API_KEY, select a current model ID, send text or image input, then save the returned image data.
The generateContent examples below remain useful when you need the older request shape, are maintaining an existing integration, or want to compare SDK behavior against the generateContent toggle in the official docs. Do not let the API surface choice hide the bigger setup rule: the key belongs to a Google Cloud project, limits are project-level, and current image output is priced by the official model rows.
Python First Request
Install the current Python SDK:
pip install -U google-genai pillowThen make the smallest useful request with the default Nano Banana 2 model:
import os
from google import genai
from google.genai import types

client = genai.Client(api_key=os.environ["GEMINI_API_KEY"])

response = client.models.generate_content(
    model="gemini-3.1-flash-image",
    contents=[
        "Create a clean 16:9 technical illustration of an API key becoming an image output."
    ],
    config=types.GenerateContentConfig(
        response_modalities=["Image"],
        response_format={
            "image": {
                "aspect_ratio": "16:9",
                "image_size": "2K",
            }
        },
    ),
)

for part in response.parts:
    image = part.as_image()
    if image is not None:
        image.save("nano-banana-output.png")
The important parts are the model ID, response_modalities=["Image"], and the response_format.image block. If you need text plus image in the response, use both modalities and handle both part.text and image parts. If you need only the image, keep the request narrow and save the returned image explicitly.
Switching to Pro should be a small code change, not a separate architecture:
model="gemini-3-pro-image"Make that swap only after a real output test shows the default model is not enough.
JavaScript First Request
Install the current JavaScript package:
npm install @google/genaiThen call the same default model:
import { GoogleGenAI } from "@google/genai";
import fs from "node:fs";

const ai = new GoogleGenAI({ apiKey: process.env.GEMINI_API_KEY });

const response = await ai.models.generateContent({
  model: "gemini-3.1-flash-image",
  contents: "Create a clean 16:9 technical illustration of an API key becoming an image output.",
  config: {
    responseModalities: ["Image"],
    responseFormat: {
      image: {
        aspectRatio: "16:9",
        imageSize: "2K",
      },
    },
  },
});

for (const part of response.candidates?.[0]?.content?.parts ?? []) {
  const inline = part.inlineData;
  if (!inline?.data) continue;
  fs.writeFileSync("nano-banana-output.png", Buffer.from(inline.data, "base64"));
}
If an older tutorial imports @google/generative-ai, do not copy it blindly into a new 2026 integration. Use the current @google/genai package unless you are maintaining legacy code and have a compatibility reason.
REST Request And Response Shape
REST is useful when you need to verify the wire contract without SDK behavior. For the generateContent route, use the stable model ID in the endpoint:
curl -s -X POST \
  "https://generativelanguage.googleapis.com/v1/models/gemini-3.1-flash-image:generateContent" \
  -H "x-goog-api-key: ${GEMINI_API_KEY}" \
  -H "Content-Type: application/json" \
  -d '{
    "contents": [{
      "parts": [{
        "text": "Create a clean 16:9 technical illustration of an API key becoming an image output."
      }]
    }],
    "generationConfig": {
      "responseModalities": ["Image"],
      "responseFormat": {
        "image": {
          "aspectRatio": "16:9",
          "imageSize": "2K"
        }
      }
    }
  }'
In raw responses, look for inline image data under candidate content parts. The exact SDK wrapper may differ, but the practical job is the same: find the image part, read the MIME type, decode the base64 payload, and write it as an image file.
Response handling is where many first tests look broken even when the request succeeded. A 200 response with no saved file usually means the client code did not walk the image part correctly, requested a mixed text/image response and ignored the image part, or assumed a URL output when the response actually returned inline data. If you hit that shape, compare your handler with the JavaScript and Python loops above before changing models.
Optional Controls Worth Adding Deliberately
Do not add every advanced option to the first request. Add controls when they solve a real workflow issue:
| Control | Use when | Setup note |
|---|---|---|
aspectRatio / aspect_ratio | The product needs a fixed format such as 16:9, 1:1, or vertical mobile output | Put it under the image response format |
imageSize / image_size | You need a specific output tier such as 1K, 2K, or 4K | Tie the choice to the pricing table |
| Image inputs | You need editing, composition, or reference-image work | Make sure the chosen model supports the input count and fidelity need |
| Google Search grounding | The image needs fresh factual context | Treat grounding as a separate capability and cost concern |
| Pro model swap | Text rendering, layout reasoning, or 4K/pro asset fidelity is the blocker | Change only the model ID first, then retest |
Google also documents that generated images include SynthID watermarking. If your product has provenance or disclosure requirements, that is a reason to understand the official route before you decide whether a provider route still helps.
Official Google Route Vs Provider Routes
Provider and gateway routes can be useful. They may give you OpenAI-compatible request formats, a single billing relationship, retry behavior across models, or a preferred operations layer. None of that changes the official Google API contract.
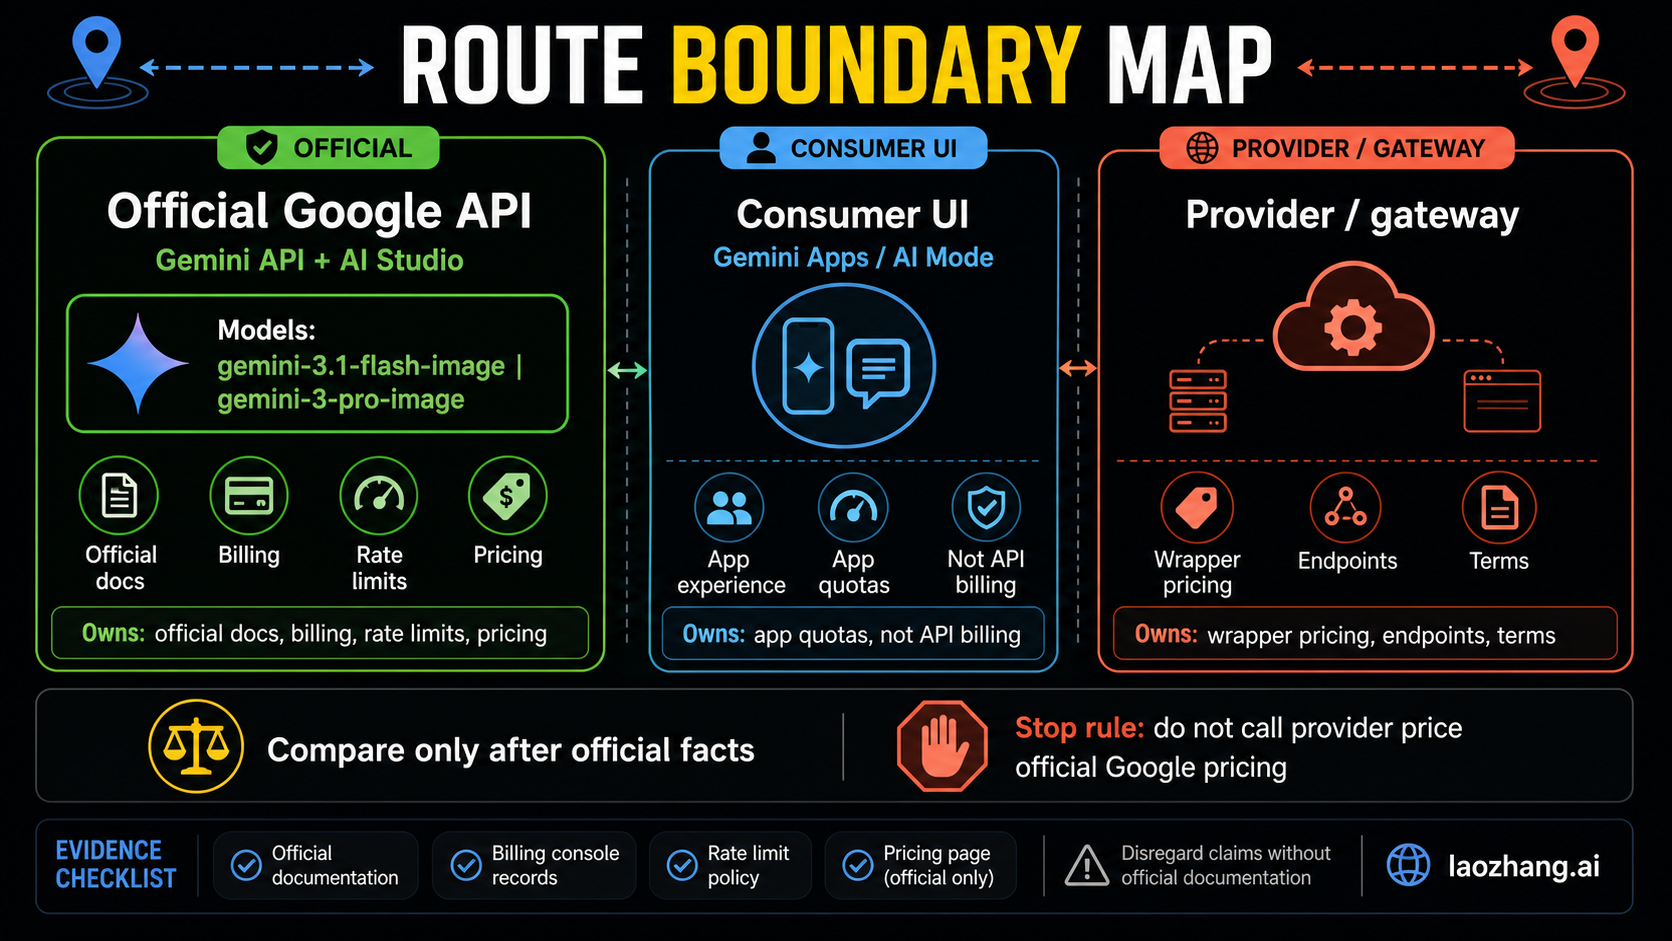
Use this boundary:
| Route | What it owns | What it does not prove |
|---|---|---|
| Official Google API | Google model IDs, official docs, project billing, official pricing, Google rate limits | Provider flat prices or wrapper guarantees |
| Consumer UI | Gemini Apps / AI Mode experience, app quotas, consumer plan behavior | API billing, SDK behavior, or project limits |
| Provider / gateway | Wrapper endpoint, wrapper pricing, gateway terms, compatibility layer | Official Google price rows or official availability |
If a provider route materially improves your workflow, compare it after the official setup is clear. The comparison questions are practical:
- Does it support the current target model?
- Does it preserve the image controls you need?
- Does it expose response data in a format your app can handle?
- Does it state retry, refund, latency, and failure behavior clearly?
- Does its price belong to the provider contract rather than Google's official price sheet?
That last question is the stop rule. A lower provider price can be real and still not be official Google pricing.
Quick Troubleshooting Checklist
Use this order before changing providers or rewriting the whole integration:
- Confirm the model ID is current:
gemini-3.1-flash-lite-image,gemini-3.1-flash-image, orgemini-3-pro-image. - Confirm the key is loaded from
GEMINI_API_KEYand not hardcoded or missing in the runtime. - Confirm billing is enabled and the project is the one attached to the key.
- Confirm live project limits in AI Studio if you see quota or rate-limit errors.
- Confirm your response handler saves inline image bytes instead of expecting a hosted URL.
- Confirm your requested image size matches both the model's supported options and your cost expectations.
- Confirm you are not mixing consumer app quotas, AI Mode behavior, or provider credits into official API logic.
For error-specific work after setup, use the Gemini image common errors guide or the Nano Banana Pro troubleshooting hub.
Frequently Asked Questions
What is the official Nano Banana API model ID in 2026?
Use gemini-3.1-flash-image for the main Nano Banana 2 path, gemini-3.1-flash-lite-image for the Lite speed/cost path, and gemini-3-pro-image for Nano Banana Pro. Treat older *-preview IDs as legacy or historical code unless you have a specific compatibility reason.
Should I start with Nano Banana 2 Lite, Nano Banana 2, or Nano Banana Pro?
Start with Nano Banana 2. Drop to Lite only for cost-sensitive 1K output where its limitations are acceptable. Move to Pro when the output test shows a real need for stronger text rendering, complex layout reasoning, 4K/pro asset quality, or a higher-fidelity professional result.
How do I get a Nano Banana API key?
Create the key in Google AI Studio, store it in GEMINI_API_KEY, and keep billing plus live project limits separate from the key itself. A key is a credential, not a standalone billing or free-tier promise.
Is the Nano Banana API free?
The current image-output rows used by this setup path do not show a free tier on the Gemini Developer API pricing page. Consumer quotas and provider credits are separate product or provider contracts.
What packages should I use for Python and JavaScript?
Use google-genai for Python and @google/genai for JavaScript. Older package names can still appear in stale examples, but they are not the best current default for a new integration.
Does the API return an image URL or image bytes?
The official setup path above handles inline image bytes. Save the returned image part as a PNG or other MIME-appropriate file. Do not assume the response returns a hosted image URL.
When should I use a provider or gateway?
Use one when you can name the infrastructure benefit: OpenAI-compatible routing, unified billing, retries, governance, or multi-model orchestration. Keep provider pricing and limits separate from official Google pricing.
Where should I go after this setup?
For broader model-family context, read the Gemini Image API guide. For Pro economics, read the Nano Banana Pro API guide. For workload choice, read Nano Banana Pro vs Nano Banana 2.