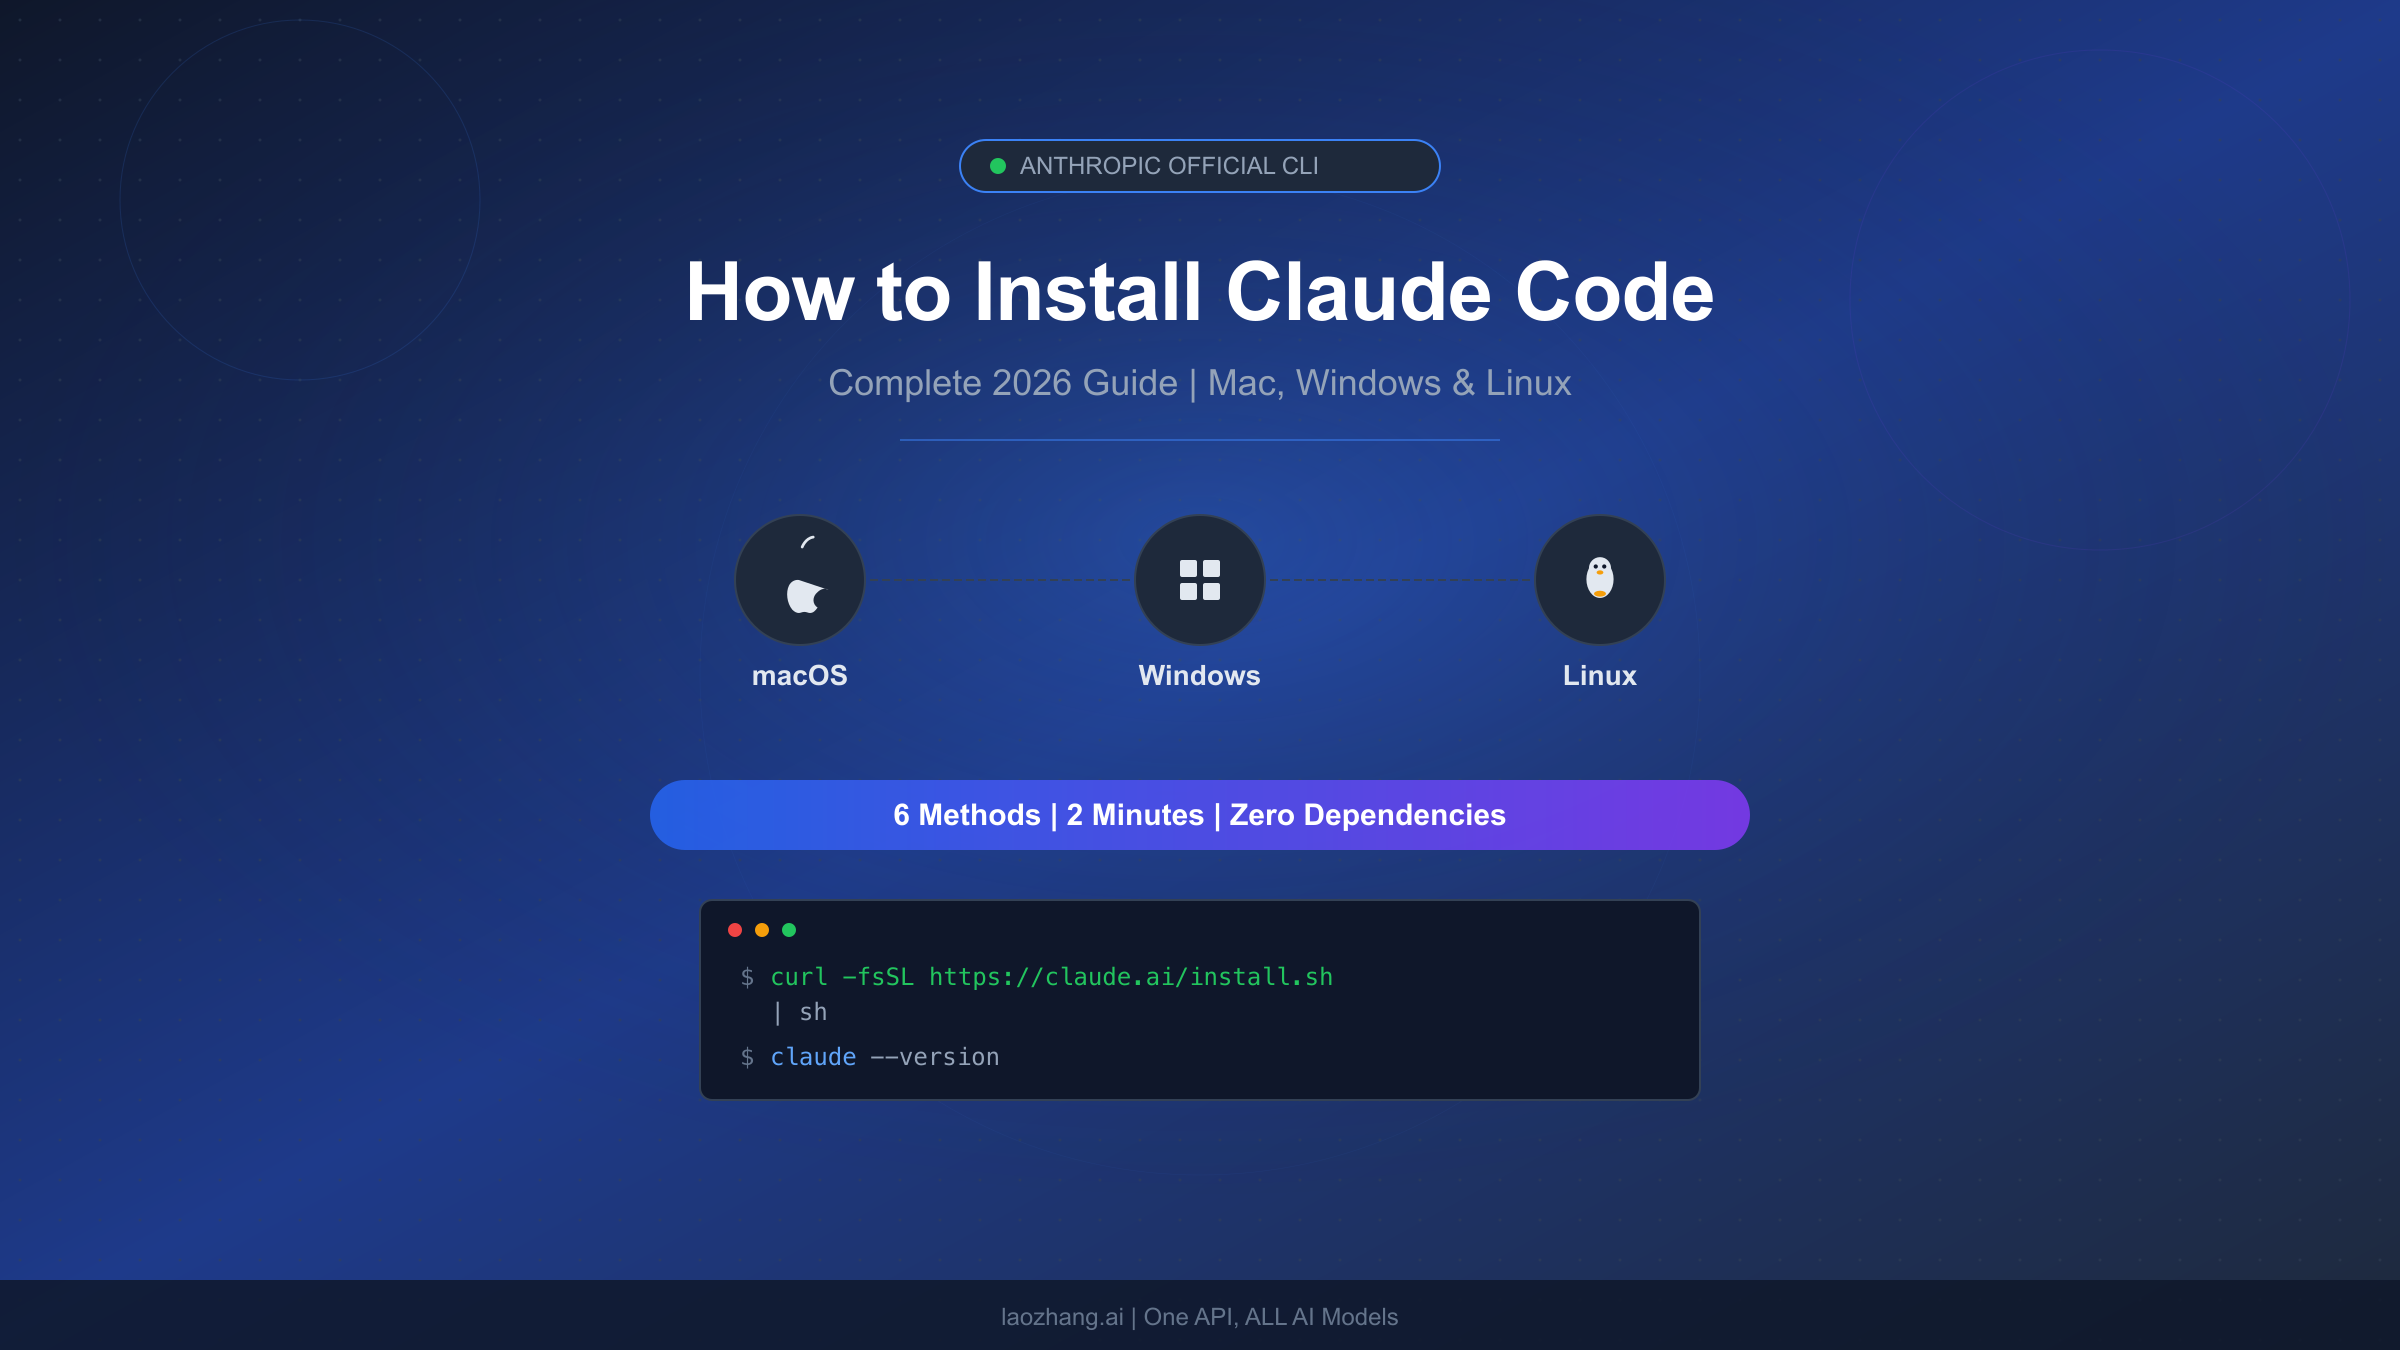
Claude Code is Anthropic's terminal-based AI coding agent that reads your codebase, edits files, runs commands, and manages git — all from the command line. As of March 2026, the recommended installation method is the native CLI installer, which requires zero dependencies, auto-updates in the background, and works on macOS, Linux, and Windows. Whether you are setting up Claude Code for the first time or migrating from an older npm-based installation, this guide walks you through every option available in 2026 so you can start coding with AI assistance in minutes rather than hours.
TL;DR
Claude Code installs with a single command on every major platform. Here is what you need to know before reading the full guide:
- macOS / Linux:
curl -fsSL https://claude.ai/install.sh | bash - Windows PowerShell:
irm https://claude.ai/install.ps1 | iex - Requirements: macOS 13+, Windows 10 1809+, or Ubuntu 20.04+. A Claude Pro subscription ($20/month) or higher is mandatory — the free tier does not include Claude Code access.
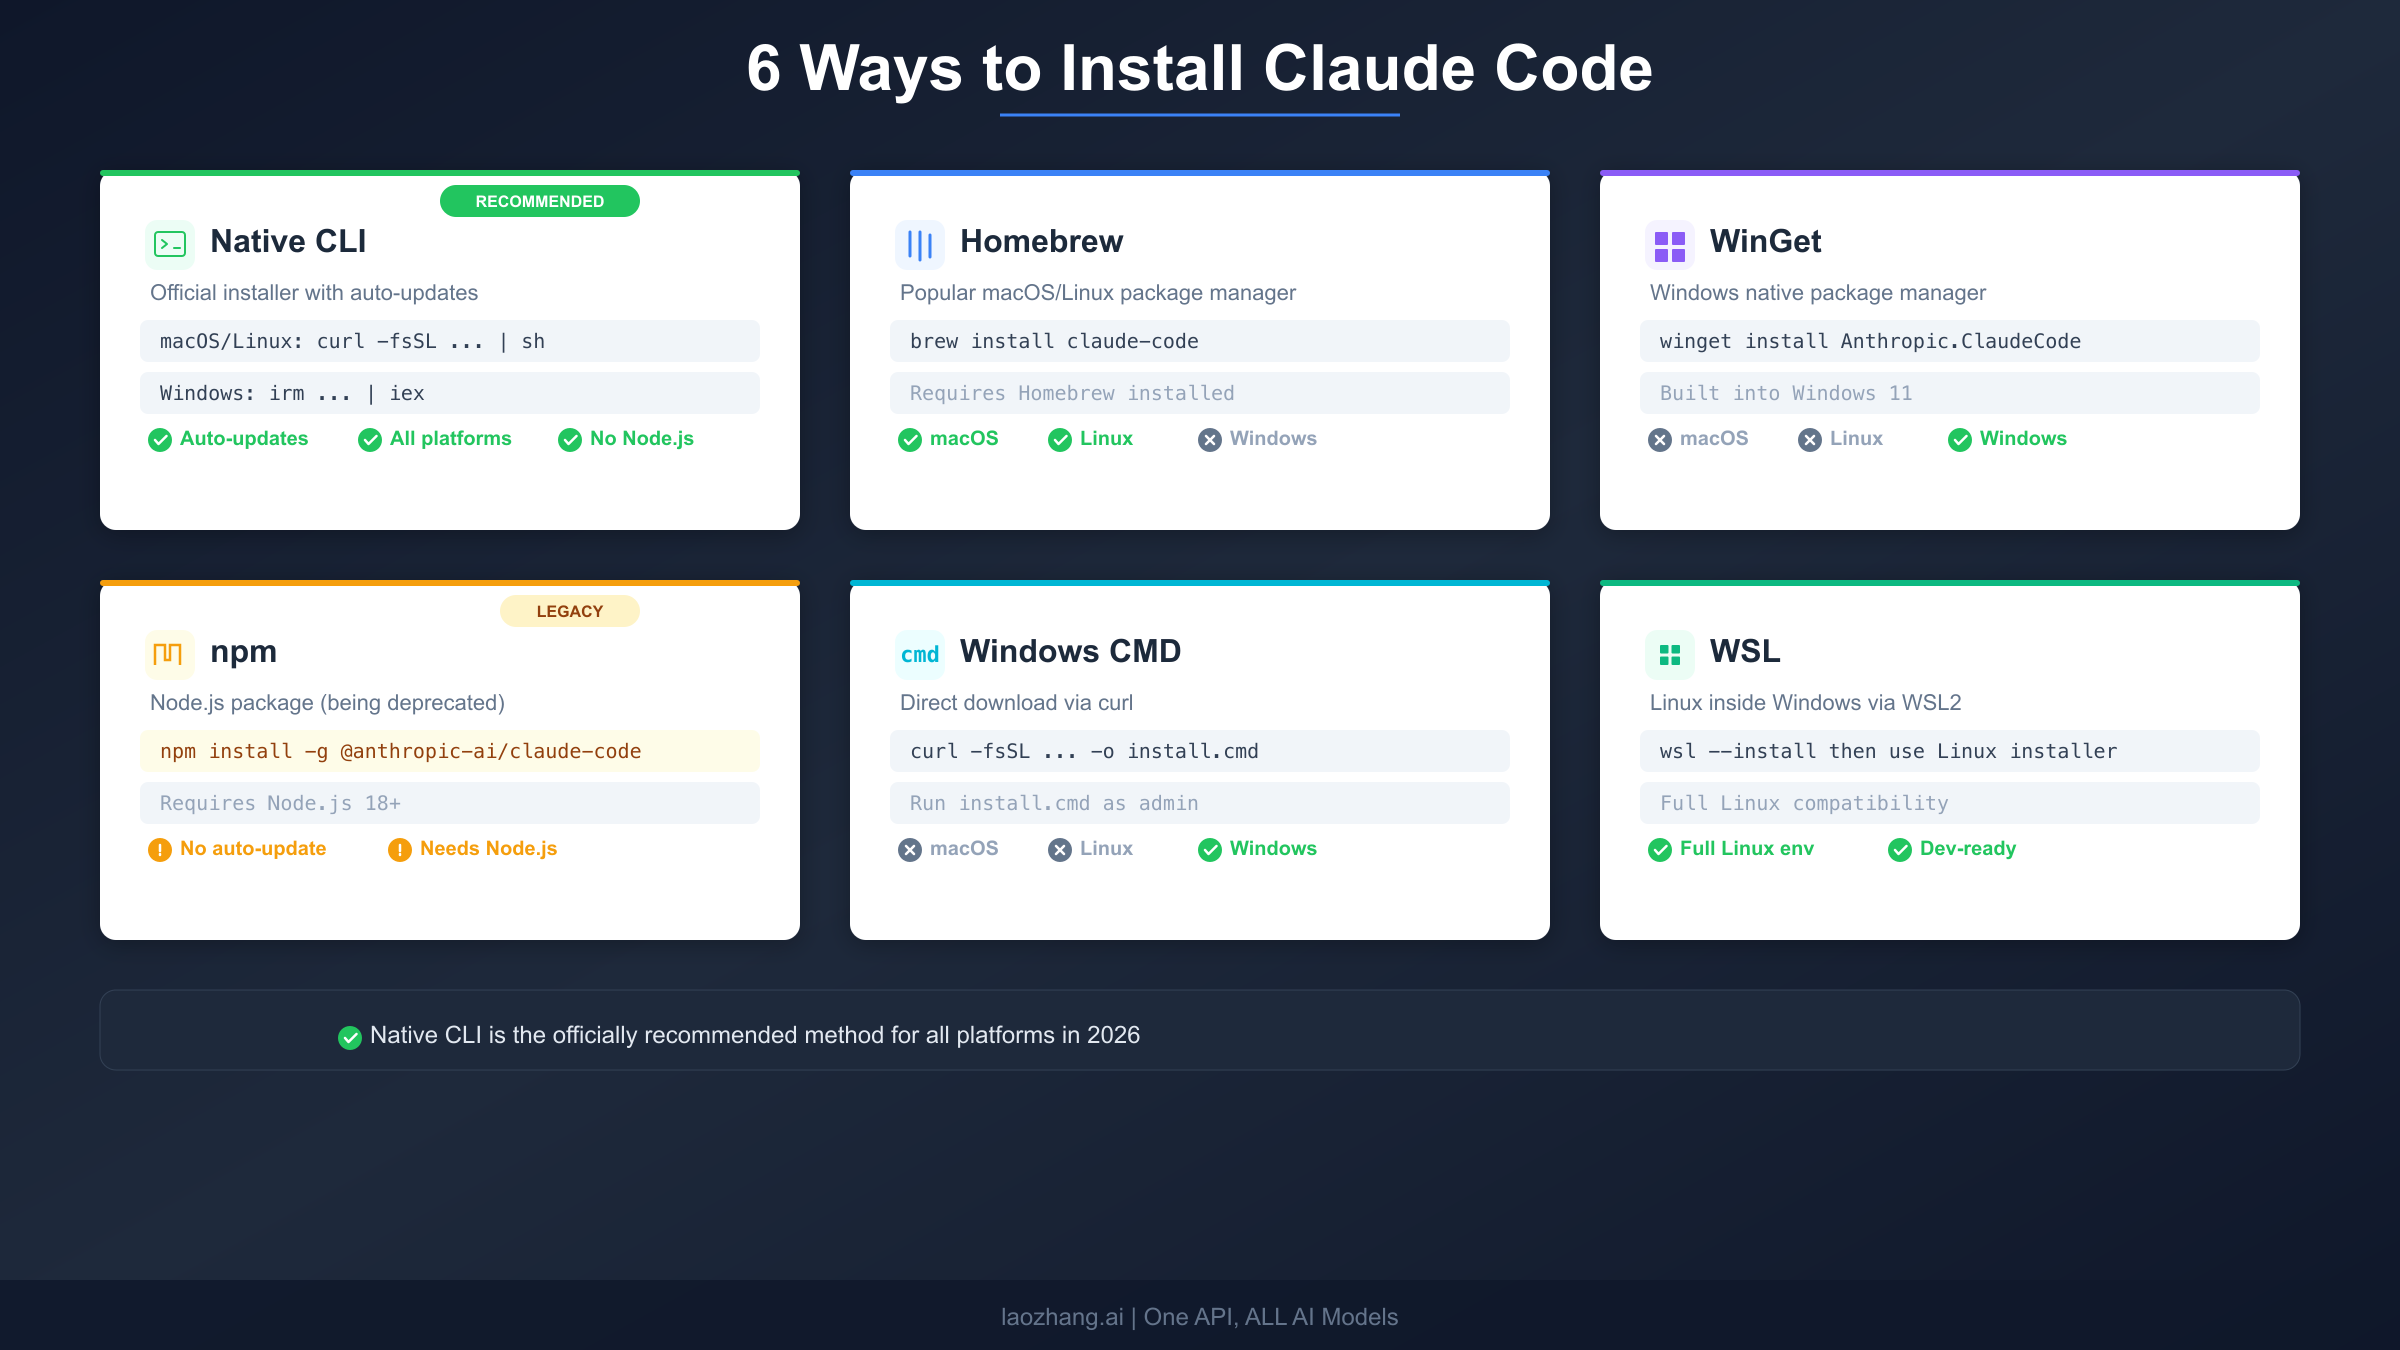
- Six methods exist: Native installer (recommended), Homebrew, WinGet, npm (legacy), Windows CMD, and WSL. The native installer is the only one that auto-updates.
- First launch: Run
claudein your terminal, authenticate through your browser, and you are ready to go.
If you just want the commands and nothing else, copy the one above for your platform and skip to the Authentication and First Launch section. For everyone who wants to understand the differences between methods, handle Windows edge cases, or pick the right Claude plan, keep reading.
What You Need Before Installing Claude Code
Before running any installation command, you need to verify two things: your operating system meets the minimum requirements, and you have the right kind of Anthropic account. Skipping this step is the number one reason developers waste time on failed installations.
System Requirements
Claude Code supports three major platforms, but the version requirements are stricter than most CLI tools. Running on an older operating system version will cause silent failures during installation or authentication, so check your version first.
On macOS, you need version 13.0 (Ventura) or later. Apple Silicon and Intel machines are both supported through the native installer. If you are unsure of your version, click the Apple menu and select "About This Mac." Most developers running Xcode-compatible setups already meet this requirement, but it catches people who are still on older MacBook hardware running macOS Monterey or earlier. The terminal app that ships with macOS works perfectly — you do not need iTerm2 or any third-party terminal, though they work fine too.
On Windows, you need version 10 build 1809 or later, which covers Windows 10 October 2018 Update and everything since, including Windows 11. The critical prerequisite that most guides gloss over is that the native Windows installer requires Git for Windows to be installed first. Without it, the installer will fail silently or produce confusing error messages. Download Git for Windows from git-scm.com, run the installer with default settings, and restart your terminal so the PATH picks up the new git command. Windows Server 2019 and later is also supported for CI/CD use cases.
On Linux, Ubuntu 20.04 and later is officially supported, along with most modern distributions that ship with glibc 2.31 or newer. Debian 11+, Fedora 36+, and Arch Linux all work without issues. The installer detects your architecture automatically (x86_64 or ARM64), so there is nothing extra to configure. If you are running Linux inside WSL on a Windows machine, the Linux installation method works identically — more on that in the Windows section below.
Across all platforms, you need at least 4 GB of RAM (8 GB recommended) and a stable internet connection for the initial download and authentication. The installed binary is relatively small (under 100 MB), so disk space is rarely a concern.
Choosing the Right Account
This is where many developers hit an unexpected wall. Claude Code is not available on the free Claude.ai plan. You must have one of the following account types to authenticate and use Claude Code:
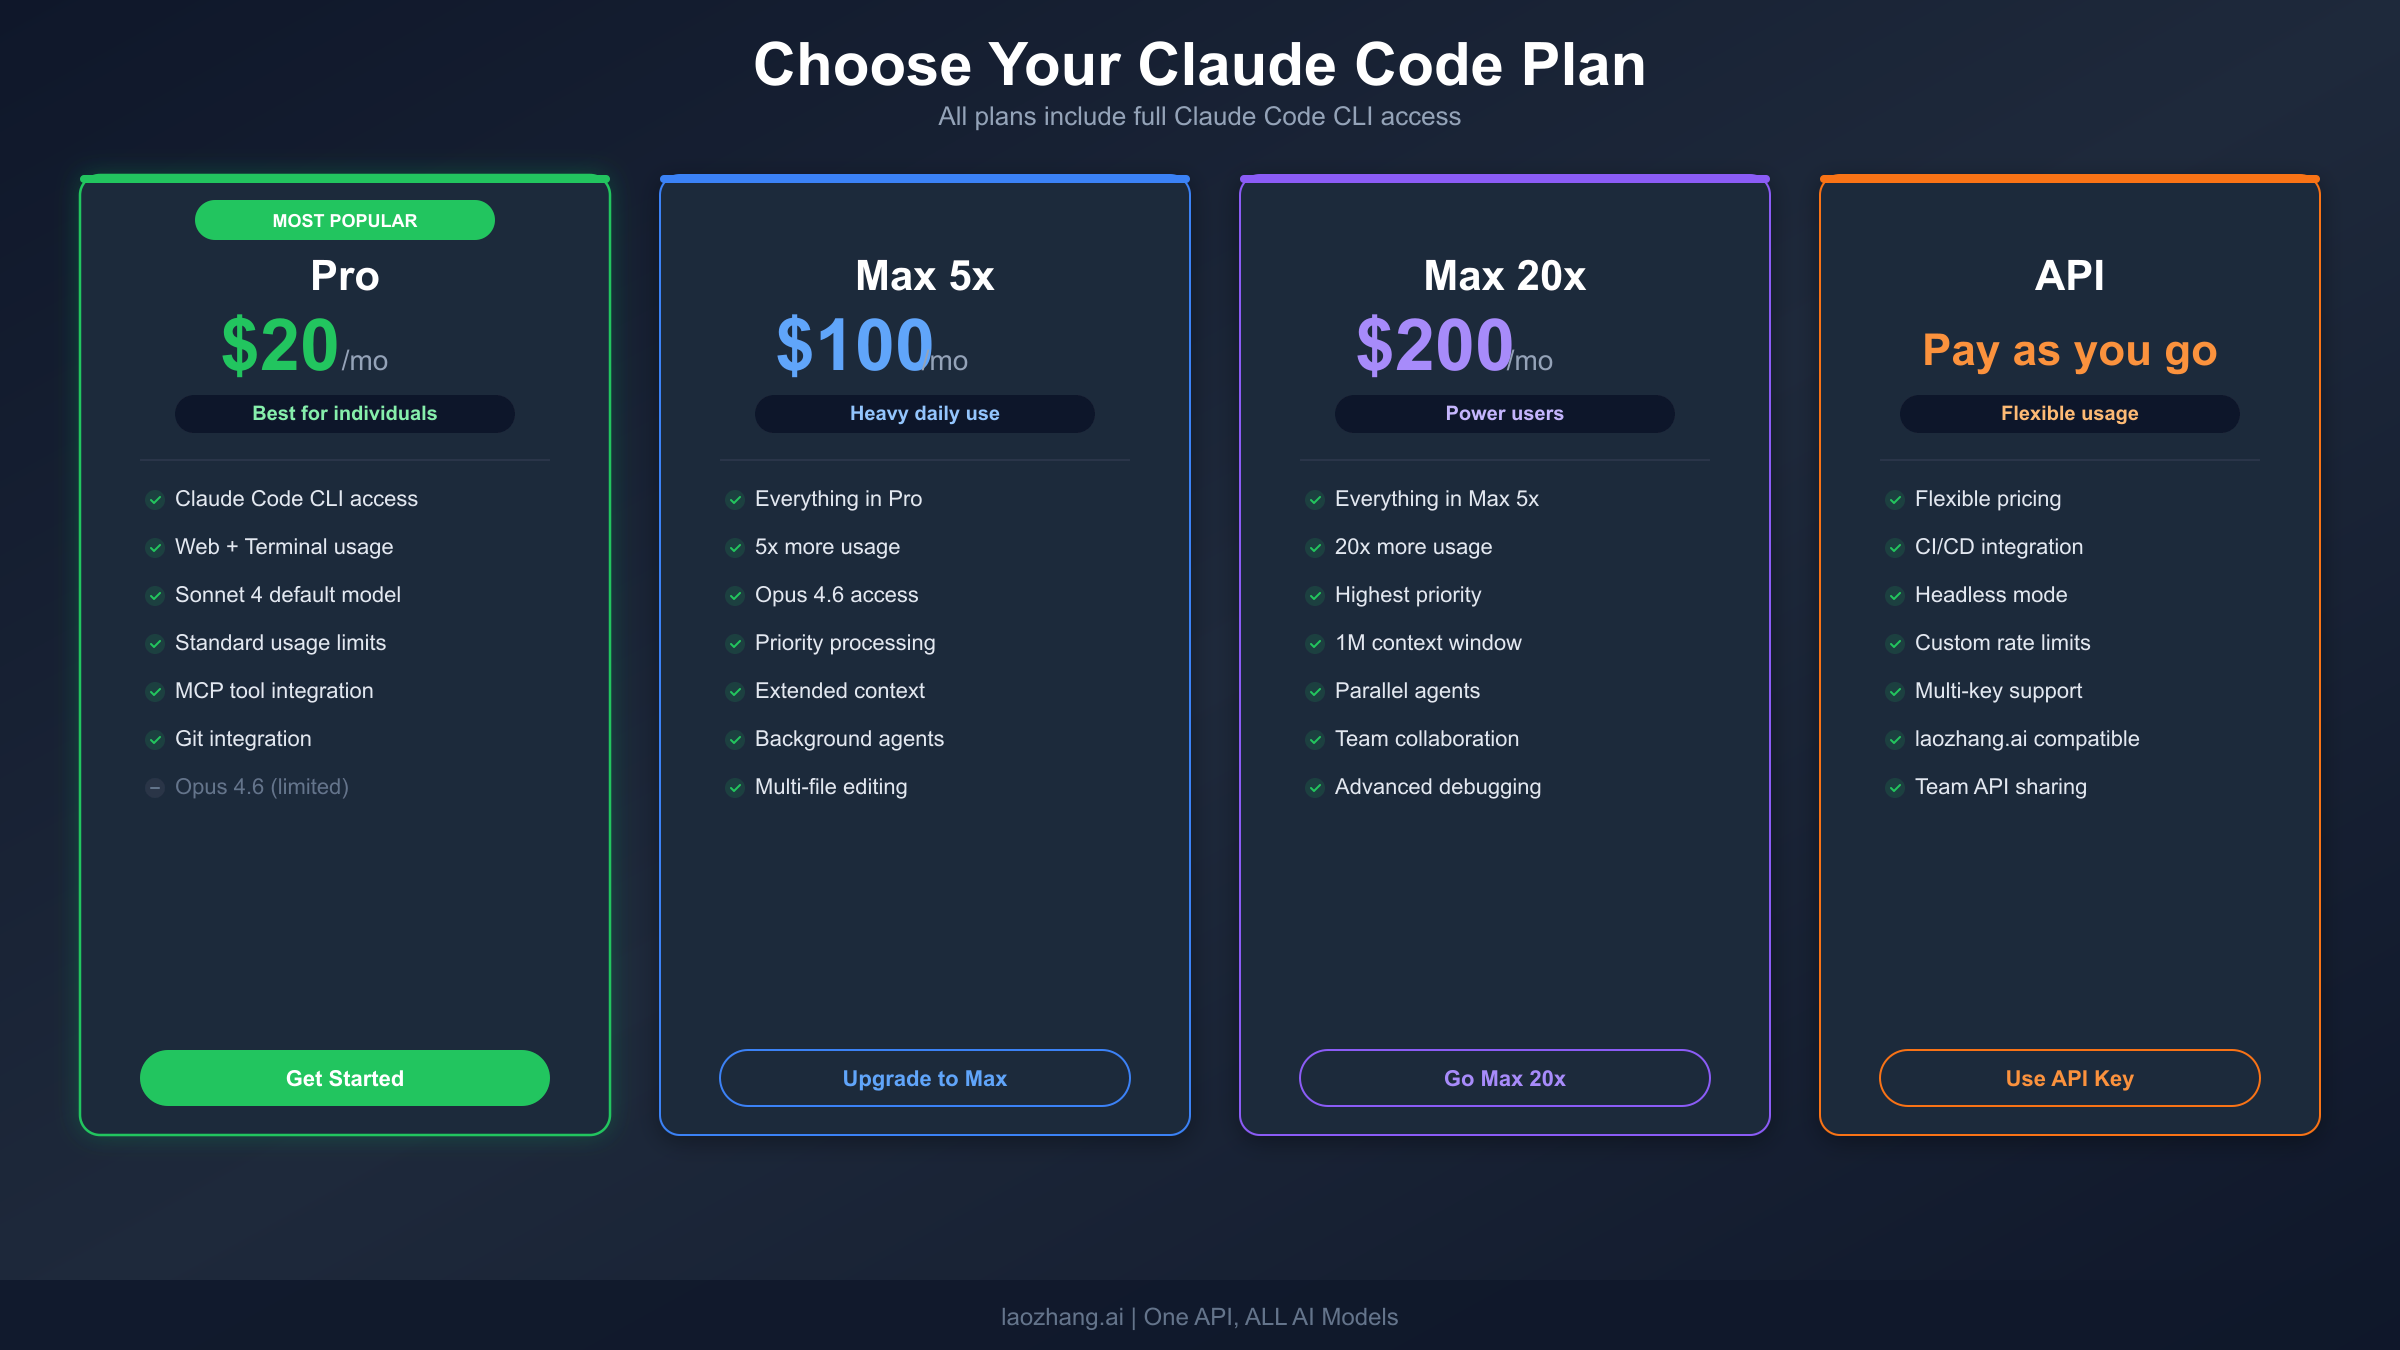
| Account Type | Monthly Cost | Best For | Claude Code Access |
|---|---|---|---|
| Claude Pro | $20/mo ($17 annual) | Individual developers | Yes — Sonnet 4.6 |
| Claude Max 5x | $100/mo | Daily heavy users | Yes — Opus 4.6 + 5x limits |
| Claude Max 20x | $200/mo | Power users, teams | Yes — Opus 4.6 + 20x limits |
| Teams Standard | $25/seat/mo | Small teams | Yes — Pro-level per seat |
| Anthropic Console | Pay-as-you-go | API-first / CI/CD | Yes — via API key |
If you are trying Claude Code for the first time, the Pro plan at $20 per month is the most sensible starting point. It gives you access to Claude Code in the terminal plus the web interface, and you can upgrade to Max later if you find yourself hitting rate limits during intensive coding sessions. For teams evaluating Claude Code across multiple developers, the Teams plan provides centralized billing and admin controls. The Anthropic Console option is ideal if you only plan to use Claude Code in CI/CD pipelines or prefer pay-per-token pricing rather than a monthly subscription — when you first log in with a Console account, a "Claude Code" workspace is automatically created for cost tracking.
Install Claude Code on macOS and Linux
Installation on macOS and Linux is straightforward because both platforms share the same installer script. The native installer downloads a statically compiled binary for your specific platform and architecture, which means it starts faster and runs more reliably than the npm-based version that required the Node.js runtime to execute. There are no dependencies to manage, no version conflicts with Node.js or nvm, and updates happen automatically in the background.
Native Installer (Recommended)
Open your terminal and run a single command:
bashcurl -fsSL https://claude.ai/install.sh | bash
This script downloads the Claude Code binary, places it in a system-accessible location, and updates your shell PATH so the claude command is available globally. The entire process takes about 30 seconds on a decent internet connection. After installation, open a new terminal window (or run source ~/.zshrc on macOS, source ~/.bashrc on Linux) so your shell picks up the new PATH entry.
The native installer's biggest advantage is automatic updates. Every time you launch Claude Code, it checks for new versions and seamlessly applies updates in the background. You never need to re-run the installer or remember to check for updates — it just stays current. This is particularly important because Anthropic ships improvements to Claude Code weekly, and older versions sometimes lose compatibility with the API.
If the idea of piping a script directly into bash makes you uncomfortable from a security perspective, you can download the script first, inspect it, and then run it manually. This is a perfectly valid approach:
bashcurl -fsSL https://claude.ai/install.sh -o install-claude.sh
less install-claude.sh  # review the script
bash install-claude.sh
Homebrew Alternative
For developers who prefer managing their tools through Homebrew, Claude Code is available as a cask:
bashbrew install --cask claude-code
This method works on both macOS and Linux (via Linuxbrew). The trade-off is that Homebrew installations do not auto-update. You need to run brew upgrade claude-code periodically to get new features and security fixes. For most developers who already use Homebrew for everything, the convenience of staying within a familiar package manager outweighs the manual update step.
To check which version you have installed:
bashclaude --version
And to update later:
bashbrew upgrade claude-code
The Homebrew installation places Claude Code in /opt/homebrew/bin/ on Apple Silicon Macs or /usr/local/bin/ on Intel Macs. If you later decide to switch to the native installer for auto-updates, uninstall the Homebrew version first with brew uninstall claude-code to avoid having two copies of the binary in different locations, which can cause confusion about which version is running.
Verify Your Installation
Regardless of which method you chose, verify that Claude Code is accessible by running:
bashwhich claude
claude --version
If which claude returns a path and claude --version shows a version number, your installation is complete. If you get "command not found," check the troubleshooting section below.
Install Claude Code on Windows
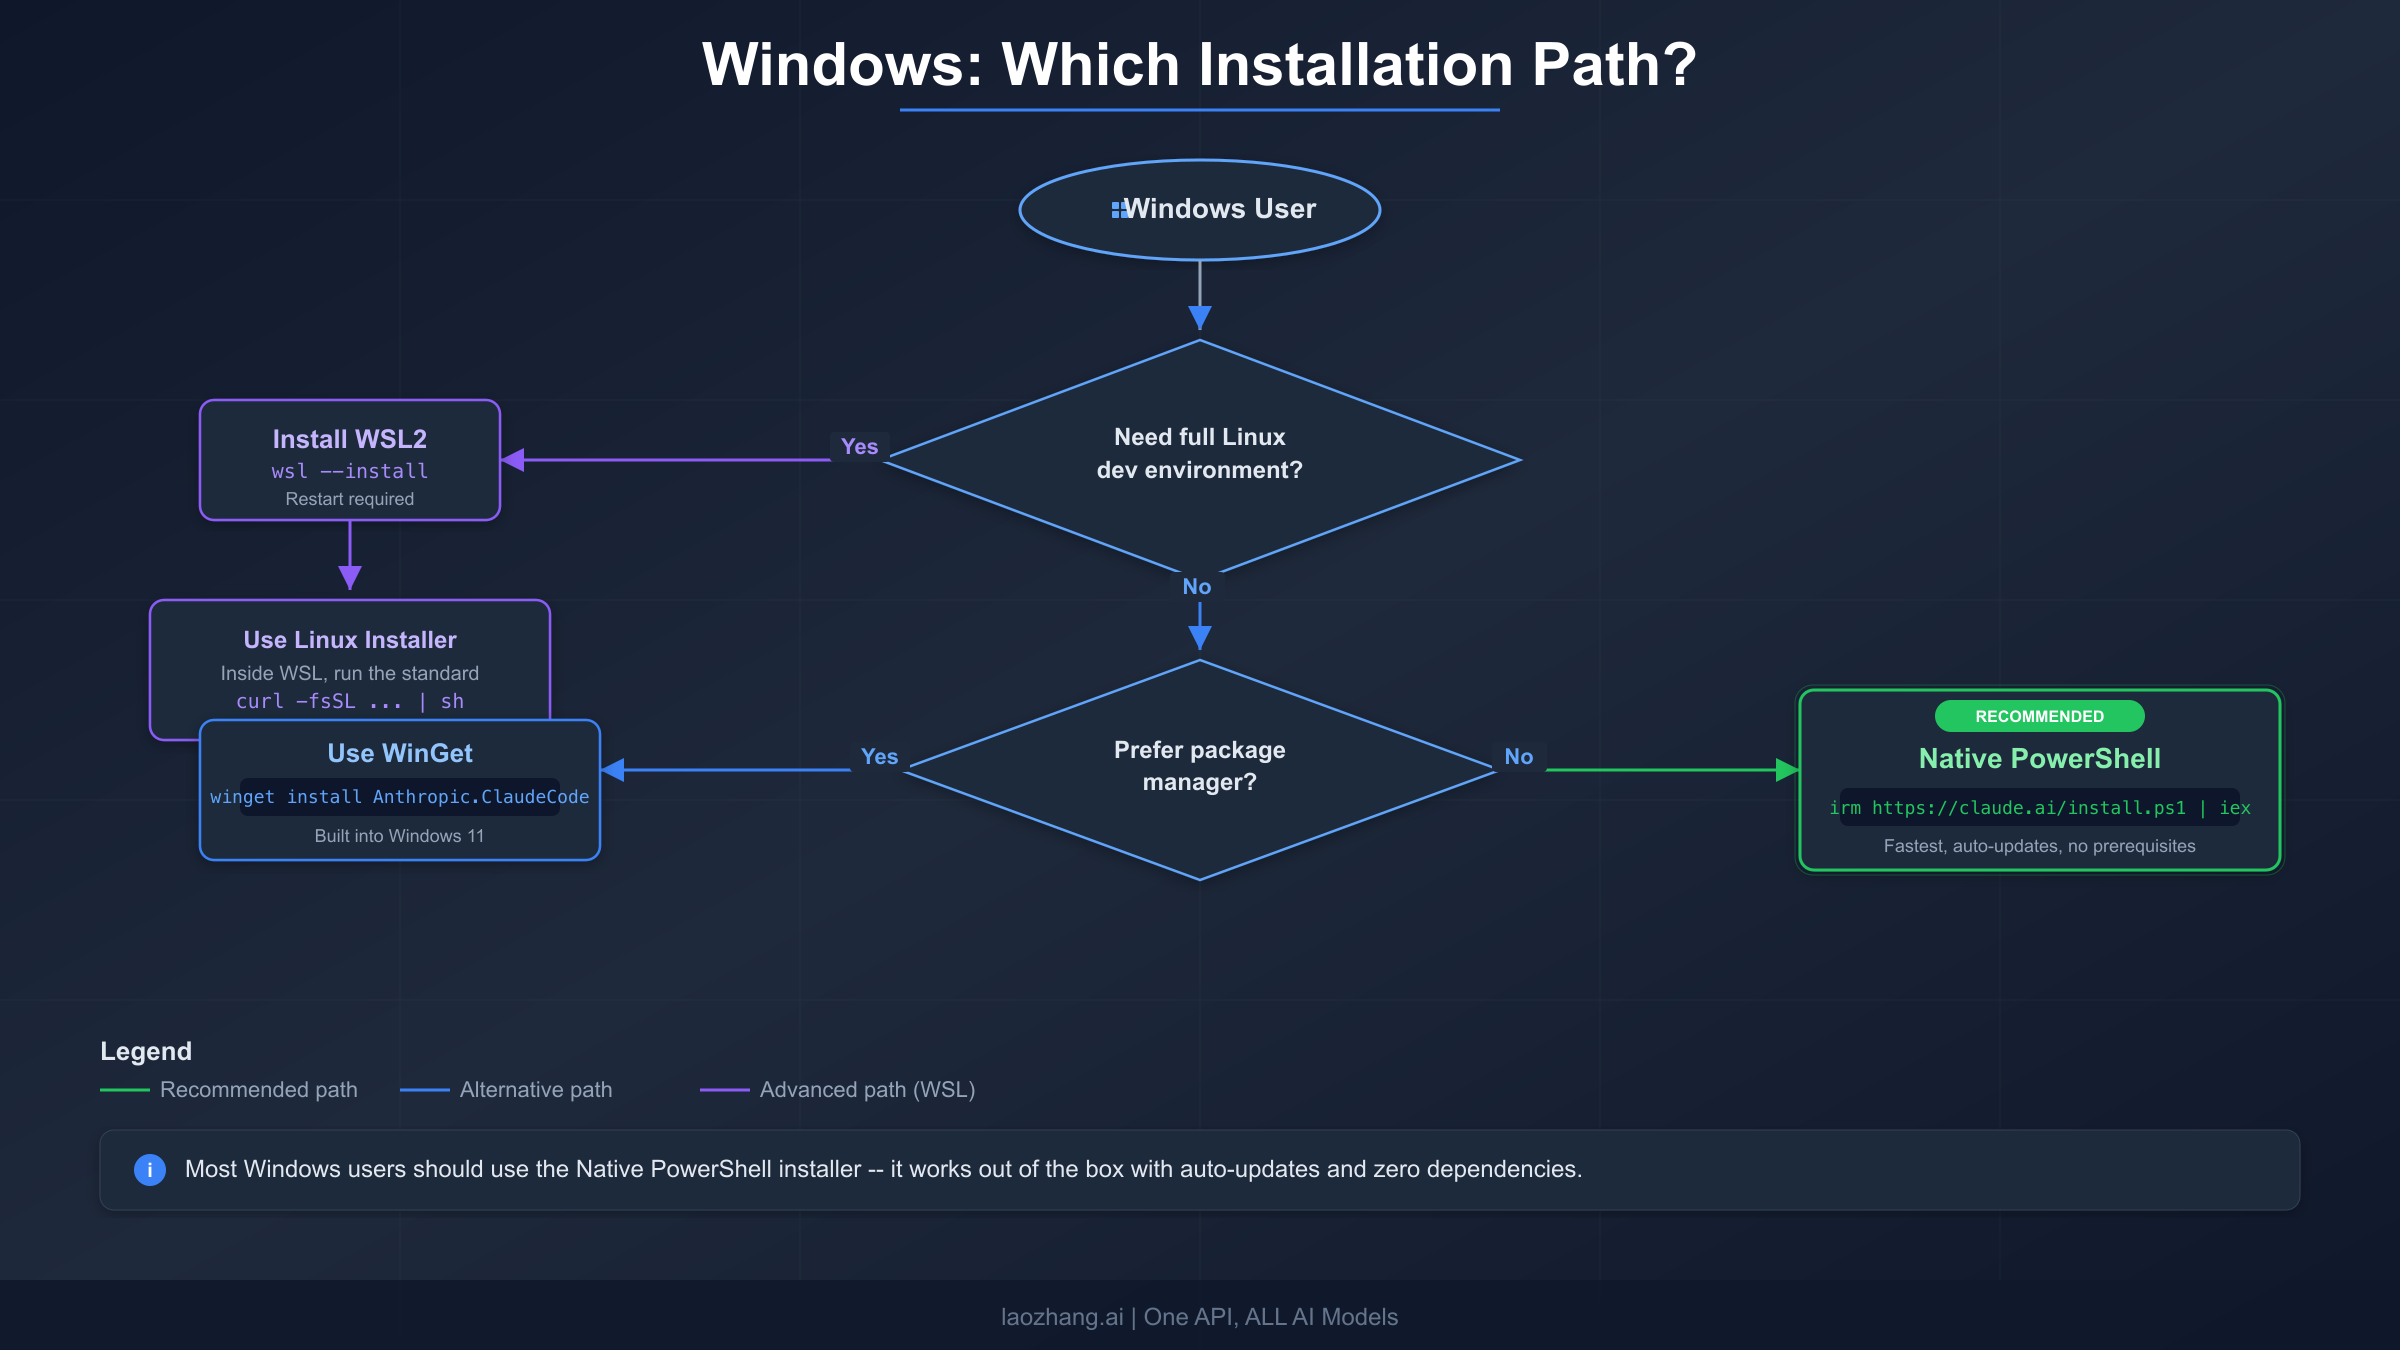
Windows installation involves one more decision than macOS or Linux: you need to choose between running Claude Code natively on Windows or inside WSL (Windows Subsystem for Linux). The right choice depends on your development workflow, and picking the wrong one leads to frustration. Let us walk through the decision and then cover each path in detail.
If you primarily write code that targets Windows — .NET applications, PowerShell scripts, Windows-native toolchains — use the native PowerShell installer. It runs directly on Windows, integrates with your existing PATH, and requires only Git for Windows as a prerequisite. If you primarily write code for Linux deployment — Node.js servers, Python backends, Docker containers — WSL gives you a genuine Linux environment where Claude Code behaves identically to macOS and Linux setups. If you are unsure, start with the native installer. You can always add WSL later.
Native PowerShell Installer (Recommended for Most Users)
First, make sure Git for Windows is installed. Open PowerShell and run git --version. If you see a version number, you are set. If not, download and install Git from git-scm.com with default settings, then restart PowerShell.
With Git confirmed, run the installer in PowerShell (not CMD):
powershellirm https://claude.ai/install.ps1 | iex
This downloads and installs the native binary, making the claude command available globally. Open a new PowerShell window after installation to ensure your PATH is updated. Like the macOS/Linux native installer, this version auto-updates in the background.
WinGet Alternative
If you use WinGet (the Windows Package Manager that ships with Windows 11 and newer Windows 10 builds), Claude Code is available through the official repository:
powershellwinget install Anthropic.ClaudeCode
This is functionally equivalent to the PowerShell installer but uses the Windows package management system. Note that WinGet installations do not auto-update — you need to run winget upgrade Anthropic.ClaudeCode periodically. WinGet is a great choice if your organization manages software through Windows Package Manager policies.
Windows CMD Installer
For environments where PowerShell is restricted, there is also a CMD-compatible installer:
cmdcurl -fsSL https://claude.ai/install.cmd -o install.cmd && install.cmd && del install.cmd
This is less common but useful in corporate environments with strict PowerShell execution policies.
WSL Path (For Linux-First Developers)
If you prefer a full Linux development environment on Windows, install WSL first and then use the standard Linux installation method inside it:
powershellwsl --install # Step 2: Reboot your computer when prompted # Step 3: Open your WSL terminal (Ubuntu by default) # Step 4: Install Claude Code using the Linux method curl -fsSL https://claude.ai/install.sh | bash
A common mistake when using WSL is having Node.js installed on the Windows side but not inside the WSL environment. If you use the npm installation method through WSL, you need Node.js installed within WSL — the Windows Node.js installation is invisible to WSL. The native installer avoids this problem entirely because it has no Node.js dependency.
For optimal WSL performance, make sure your project files live inside the WSL filesystem (e.g., ~/projects/) rather than on the Windows filesystem (e.g., /mnt/c/Users/...). File operations across the WSL/Windows boundary are significantly slower and can cause timeouts in Claude Code.
Migrate from npm to the Native Installer
If you previously installed Claude Code using npm install -g @anthropic-ai/claude-code, you should migrate to the native installer. The npm method is officially deprecated as of early 2026, and while it continues to work for now, it will eventually stop receiving updates. The native installer is faster to start, has zero dependencies, and handles updates automatically.
The migration process takes about two minutes and preserves your existing configuration:
bash# Step 1: Check your current installation method
which claude
# If it returns a path inside node_modules or .npm-global, you're on npm

# Step 2: Uninstall the npm version
npm uninstall -g @anthropic-ai/claude-code

# Step 3: Verify it's gone
which claude  # Should return "not found"

# Step 4: Install the native version
curl -fsSL https://claude.ai/install.sh | bash  # macOS/Linux
# OR
irm https://claude.ai/install.ps1 | iex  # Windows PowerShell

# Step 5: Open a new terminal and verify
claude --version
Your authentication tokens and configuration files (stored in ~/.claude/) are preserved across this migration. You do not need to re-authenticate or reconfigure anything. The native binary simply takes over from where the npm version left off.
If you were using nvm or asdf to manage Node.js versions specifically for Claude Code, you can now simplify your setup by removing Claude Code from your Node.js dependency chain entirely. This eliminates an entire class of "Node version mismatch" errors that plagued npm-based installations.
One subtle benefit of migration is that the native binary starts significantly faster than the npm version. The npm package had to initialize the Node.js runtime on every launch, which added 500 to 1500 milliseconds of startup time depending on your system. The native binary starts almost instantly because it is a statically compiled executable with no runtime dependencies. Over the course of a workday where you might start Claude Code dozens of times, this adds up to a noticeably smoother experience.
If you are managing Claude Code across a team, the migration is even more important. With the npm method, every team member needed the same Node.js version installed, and version mismatches between developers were a constant source of "it works on my machine" problems. The native installer eliminates this dependency entirely — every team member gets the same binary regardless of their local Node.js setup.
Authentication and First Launch
With Claude Code installed, the next step is authentication. Navigate to any project directory and run:
bashcd /path/to/your/project
claude
On first launch, Claude Code opens your default web browser to the Anthropic OAuth page. Log in with your Claude Pro, Max, or Teams account, authorize the CLI, and the browser redirects back to confirm success. A session token is stored locally in ~/.claude/ so you only need to do this once.
Authentication Methods
Claude Code supports three authentication pathways, each suited to different use cases.
Browser OAuth is the default and works for most developers. When you run claude for the first time, it opens your browser automatically. If you are using Claude Pro or Max, this is the simplest path. Your subscription handles all billing, and you get the usage limits associated with your plan tier.
API Key authentication is designed for headless environments — CI/CD pipelines, Docker containers, remote servers without a browser. Set the ANTHROPIC_API_KEY environment variable before launching Claude Code:
bashexport ANTHROPIC_API_KEY=sk-ant-...
claude
With an API key, billing goes through your Anthropic Console account on a pay-per-token basis.
Third-party cloud providers — Amazon Bedrock, Google Vertex AI, and Microsoft Foundry — are supported through environment variables:
bash# Amazon Bedrock
export CLAUDE_CODE_USE_BEDROCK=1
export AWS_REGION=us-east-1

# Google Vertex AI
export CLAUDE_CODE_USE_VERTEX=1
export CLOUD_ML_REGION=us-east5
export ANTHROPIC_VERTEX_PROJECT_ID=your-project-id
These options are primarily used by enterprises that already have cloud provider agreements and prefer routing AI traffic through their existing infrastructure.
Initialize Your Project with CLAUDE.md
After authenticating, the single most impactful thing you can do is create a CLAUDE.md file in your project root. This markdown file gives Claude persistent context about your codebase — build commands, code conventions, architecture decisions, testing instructions — anything Claude cannot infer from the code alone. Without it, Claude starts every session without understanding your project's unique patterns.
Generate a starter CLAUDE.md automatically:
bash# Inside a Claude Code session, run:
/init
This command analyzes your codebase and creates a CLAUDE.md with detected build systems, test frameworks, and code patterns. A good CLAUDE.md is concise — aim for 50 to 100 lines. For every line, ask yourself: "Would removing this cause Claude to make a mistake?" If not, cut it. For monorepos, add additional CLAUDE.md files in subdirectories. Claude loads them hierarchically — root-level rules apply everywhere, and child-level rules apply only when working in that directory.
The /init command also walks you through setting up essential Claude Code features like permission controls and preferred text formatting. It takes about a minute and makes a measurable difference in how accurately Claude works with your code.
Here is an example of what a well-structured CLAUDE.md looks like for a typical Next.js project:
markdown# CLAUDE.md

## Commands
- `npm run dev` - Start dev server on port 3000
- `npm run build` - Production build
- `npm test` - Run Jest tests
- `npm run lint` - ESLint check

## Architecture
- Next.js 15 with App Router
- PostgreSQL with Drizzle ORM
- Authentication via Clerk
- All API routes in src/app/api/

## Conventions
- Server components by default; use "use client" only when needed
- TypeScript strict mode; no any types
- Commit messages: imperative mood, < 72 chars
The key insight is that CLAUDE.md should tell Claude what it cannot figure out by reading your code directly. Your build commands, naming conventions, and architectural decisions are the most valuable things to include because these are the decisions Claude is most likely to get wrong without explicit guidance.
Troubleshooting Common Installation Issues
About 60 percent of new users encounter at least one issue during installation or first launch, but the good news is that most problems resolve in under five minutes. The built-in diagnostic tool catches the majority of configuration problems automatically:
bashclaude doctor
Run this command whenever something feels off. It checks your installation integrity, authentication state, configuration validity, and network connectivity, then reports what it finds. Below are the most common issues and their solutions.
"command not found: claude"
This is the most frequent post-installation error and simply means your shell has not picked up the new PATH entry. The fix depends on your platform:
On macOS and Linux, open a new terminal window. If that does not work, manually reload your shell configuration:
bashsource ~/.zshrc   # macOS (Zsh is default since Catalina)
source ~/.bashrc  # Linux (most distributions)
If the command is still not found, check that the installer actually added the PATH entry:
bashgrep -r "claude" ~/.zshrc ~/.bashrc ~/.profile 2>/dev/null
On Windows, close PowerShell completely and reopen it. If the command is still not found, verify that Git for Windows is installed (git --version) and restart your machine as a last resort.
EACCES Permission Errors (npm Method Only)
If you chose the npm installation method and encounter EACCES permission errors, never use sudo npm install -g. Running sudo with npm creates files owned by root in your npm directory, which causes cascading permission problems for every future npm global install. Instead, fix the underlying permission issue:
bashmkdir -p ~/.npm-global
npm config set prefix '~/.npm-global'
echo 'export PATH=~/.npm-global/bin:$PATH' >> ~/.bashrc
source ~/.bashrc
npm install -g @anthropic-ai/claude-code
Or better yet, switch to the native installer, which avoids this entire class of problems.
Authentication Failures
If the browser redirect does not work during OAuth:
- Confirm you are logged into claude.ai in the browser that opens
- Check that your account is on a paid plan — Pro, Max, Teams, or Enterprise
- Try logging out and back in:
claude logoutfollowed byclaude - For corporate networks with proxy configurations, you may need to set
HTTPS_PROXYenvironment variable
For CI environments where no browser is available, switch to API key authentication as described in the authentication section above.
Windows-Specific Issues
The most common Windows issue is the installer failing because Git for Windows is missing. The error message is not always clear about this dependency. Always install Git first, restart your terminal, and then run the Claude Code installer.
If you see execution policy errors in PowerShell, you may need to temporarily allow script execution:
powershellSet-ExecutionPolicy -Scope CurrentUser -ExecutionPolicy RemoteSigned
For WSL users experiencing slow file operations, move your project files from the Windows filesystem (/mnt/c/...) into the WSL filesystem (~/projects/). Cross-filesystem access through WSL adds significant latency that compounds with Claude Code's frequent file reads.
Network and Proxy Issues
Corporate networks with proxy servers can block the installation script or the OAuth authentication flow. If curl times out during installation, configure your proxy settings before running the installer:
bashexport HTTPS_PROXY=http://proxy.yourcompany.com:8080
export HTTP_PROXY=http://proxy.yourcompany.com:8080
curl -fsSL https://claude.ai/install.sh | bash
If authentication fails behind a proxy, the same environment variables usually resolve the issue. Some corporate firewalls specifically block WebSocket connections, which Claude Code uses for real-time communication. In this case, contact your IT department to whitelist claude.ai and api.anthropic.com domains.
Slow Performance After Installation
If Claude Code starts but responds slowly, the most common cause is an overloaded context window. Running /compact inside a session compresses your conversation history and frees up context space. For projects with very large codebases, creating a .claudeignore file (similar to .gitignore) prevents Claude from scanning directories that are not relevant to your work, such as node_modules, dist, or large binary asset folders.
Which Claude Code Plan Is Right for You?
Choosing the right plan prevents both overspending and frustrating rate limits. The decision comes down to how often you use Claude Code and whether you need the most powerful model.
Claude Pro at $20 per month is the starting point for most individual developers. It gives you access to Claude Sonnet 4.6 in the terminal and the web interface, with usage measured over rolling five-hour windows. For developers who use Claude Code a few times a day for code reviews, bug fixes, and small features, Pro is sufficient. Based on community estimates, Pro users typically get 40 to 80 Sonnet hours per week, which covers moderate daily usage comfortably.
Claude Max at $100 per month (5x tier) makes sense when you hit rate limits on Pro regularly — typically developers who keep Claude Code running as an active pair programmer throughout their workday. The 5x multiplier translates to roughly 140 to 280 Sonnet hours per week, and you also get access to Claude Opus 4.6, the most powerful model in the lineup. If you find yourself waiting for rate limit resets more than once or twice a week on Pro, upgrading to Max 5x usually pays for itself in recovered productivity.
Claude Max at $200 per month (20x tier) is for power users and leads running Claude Code across multiple projects simultaneously. With approximately 240 to 480 Sonnet hours per week, you are unlikely to ever hit a rate limit. This tier is also popular among developers who use Claude Code extensively for large-scale refactoring, automated testing, and continuous code review workflows.
Anthropic Console (pay-as-you-go API) is the best choice if your usage is sporadic or if you primarily run Claude Code in CI/CD pipelines. Instead of a monthly subscription, you load credits and pay per token consumed. Current pricing for Claude Sonnet 4.6 is $3.00 per million input tokens and $15.00 per million output tokens (Anthropic Console, March 2026). A single Claude Code command typically generates 8 to 12 API calls, so a heavy session might consume $0.50 to $2.00 in API costs, making it significantly cheaper than a subscription for occasional use.
For teams evaluating Claude Code, the Teams Standard plan at $25 per seat per month ($20 annual) provides Pro-level access with centralized administration. If your team decides to upgrade, the Teams Premium plan at $125 per seat per month ($100 annual) adds 5x usage limits comparable to Max. For more details on managing rate limits effectively, see our detailed guide to Claude Code rate limits.
Comparing Installation Methods at a Glance
With six different ways to install Claude Code, it helps to see them side by side. The table below summarizes the key differences so you can pick the right method for your environment:
| Method | Platform | Command | Auto-Updates | Dependencies | Best For |
|---|---|---|---|---|---|
| Native CLI | macOS, Linux, WSL | curl -fsSL https://claude.ai/install.sh | bash | Yes | None | Most users |
| Native PowerShell | Windows | irm https://claude.ai/install.ps1 | iex | Yes | Git for Windows | Windows users |
| Homebrew | macOS, Linux | brew install --cask claude-code | No | Homebrew | Homebrew users |
| WinGet | Windows | winget install Anthropic.ClaudeCode | No | WinGet | Windows pkg mgmt |
| npm | All platforms | npm install -g @anthropic-ai/claude-code | No | Node.js 18+ | Legacy / pinning |
| WSL | Windows | Linux installer inside WSL | Yes (via Linux) | WSL2 | Linux-first devs |
The native installer is the recommended method for the vast majority of users. It has zero dependencies, auto-updates silently, and provides the most stable experience. Homebrew and WinGet are solid alternatives if you prefer managing tools through a package manager and do not mind running updates manually. The npm method still works but is deprecated — use it only if you need to pin a specific Claude Code version for compatibility reasons.
Frequently Asked Questions
Does Claude Code require Node.js? No. The native installer and Homebrew methods have zero external dependencies. Only the legacy npm method requires Node.js 18 or higher.
Can I use Claude Code on Apple Silicon? Yes. The native installer detects your architecture automatically and downloads the ARM64 binary for Apple Silicon Macs.
How do I completely uninstall Claude Code? For the native installer, remove the binary (which claude shows its location) and delete the configuration directory (rm -rf ~/.claude). For Homebrew, run brew uninstall claude-code. For npm, run npm uninstall -g @anthropic-ai/claude-code.
Can I use Claude Code without a subscription? Not through the standard installation. You need either a paid Claude subscription (Pro, Max, Teams, Enterprise) or an Anthropic Console account with API credits. There is no free tier for Claude Code itself, though the Console option lets you pay only for what you use.
Does Claude Code work in VS Code? Yes. Claude Code is available as a VS Code extension and a JetBrains plugin, in addition to the terminal CLI covered in this guide. The installation methods here set up the core CLI, which the IDE extensions build upon. Install the extension from the VS Code marketplace by searching for "Claude Code" and clicking install — it connects to the same CLI binary you just installed.
Is there a desktop app for Claude Code? Yes. Anthropic launched the Claude Code desktop app which provides a graphical interface alongside the terminal functionality. You can download it from claude.ai after logging in. The desktop app and the terminal CLI share the same authentication and configuration, so installing one gives you access to both.
Final Thoughts and Next Steps
Installing Claude Code in 2026 is remarkably simple compared to just a year ago. The native installer eliminated the Node.js dependency that caused the majority of installation headaches, and the addition of WinGet and CMD installers gave Windows users proper first-class support. Whether you chose the one-line native installer, Homebrew, or WinGet, the hard part is over.
Now that Claude Code is running on your machine, here are the most valuable next steps. First, run /init inside Claude Code to generate your project's CLAUDE.md — this single step dramatically improves the quality of Claude's responses by giving it persistent context about your codebase. Second, explore the built-in slash commands by typing /help — you will find shortcuts for common workflows like code review, commit generation, and test writing. Third, consider connecting MCP (Model Context Protocol) servers to give Claude Code direct access to your tools and data sources, turning it from a coding assistant into a proper development agent.
If you are evaluating Claude Code alongside other AI coding tools, our comparison of how Claude Code stacks up against OpenClaw provides a detailed breakdown of strengths, weaknesses, and ideal use cases for each tool. For developers already using Claude Code and running into usage limits, our guide on managing Claude Code rate limits covers practical strategies for maximizing your available quota.
For a broader perspective on which AI coding tools fit different workflows, our comparison of connecting AI tools through API providers covers how to set up flexible multi-model access that works alongside Claude Code.
The future of AI-assisted coding is here, and it runs in your terminal. Happy coding.