Getting a Gemini API key takes less than five minutes and costs nothing. But if you have searched for "Gemini T3 key" or "how to apply for Gemini Tier 3 access," you already know that the higher tiers are a different story. Tier 3 (commonly abbreviated T3) is the highest commercial quota level in Google's Gemini API program, offering 4,000+ requests per minute compared to just 5–15 for free accounts. Reaching it requires either substantial real spending on Google Cloud services or a direct conversation with Google's enterprise sales team. This guide covers everything — from creating your first API key to unlocking T3 — with the verified data and the pitfalls nobody else tells you about.
TL;DR
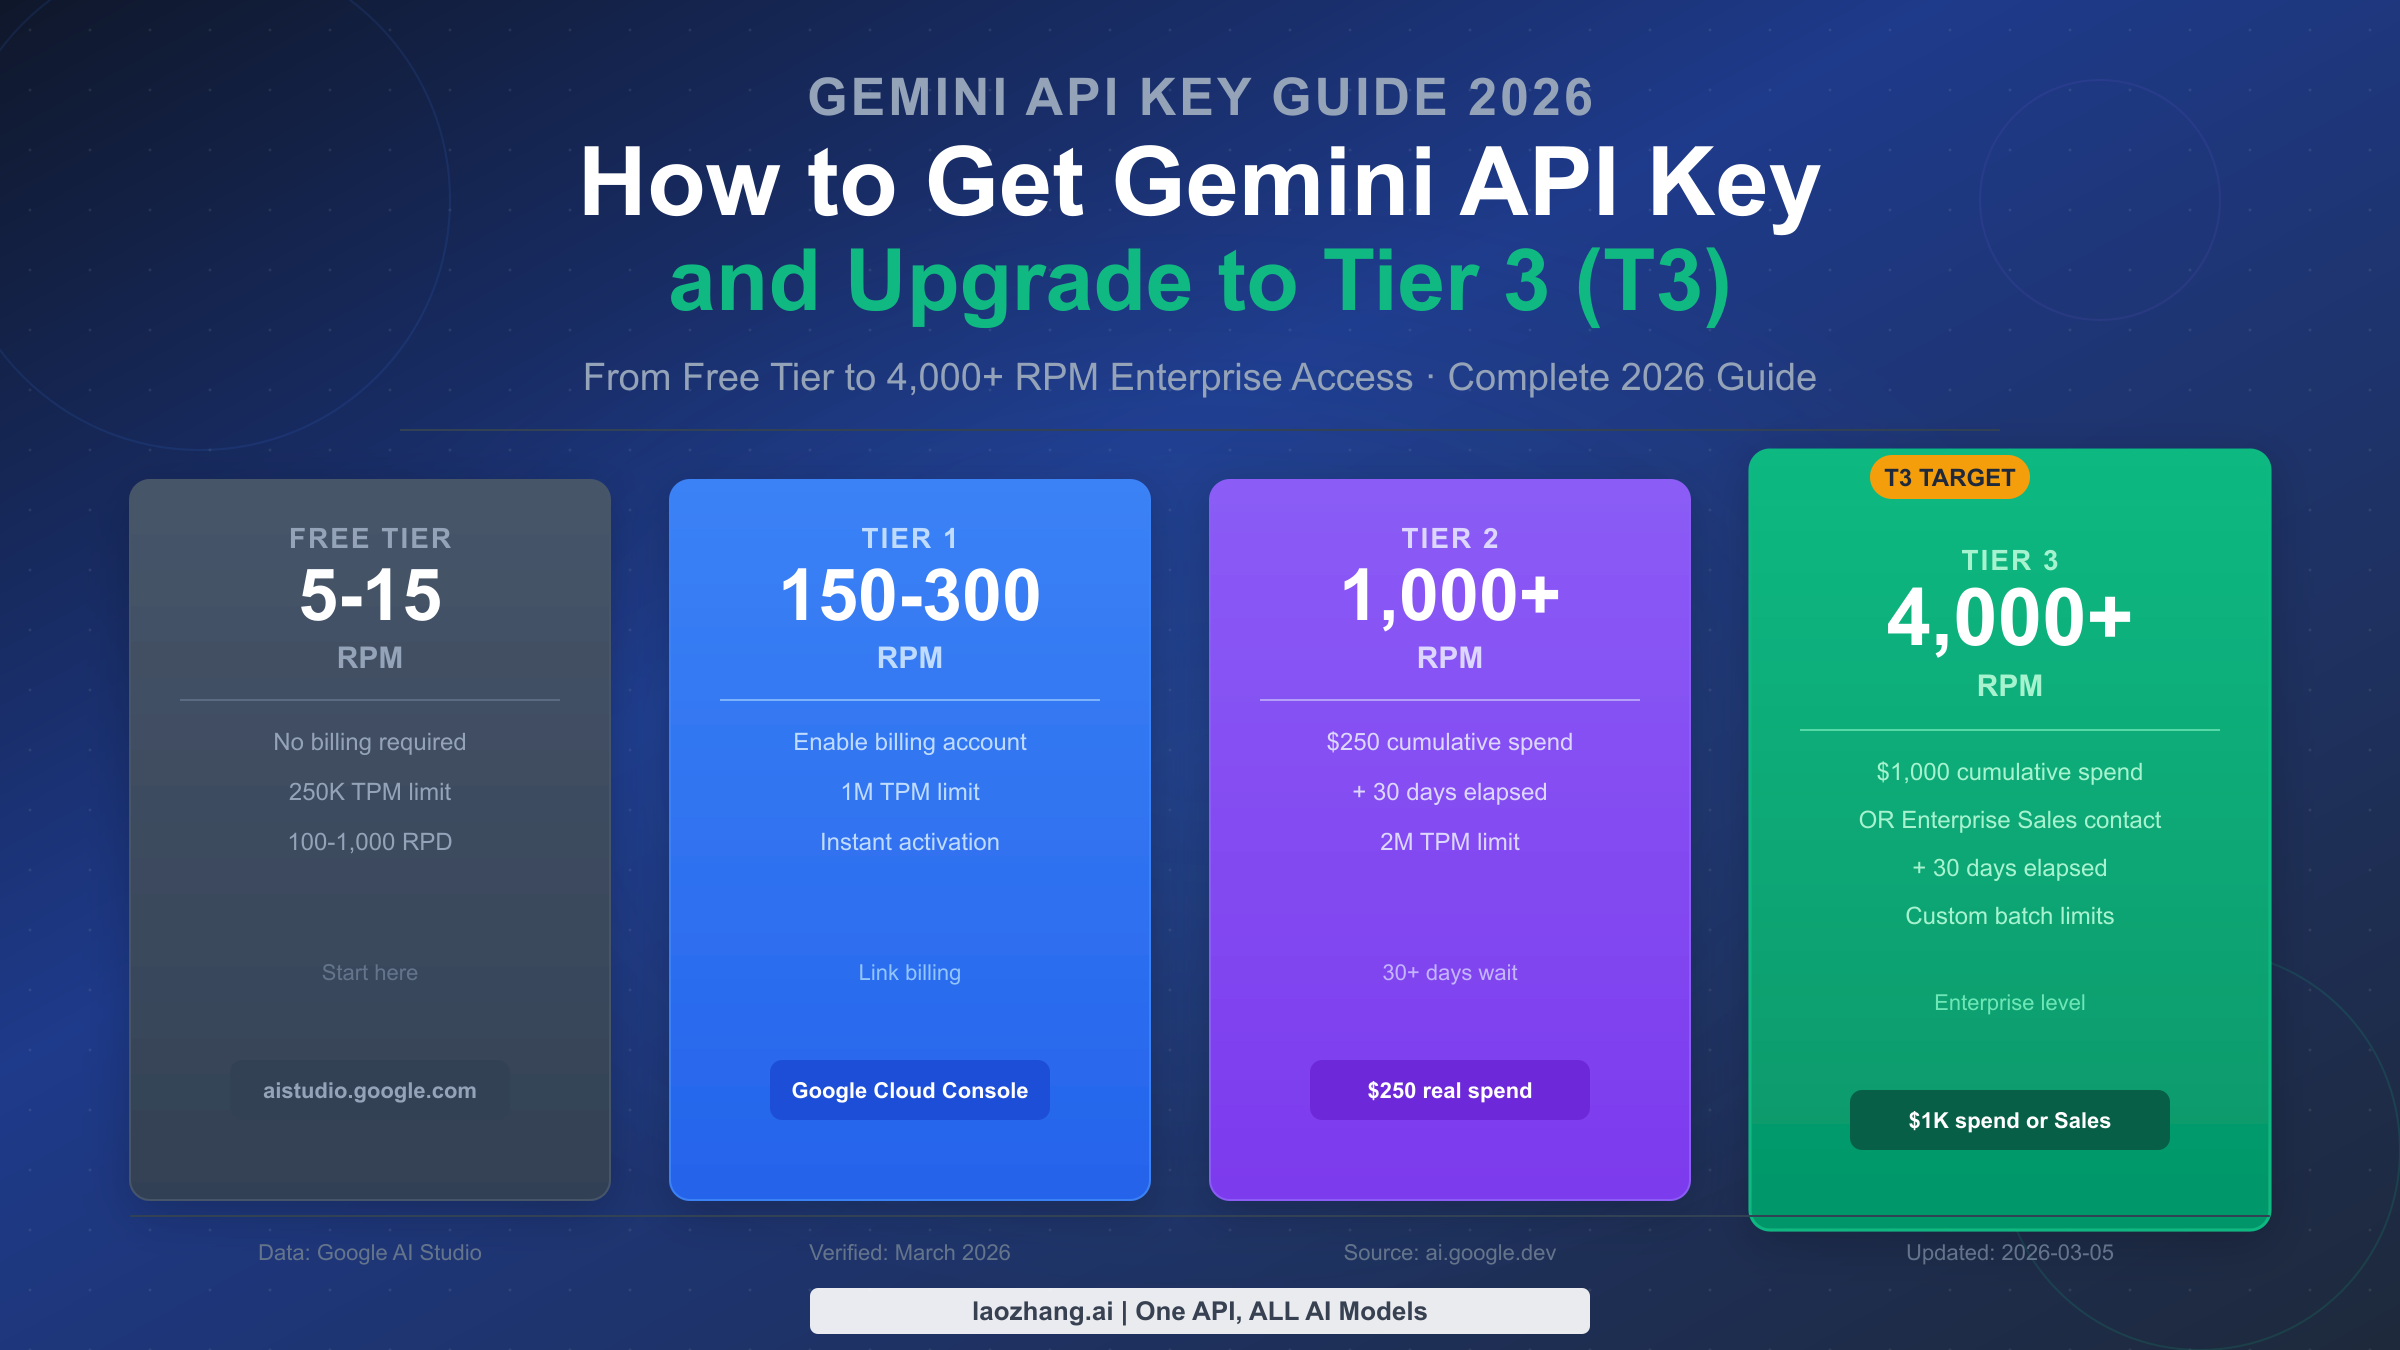
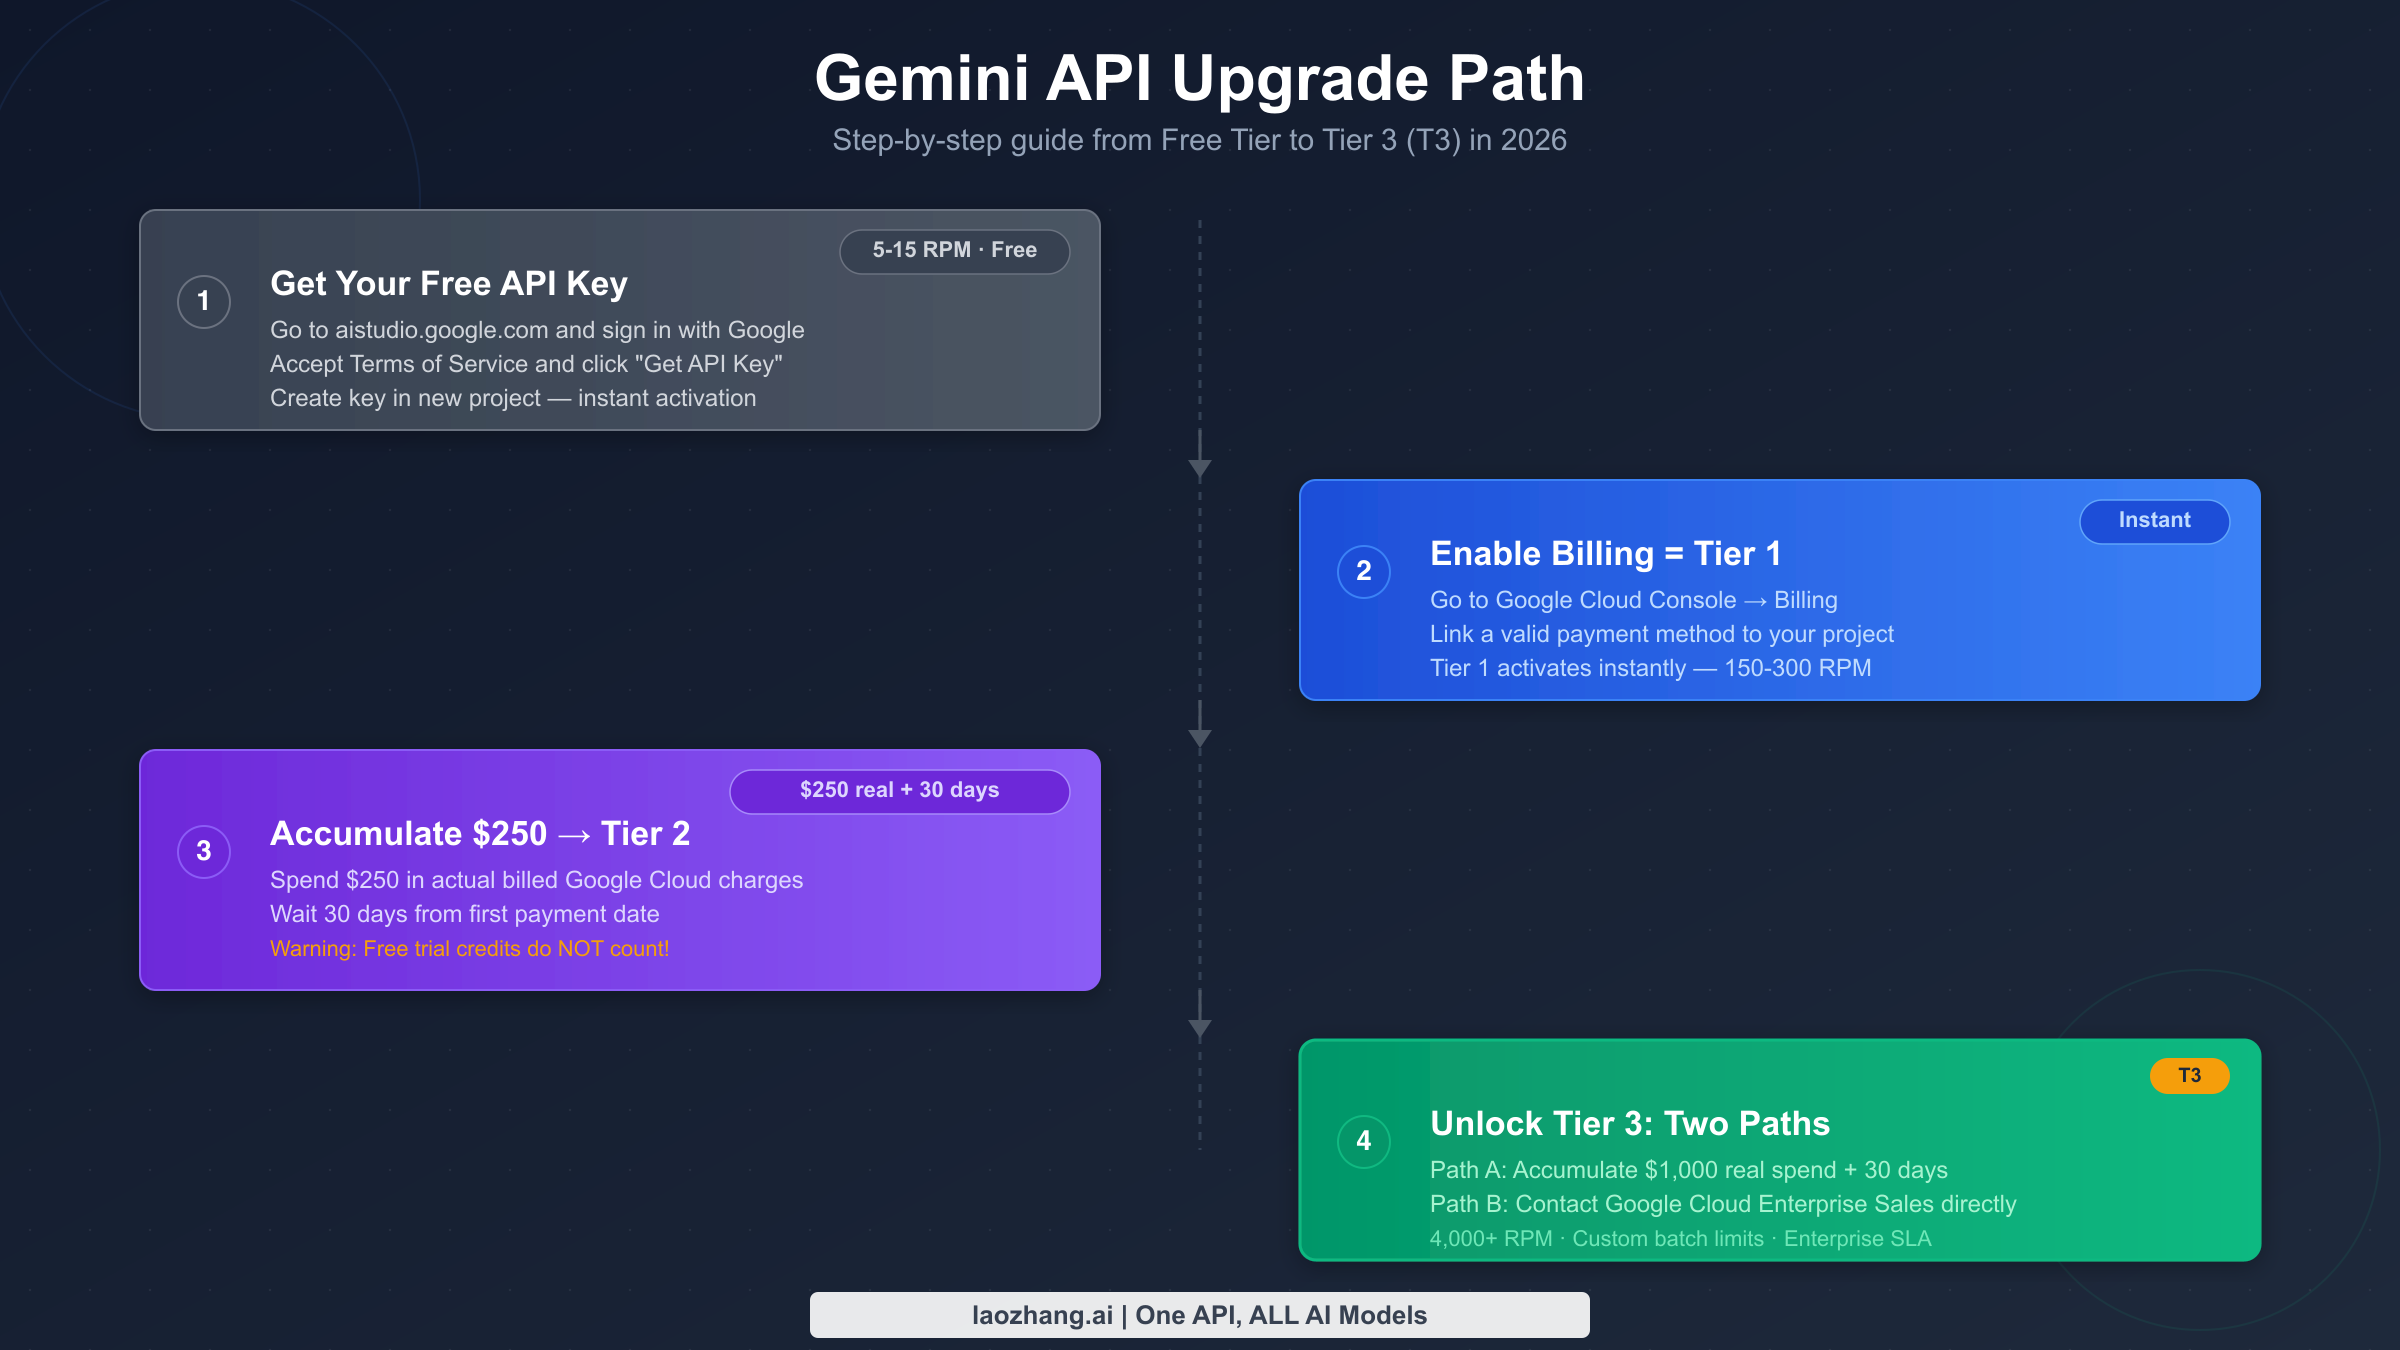
- Free Tier: 5–15 RPM, no billing required, created at aistudio.google.com in 5 minutes
- Tier 1: 150–300 RPM, link a billing account to your Google Cloud project (instant)
- Tier 2: 1,000+ RPM, accumulate $250 in real billed Google Cloud charges + wait 30 days
- Tier 3 (T3): 4,000+ RPM, accumulate $1,000 in real charges + 30 days, OR contact Google Cloud Enterprise Sales
- Free trial credits and promotional credits do not count toward spending thresholds
- Rate limits apply at the project level, not per API key — multiple keys in one project share the same quota
What Is a Gemini API Key and What Does "T3" Mean?
A Gemini API key is a credential string that authenticates your application when it calls Google's Gemini large language model endpoints. You generate the key in Google AI Studio, attach it to your API requests as a header or query parameter, and Google's infrastructure uses it to identify your project, enforce rate limits, and bill usage against your linked account.
The "T3" designation comes from Google's four-tier usage tier system. When developers in forums and communities refer to a "Gemini T3 key," they mean API access at the Tier 3 quota level — not a different type of key, but a different quota bucket that your existing key unlocks once your project qualifies. The key itself is the same SHA-256 token regardless of your tier. What changes is the ceiling on how many requests that key can make per minute, per day, and per month.
Understanding the distinction matters because many developers spend time creating additional API keys or additional projects hoping to multiply their quota. This does not work — Google enforces rate limits at the project level, not the key level. Ten keys in one project share the same 15 RPM ceiling. To get genuinely separate quota pools, you need separate Google Cloud projects, each with its own billing account linked and its own spending history. The practical implication: the only path to T3 access is to build up spending on a single project's billing account over time.
Google introduced the tiered system to balance democratized access for developers and students with the infrastructure demands of production workloads. The free tier's 5–15 RPM (verified against the official rate limits documentation updated March 3, 2026) is generous enough to prototype and test but insufficient for applications serving real users. The paid tiers provide the headroom production systems need, with the spending thresholds designed to ensure meaningful commitment before granting enterprise-grade capacity.
Gemini API Tier System: Complete 2026 Comparison
Before starting the upgrade process, it helps to have a clear picture of what each tier actually provides. The following data comes from the official Google AI for Developers documentation (last verified March 2026, source: ai.google.dev/gemini-api/docs/rate-limits).
Requests per minute (RPM) by tier:
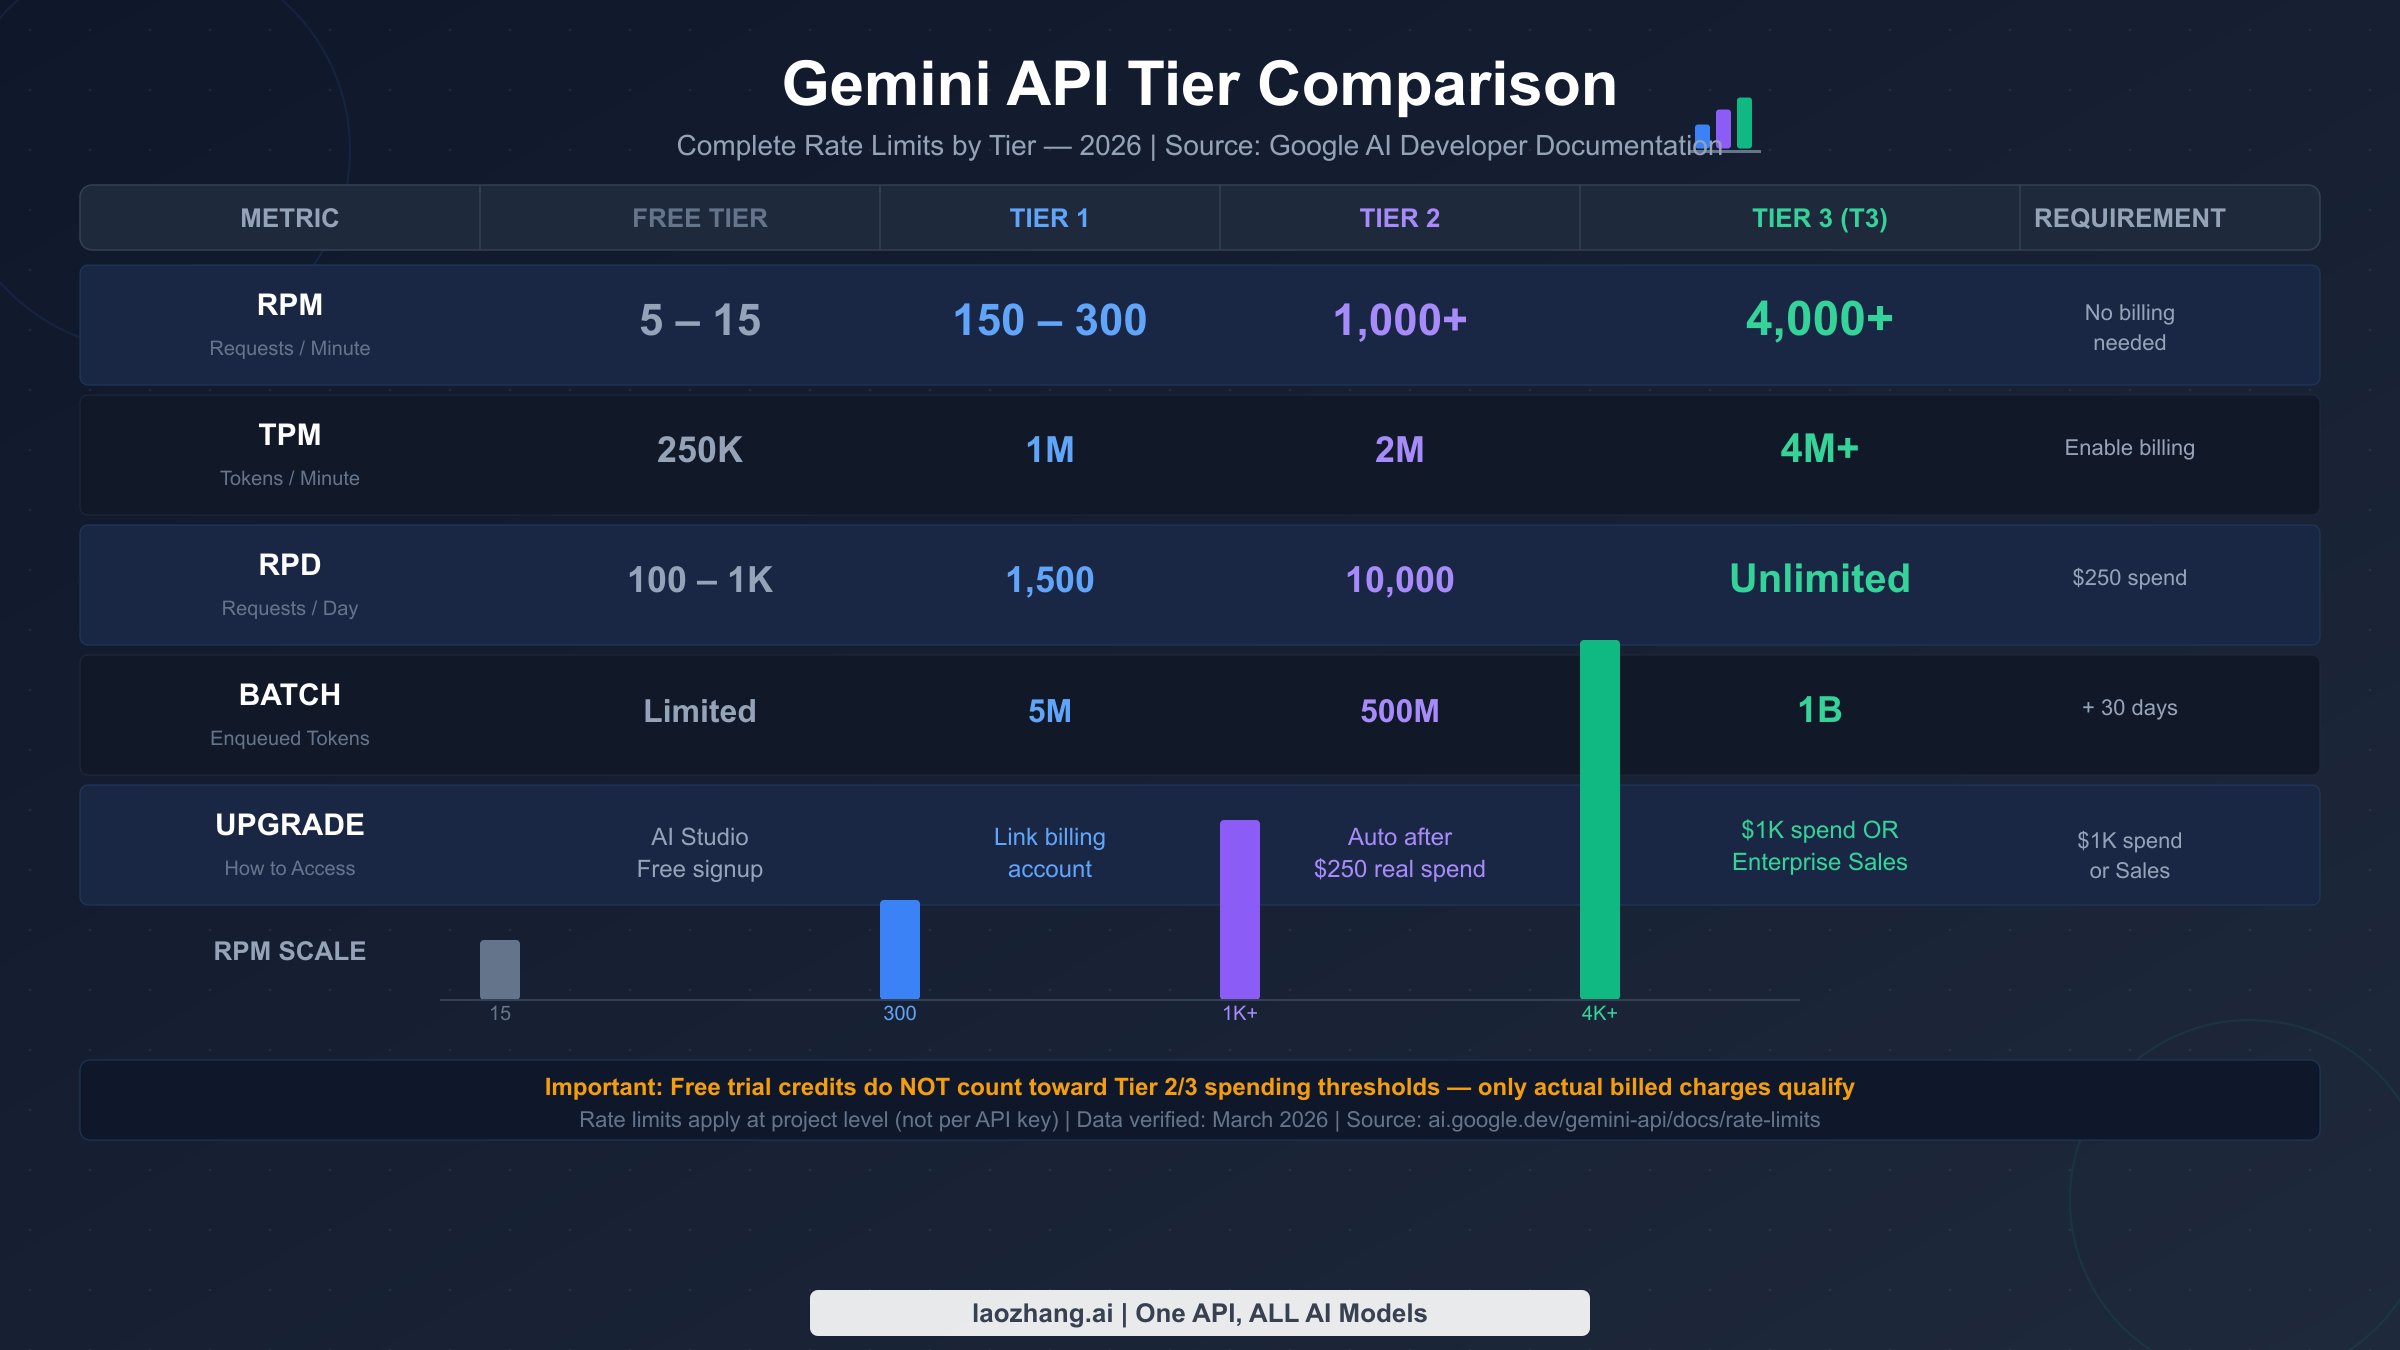
| Tier | RPM | TPM | RPD | Upgrade Requirement |
|---|---|---|---|---|
| Free | 5–15 | 250K | 100–1,000 | None — just sign up |
| Tier 1 | 150–300 | 1M | 1,500 | Enable billing account |
| Tier 2 | 1,000+ | 2M | 10,000 | $250 real spend + 30 days |
| Tier 3 | 4,000+ | 4M+ | Unlimited | $1,000 real spend + 30 days, or Enterprise Sales |
The RPM figures vary by model within each tier. As of March 2026, the free tier provides 5 RPM for Gemini 2.5 Pro and up to 15 RPM for Flash-Lite variants. Tier 1 ranges from 150–300 RPM across the same model family. These numbers can change when Google releases new models or adjusts quotas (as happened in December 2025 when free tier quotas were cut by 50–80% to manage infrastructure demand), so always cross-check against the current documentation before building rate limit assumptions into your architecture.
Batch API limits follow a separate scale. For Gemini 3.1 Pro, Tier 1 caps batch-enqueued tokens at 5 million, Tier 2 raises it to 500 million, and Tier 3 allows up to 1 billion tokens in the batch queue. Batch processing comes with a 50% cost discount compared to live API calls, which makes it the preferred approach for offline workloads that do not require real-time responses.
One critical detail worth highlighting: rate limits reset on different cycles. RPM limits reset every 60 seconds. RPD limits reset at midnight Pacific Time (00:00 PT / 08:00 UTC). If you hit your daily limit at 11:55 PM Pacific, you need to wait only five minutes, not a full 24 hours. This is worth building into your retry logic.
For a deeper breakdown of how these limits work across all Gemini models, including Flash, Flash-Lite, and Pro variants, see our complete Gemini API rate limits guide.
Step 1 — Getting Your First Gemini API Key (Free Tier)
Creating a Gemini API key is the easiest part of this entire process. Google has designed the onboarding to take under five minutes, and you do not need a credit card or billing account for the free tier.
Start at Google AI Studio. Navigate to aistudio.google.com and sign in with your Google account. If this is your first visit, you will be prompted to review and accept Google's Generative AI Terms of Service. You also need to confirm your country, because Gemini API availability varies by region — as of March 2026, it is available in most countries except those under US export restrictions.
Find the API key interface. Once inside AI Studio, look for "Get API key" in the left navigation panel, or click the key icon in the top menu bar. This takes you to the API key management page at aistudio.google.com/app/apikey.
Create your key in a new project. Click "Create API key." You will see two options: create a key within an existing Google Cloud project, or create a key in a new project. For first-time users, Google recommends the new project option — it automatically creates a project with sensible defaults and generates a key linked to that project. You can name the project descriptively (for example, "my-chatbot-app" or "research-project") because you cannot rename it later without creating a new one.
Copy and store your key immediately. The full key string is only displayed once. Copy it right away and store it in a secure location — a password manager works well, or an encrypted notes application. Treat the key like a password: anyone who has it can make API calls that count against your quota and, once billing is enabled, can generate charges on your account.
Verify your key works. The fastest validation is a cURL command:
bashcurl -X POST \
  "https://generativelanguage.googleapis.com/v1beta/models/gemini-2.5-flash:generateContent?key=YOUR_API_KEY" \
  -H "Content-Type: application/json" \
  -d '{"contents":[{"parts":[{"text":"Hello, Gemini!"}]}]}'
A successful response returns a 200 OK with the model's generated text. A 403 error indicates an invalid key or a missing API permission. A 429 error means you have already hit a rate limit, which is unlikely on a brand-new key unless you send many requests in quick succession.
At this point you have free tier access: 5–15 RPM depending on the model, and rate limits that refresh every minute. This is enough for development, testing, and low-volume personal projects. If your application will serve more than a handful of users or needs consistent throughput, you will need to enable billing and work toward Tier 1 or higher.
Step 2 — Upgrading to Tier 1: Enable Billing
Tier 1 delivers an immediate, meaningful improvement — 150–300 RPM versus 5–15 — and the upgrade is instant. There is no spending requirement, no waiting period, and no approval process. The only action required is linking a billing account to your Google Cloud project.
Create a billing account if you do not have one. Go to console.cloud.google.com/billing. Click "Create account," enter your organization or individual name, agree to the terms, and add a payment method. Google accepts most major credit cards and direct debit in supported regions. Once the account is created, you will see a confirmation and can set a billing budget alert if you want to cap spending — a useful safety net when you start making paid API calls.
Link the billing account to your project. In the Cloud Console, navigate to "Billing" in the left sidebar, then select "Manage Billing Account" and use the link to associate your billing account with the project that holds your Gemini API key. Alternatively, go to the project's settings and use the "Change billing account" option to link it there.
Confirm the upgrade in AI Studio. After linking billing, return to aistudio.google.com. Navigate to the Projects page at aistudio.google.com/projects. Your project should show a billing status of "Active" and a tier of "Tier 1." If it still shows "Free," wait a few minutes and refresh — the billing propagation occasionally takes a short while.
One important nuance: a linked billing account does not mean you are immediately incurring charges. The Gemini API has a free tier allowance for certain models and request volumes even after billing is enabled. You only start paying once usage exceeds those free allowances, and only for models in the paid tier. Review the pricing page at ai.google.dev/gemini-api/docs/pricing for the current model-level pricing, which changes as new models launch.
Step 3 — Reaching the $250 Threshold for Tier 2
Tier 2 is where the upgrade process gets more complex and where most developers encounter unexpected friction. The requirements are straightforward on paper — $250 in cumulative spending plus 30 days since your first payment — but there are two important caveats that many guides omit.
Free credits and promotional credits do not count. This is the most common source of confusion. Google frequently offers $300 in free trial credits to new Google Cloud accounts. Many developers spend several weeks burning through these credits on Gemini API calls, then check their tier status and find nothing has changed. The spending threshold applies only to real charges to your payment method, not credits. If you have used $250 in Google Cloud credits and paid zero dollars out of pocket, you have not met the Tier 2 requirement. You can verify this by checking your billing account's "Transaction history" — only entries labeled as actual charges (not credits applied) count toward the threshold.
The 30-day clock starts on your first real payment, not your first API call. This means you can reach $250 in spending in week one, but you still need to wait until day 30 from that first payment before the automatic tier upgrade triggers. There is no manual request process for Tier 2 — it upgrades automatically once both conditions are satisfied. Google's automated system checks your billing account periodically and updates your tier without requiring any action from you.
Strategies for reaching the threshold intentionally. Developers who need Tier 2 and are willing to invest in getting there can accelerate spending through legitimate usage: running batch processing jobs, using higher-cost models like Gemini 2.5 Pro for large-scale document analysis, or combining Gemini API usage with other Google Cloud services (compute, storage, BigQuery) that all count toward the cumulative total. Google Cloud spending from any service on the billing account applies — you are not limited to Gemini API charges specifically.
During the 30-day waiting period, practical workarounds matter. We cover these in detail in the section on managing the wait. For now, note that the 30-day requirement is non-negotiable — there is no exception process or expedited path for Tier 2.
Step 4 — Upgrading to Tier 3 (T3): Two Paths
Tier 3 represents enterprise-grade Gemini API access: 4,000+ RPM, 4M+ TPM, and effectively unlimited daily requests. Getting there requires meeting a higher spending threshold, but there is a second path that most guides miss entirely.
Path A: The $1,000 spending threshold. The automatic upgrade to Tier 3 follows the same logic as Tier 2 — cumulative real spending on your Google Cloud billing account must exceed $1,000, and at least 30 days must have passed since your first payment. As with Tier 2, free credits do not count. Once both conditions are met, Google's system upgrades your project tier automatically, typically within 24–48 hours of the threshold being crossed.
The 30-day requirement means the minimum calendar time to reach T3 from a fresh account is 30 days — the same as Tier 2 — assuming you can accumulate $1,000 in real charges within that window. In practice, $1,000 per month is a meaningful API budget, roughly equivalent to processing tens of millions of input tokens with a mid-range model. Teams with existing Google Cloud footprints (infrastructure, databases, other AI services) often find this easier to reach because all spending on the linked billing account aggregates.
Path B: Enterprise Sales contact. This is the path most guides ignore, but it is genuinely available and often faster for teams with serious production requirements. Google Cloud has a dedicated enterprise sales team that handles custom quota arrangements. You can reach them at cloud.google.com/contact or through your existing Google Cloud account representative if your organization already has a sales relationship.
The enterprise path typically involves a conversation about your use case, expected volume, and technical requirements. Google's team can grant Tier 3 access (and in some cases custom limits that exceed T3 defaults) without requiring the spending threshold to be met first. Approval timelines vary — a few days to a few weeks depending on the complexity of the arrangement and the sales team's workload. This path makes particular sense for enterprises that are committed to Google Cloud but have not yet accumulated $1,000 in Gemini API spending, or for organizations that need access immediately for a product launch.
After reaching Tier 3. Once you are at T3, your rate limits update automatically in Google AI Studio. You can view your current limits at any time by navigating to your project in AI Studio and checking the rate limit display under your API key settings. If you notice your limits have not updated after meeting the criteria, wait 48 hours before contacting Google Cloud support — the propagation delay is normal and usually resolves on its own.
How to Verify Your Current Tier Status
One gap in most Gemini API guides is explaining how to actually check which tier you are on. This matters because the upgrade is automatic and silent — there is no email notification or dashboard alert when your tier changes.
Check via Google AI Studio. The primary place to verify your tier is the Projects page at aistudio.google.com/projects. Each project in your account shows a billing status and, for projects with billing enabled, a tier indicator. Look for labels like "Tier 1 (Paid)," "Tier 2," or "Tier 3" next to your project name.
Check via the Google Cloud Console. In the Cloud Console, navigate to APIs and Services → Credentials. Select your Gemini API key and look at the key details page. Under "Quota," you can see the current limits applied to that key, which reflect your project's tier. If the quota shows 5–15 RPM, billing is not linked. If it shows 150–300 RPM, you are on Tier 1. Higher numbers indicate Tier 2 or Tier 3.
Verify programmatically. If you want to test your actual limit rather than rely on the displayed tier label, send a burst of requests and observe when rate limit errors (429 RESOURCE_EXHAUSTED) begin appearing. A ceiling around 15 requests in 60 seconds confirms Free tier. If you can sustain 150+ RPM without errors, you are on Tier 1 or higher. This empirical approach is particularly useful if you believe your tier should have updated but the UI has not reflected the change yet.
One important note on timing. If you have recently met the spending threshold for Tier 2 or Tier 3, allow 24–48 hours before expecting the Projects page to reflect the new tier. Google's systems check eligibility on a rolling basis, not in real time. If you have waited more than 72 hours and the tier has not updated despite meeting both conditions, contact Google Cloud support with your billing account ID and project ID — they can manually trigger the check.
Managing the 30-Day Wait: 4 Interim Solutions
The 30-day wait period is the most friction-generating aspect of the Tier 2 and Tier 3 upgrade process. Most development teams encounter a real production need — a product launch, a client deadline, a scaling event — precisely when they are waiting for tier eligibility. Here are four practical strategies.
Solution 1: Shift load to lighter models. The free-tier rate limits are lower for heavy models like Gemini 2.5 Pro and higher for lighter variants. If your application currently uses a Pro-class model for all requests, evaluate whether lighter tasks (classification, summarization of short texts, simple Q&A) could use Flash or Flash-Lite instead. Flash-Lite's 15 RPM free tier is three times the 5 RPM limit of Pro. For applications with mixed workloads, routing cheap tasks to lightweight models can significantly extend how far your free quota stretches while you wait for paid tier access.
Solution 2: Use the Batch API. Google's Batch API processes requests asynchronously, outside the real-time rate limit window. Batch requests are queued and processed when capacity is available, with results typically returned within a few hours. In exchange for the latency, Batch API usage comes at a 50% discount on token costs and is not subject to the same RPM limits as live API calls. For any use case where the results are not needed immediately — data enrichment, document indexing, nightly summarization, offline analysis — the Batch API is both cost-effective and rate-limit-free.
Solution 3: Implement exponential backoff. For real-time applications that must stay on the synchronous API during the waiting period, robust error handling makes the limited quota go further. When a 429 Resource Exhausted error arrives, do not retry immediately. Instead, wait 1 second, then 2, then 4, then 8, with some random jitter added to avoid synchronized retry thundering herds. Most production SDK clients (Python google-generativeai, Node.js equivalents) have configurable retry mechanisms. Combining backoff with request queuing — batching user requests into a controlled flow that stays just under your RPM ceiling — is a common architecture for teams operating on free or Tier 1 limits.
Solution 4: Use a third-party API aggregator. For teams that genuinely cannot wait 30 days and need higher capacity now, third-party API aggregators provide an alternative path. Services like laozhang.ai aggregate access to Gemini and other AI models, offering higher effective throughput without requiring you to individually meet Google's spending thresholds. These services work by distributing load across multiple provider accounts and passing through API-compatible endpoints, so your code changes are minimal — typically just swapping the base URL and using the aggregator's API key instead of your Google key. This approach is particularly useful during the waiting period or for teams with variable workloads who want flexible capacity without committing to a fixed cloud spending level. Documentation and integration guides for this type of approach are available at docs.laozhang.ai.
API Key Security: Protecting Your Quota and Account
API key security matters from the moment you create your first key. A leaked Gemini API key can result in unexpected charges (once billing is linked), quota exhaustion, and the hassle of revoking and recreating credentials. The security principles are straightforward but worth making explicit, especially since several common development patterns inadvertently expose keys.
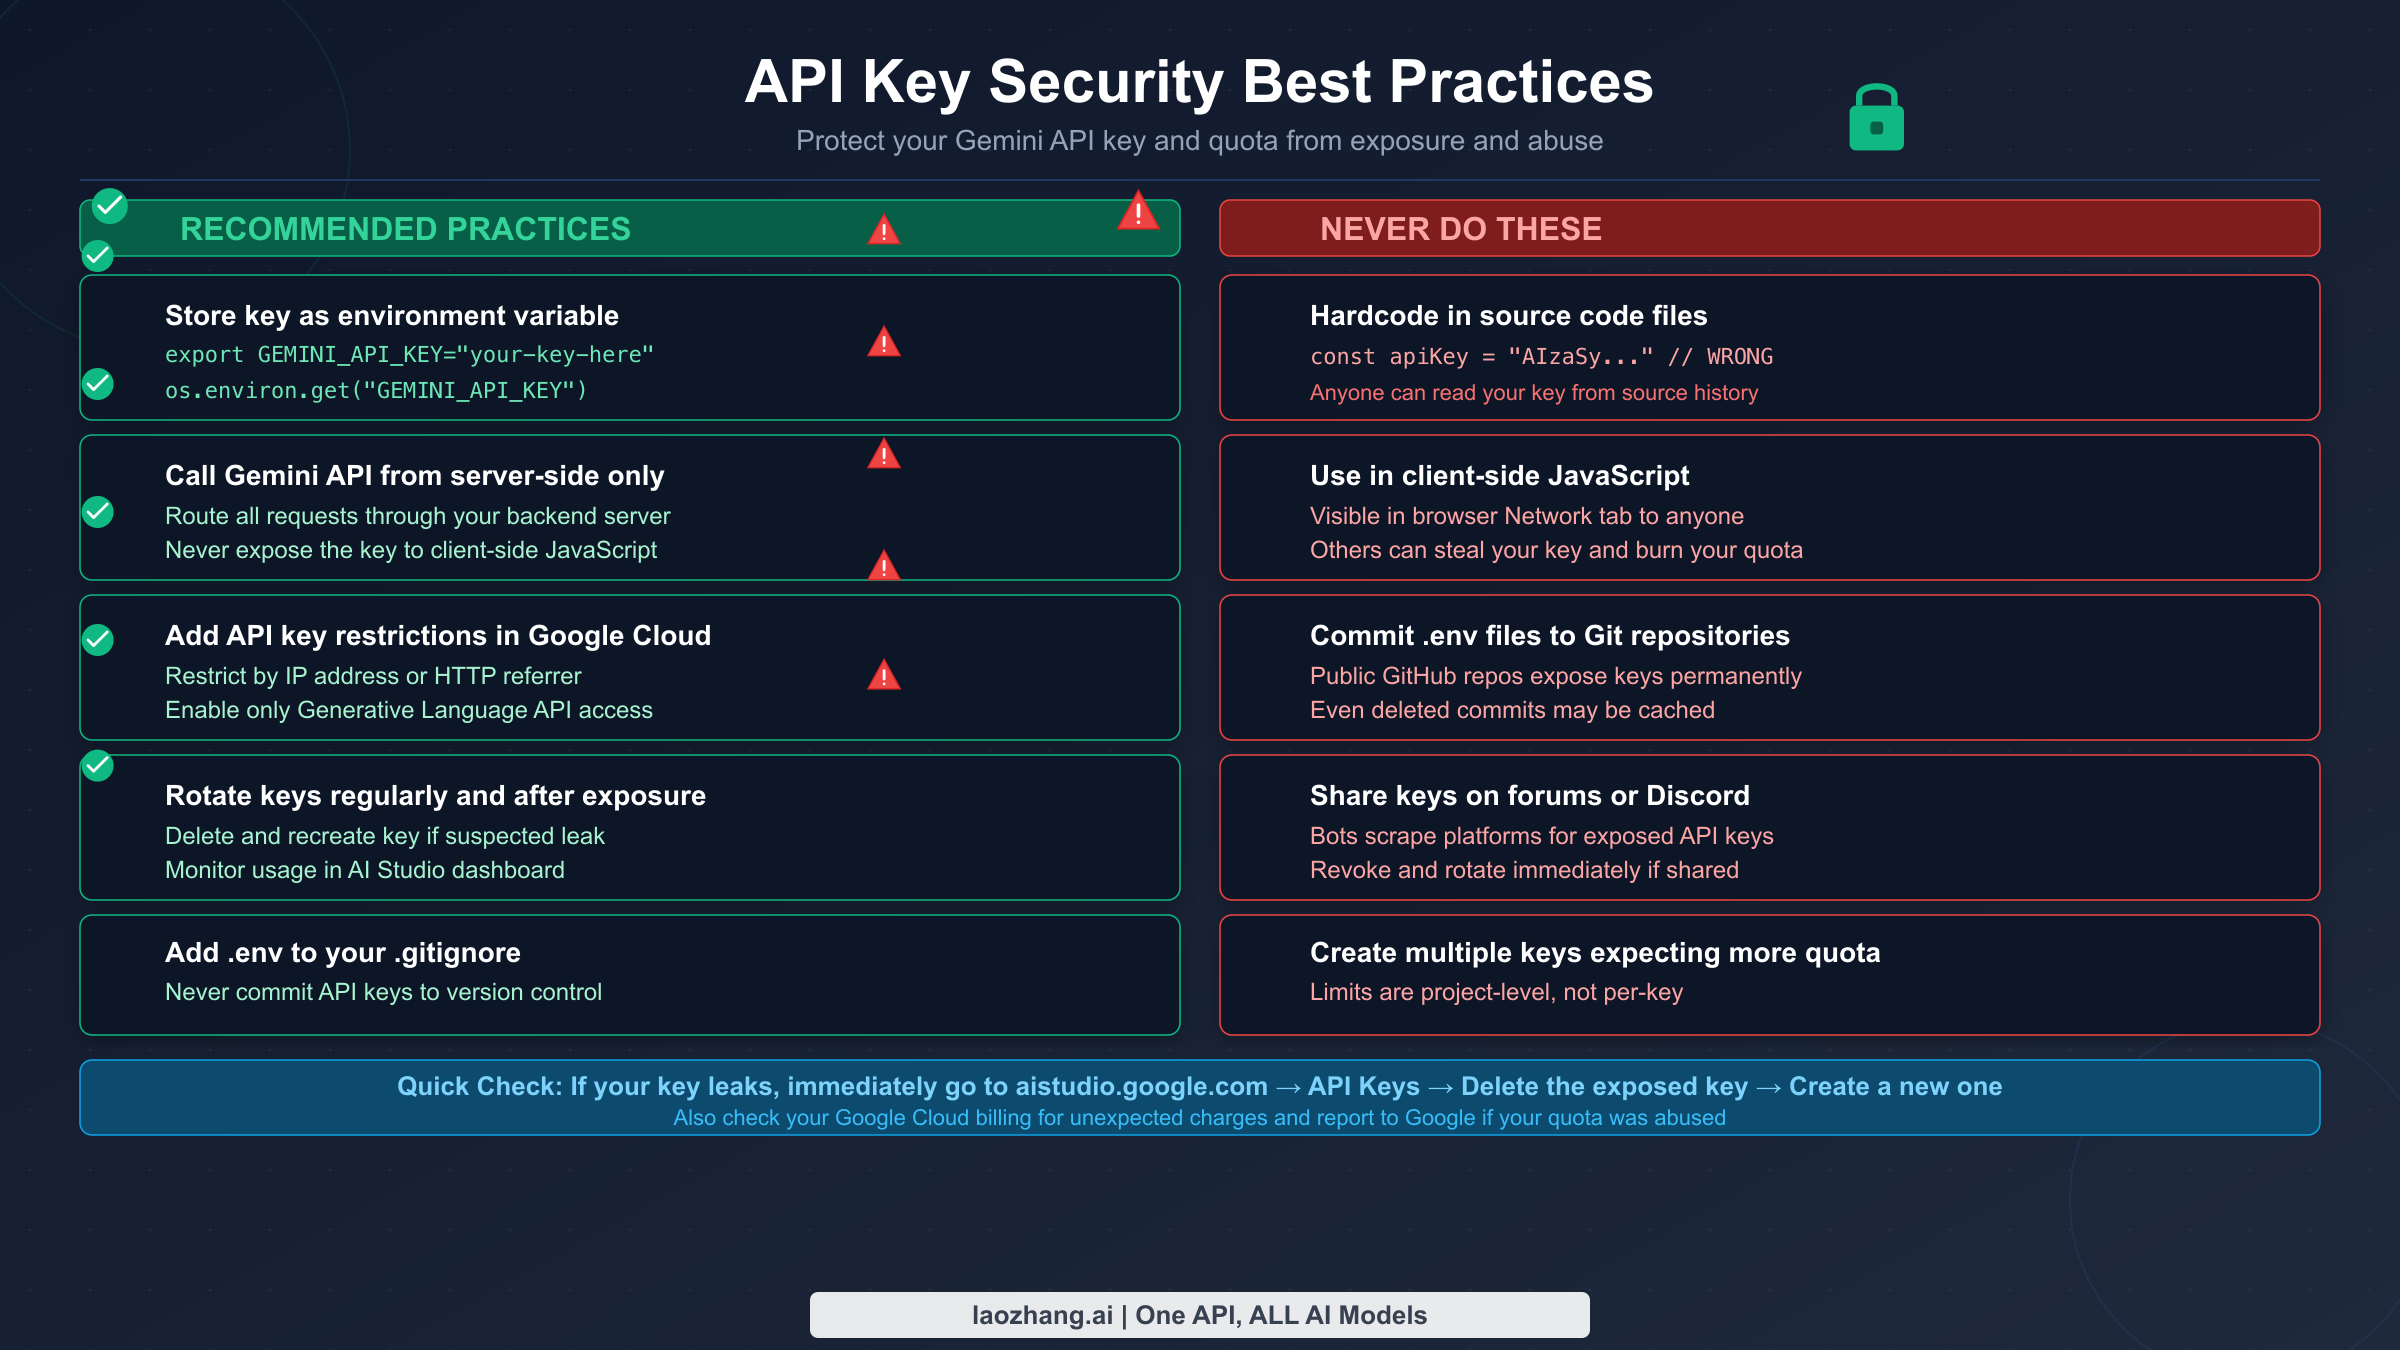
Store keys as environment variables, not in code. The single most impactful practice is keeping your API key out of your source code. Instead of hardcoding the key string in a configuration file or directly in your application logic, load it at runtime from an environment variable:
bashexport GEMINI_API_KEY="your-key-here"
python# Python: read from environment
import os
api_key = os.environ.get("GEMINI_API_KEY")
javascript// Node.js: read from environment
const apiKey = process.env.GEMINI_API_KEY;
Never call the Gemini API directly from client-side JavaScript. This is a subtle but serious mistake. When you make API calls from a browser frontend, the key is visible in the browser's Network tab to anyone who opens developer tools. A single exposed key can be scraped by bots and used to drain your quota or run up charges. Instead, route all Gemini API calls through your backend server, which holds the key and acts as a proxy between your frontend and Google's infrastructure.
Add API key restrictions in Google Cloud Console. You can configure restrictions on your key to limit where it can be used. Navigate to the API key settings in the Cloud Console and apply IP address restrictions (to only allow calls from your server's IP), or API restrictions (to only allow calls to the Generative Language API, preventing misuse if the key is compromised). These restrictions add a meaningful layer of defense in depth.
Never commit keys to version control. Add .env to your .gitignore file before you put any secrets in it. If a key is ever accidentally committed, assume it is compromised — even if you immediately delete the commit, the key may have been indexed by GitHub's public search or scraped by automated tools within minutes. Delete the key from Google AI Studio and create a new one.
If your key is exposed, act immediately. Go to aistudio.google.com/app/apikey, find the compromised key, and delete it. Create a fresh key and update all services that use it. Check your Google Cloud billing dashboard for unexpected charges — if you find unauthorized usage, report it to Google Cloud support, who can sometimes reverse fraudulent charges.
The maximum visible key count in the AI Studio dashboard is 100 keys across 50 projects. If you are managing multiple applications, it is good practice to use separate keys per environment (development, staging, production) so that rotating a compromised key in one environment does not require updating all others.
Troubleshooting Common Issues
Even with a correct setup, developers regularly encounter a handful of recurring problems. The following covers the most common issues and their resolutions.
HTTP 429 — Resource Exhausted. This error means you have hit a rate limit. The most likely causes are sending requests faster than your current RPM ceiling, exceeding your daily RPD limit (which resets at midnight Pacific Time), or running multiple services that share the same project quota. Solutions: implement exponential backoff, reduce request frequency, split workloads between projects with separate billing accounts, or upgrade your tier.
HTTP 403 — Permission Denied or Invalid Key. A 403 error usually means the API key is malformed, has been deleted, or does not have access to the model you are requesting. Check that you copied the key correctly (no trailing spaces, no line breaks). Verify in the AI Studio key management page that the key still exists and has not been restricted to a specific API that excludes Generative Language. If you added IP restrictions, confirm that your request is coming from an allowed IP address.
Tier upgrade not appearing after meeting requirements. If you are confident you have accumulated the required spending and 30 days have elapsed but your project still shows the previous tier, give it 72 hours. Google's upgrade process runs periodically, not in real time. After 72 hours with no change, open a support ticket with Google Cloud, providing your billing account ID, project ID, and the date of your first real payment. Support can typically resolve this within a few business days.
Upgrade request denied despite meeting criteria. In rare cases, Google's automated abuse protection system may decline a tier upgrade even when stated thresholds are met. The upgrade request might be flagged based on usage patterns or account signals that fall outside the standard review flow. If this happens, contact Google Cloud support directly for a manual review. Providing context about your use case and expected usage patterns can help expedite resolution.
Multiple API keys not increasing quota. As discussed earlier, creating additional keys within the same project does not increase your quota — all keys share the project-level ceiling. If you genuinely need separate, additive quota pools, create separate Google Cloud projects with separate billing accounts and separate spending histories.
Key Takeaways and FAQ
Getting Gemini API access at any tier is fundamentally straightforward. The free tier requires only a Google account and five minutes. Tier 1 adds a billing account link and delivers an immediate 10–20x RPM increase. Tiers 2 and 3 are gated by real spending thresholds and a 30-day clock — both designed to ensure Google is providing enterprise-level capacity to committed, legitimate production users.
The practical advice that makes the biggest difference: start spending real money early if Tier 2 or 3 is your goal, because the 30-day clock cannot be shortened. Keep your API key out of source code from day one. And if you genuinely need higher capacity before your tier upgrades, the Batch API or third-party aggregators provide legitimate paths to keep your project running.
FAQ
Does Google notify me when my tier upgrades? No, there is no email notification. Check your tier manually at aistudio.google.com/projects or set a calendar reminder for day 31 after your first real payment.
Can I use free trial credits to meet the Tier 2 or Tier 3 spending threshold? No. Only actual charges to your payment method count. Free credits, promotional credits, and Google Cloud free tier allowances do not apply.
What happens if I cancel my billing account after reaching Tier 3? Your tier will downgrade. Google regularly checks billing account status, and a project with a cancelled or inactive billing account reverts to Free tier behavior.
Can I have Tier 3 access on multiple projects simultaneously? Yes — each project independently qualifies based on its own billing account's cumulative spending history. If you link the same billing account to multiple projects and that account has $1,000+ in real spending plus 30 days, all linked projects can qualify for Tier 3.
Is there a Tier 4 or anything above Tier 3? Not as a standard tier. Above Tier 3, Google offers custom quota arrangements through the enterprise sales process. These are negotiated on a case-by-case basis and can include custom RPM ceilings, dedicated infrastructure, and service-level agreements beyond standard support. If you are building something that needs more than 4,000 RPM at sustained load, start the conversation with Google Cloud sales early — these agreements typically take several weeks to finalize.