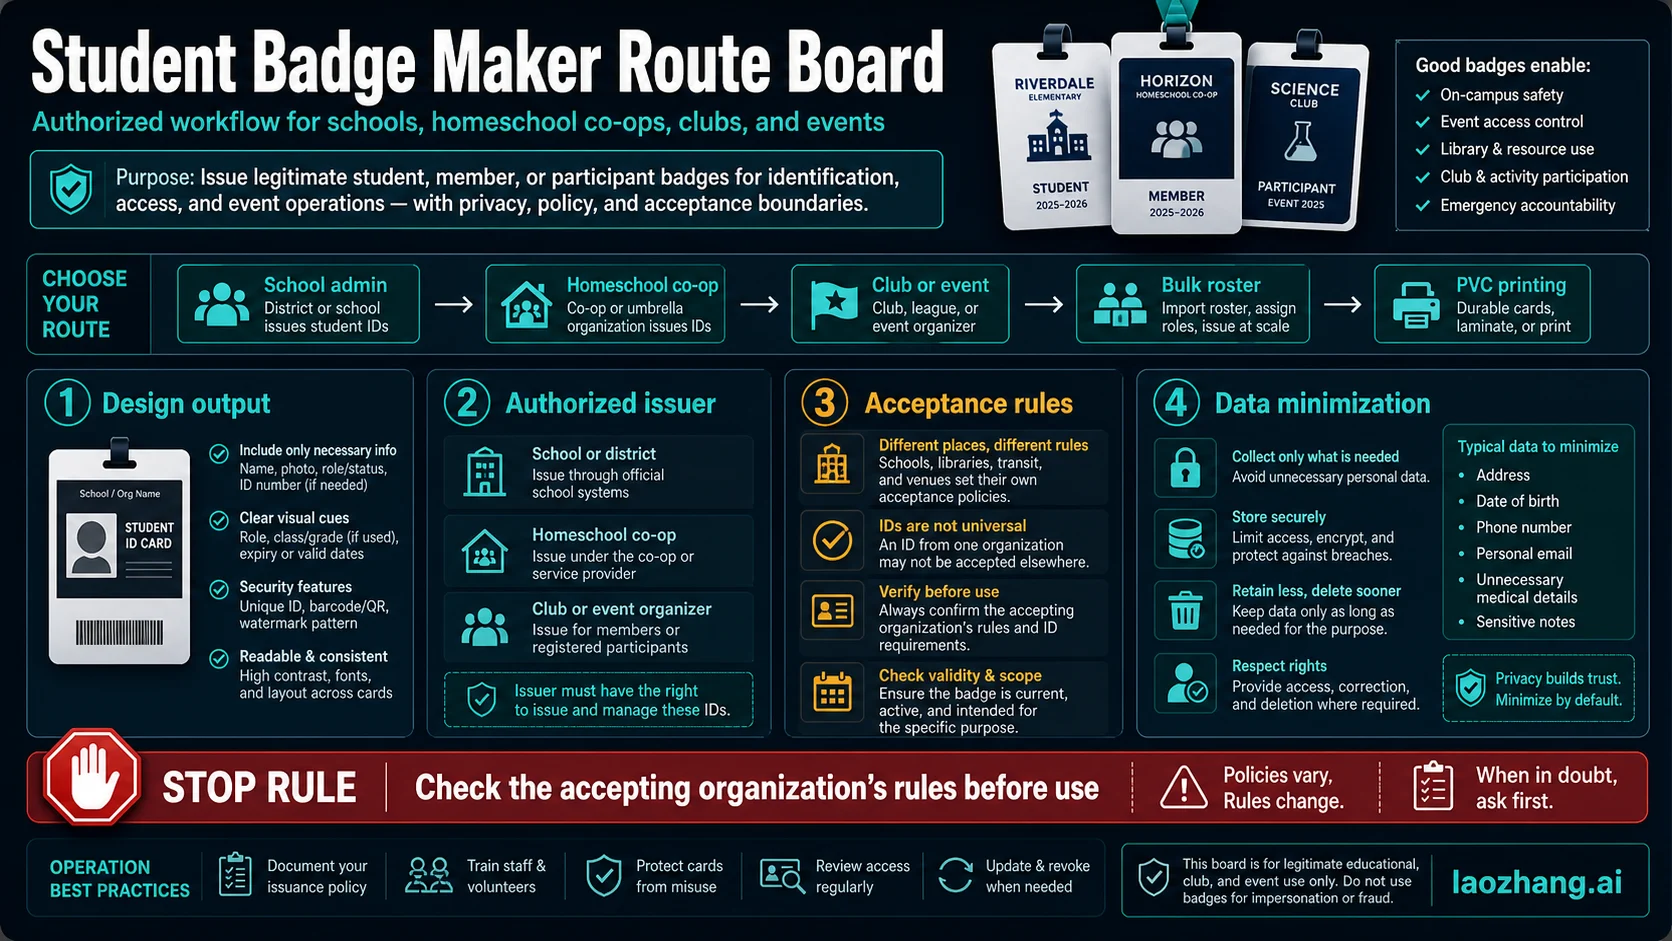
A student ID card maker can help you design, print, or batch-generate cards, but it does not make a card official. Before choosing a template, AI layout tool, bulk PDF generator, or PVC printing service, decide who is allowed to issue the card, where it must be accepted, how many cards you need, and which student data is safe to upload.
Short answer: use a maker for the output, not for authority. A school or program issues the card, and the accepting organization decides whether it counts as ID. For clubs, events, homeschool co-ops, and internal school workflows, a maker can be useful when the card is honest about who issued it and what it is for. For exams, discounts, employment, travel, age checks, online verification, or any external gate, read the verifier's rules first.
Route board:
| Your situation | Better route | Output to choose | Stop rule |
|---|---|---|---|
| School office or district program | Authorized school ID workflow | Vendor, roster batch, or PVC print route | Do not issue cards without school authorization. |
| Homeschool, co-op, club, or event | Honest organization badge | Design tool, printable PDF, or small PVC batch | Do not imply acceptance outside that organization. |
| One-off design or mockup | Design-only maker | Canva-style editor, template, or AI layout draft | Do not copy a real school's marks or seals. |
| Many students or members | Bulk roster workflow | CSV import, photo review, proof print, batch export | Confirm data permission before upload. |
| SAT, AP, discounts, jobs, travel, or age checks | Verifier rule check first | Often not a homemade card | Stop if the verifier requires a specific official ID or form. |
Stop before you design: a card that looks polished can still be rejected if the issuer is not authorized or the receiving organization does not accept that kind of card. Keep student data minimal: name, photo, issuer, current year, and an internal number are usually enough; home address, birth date, personal email, phone, and sensitive notes usually do not belong on a badge.
Choose the route before the student ID card maker
The best student ID maker is not always the fastest editor. It is the route that matches the issuer, the purpose, the number of cards, and the accepting rule. A school office ordering PVC cards has a different job from a homeschool co-op making library cards. A science club making event badges has a different job from a student trying to pass an exam check-in.
Use the maker label as a starting point, not as the whole decision. A maker can give you a layout, a print-ready PDF, a roster export, or a shipped plastic card. The issuer is the school, program, club, co-op, or event organizer that stands behind the card. The verifier is the place or service deciding whether that card is enough for access, check-in, or eligibility.
That split creates the practical rule for the whole article: choose a tool only after you know which role you are filling. If you are not the issuer, you should not create a card that appears to speak for one.
Maker, issuer, and verifier are different jobs
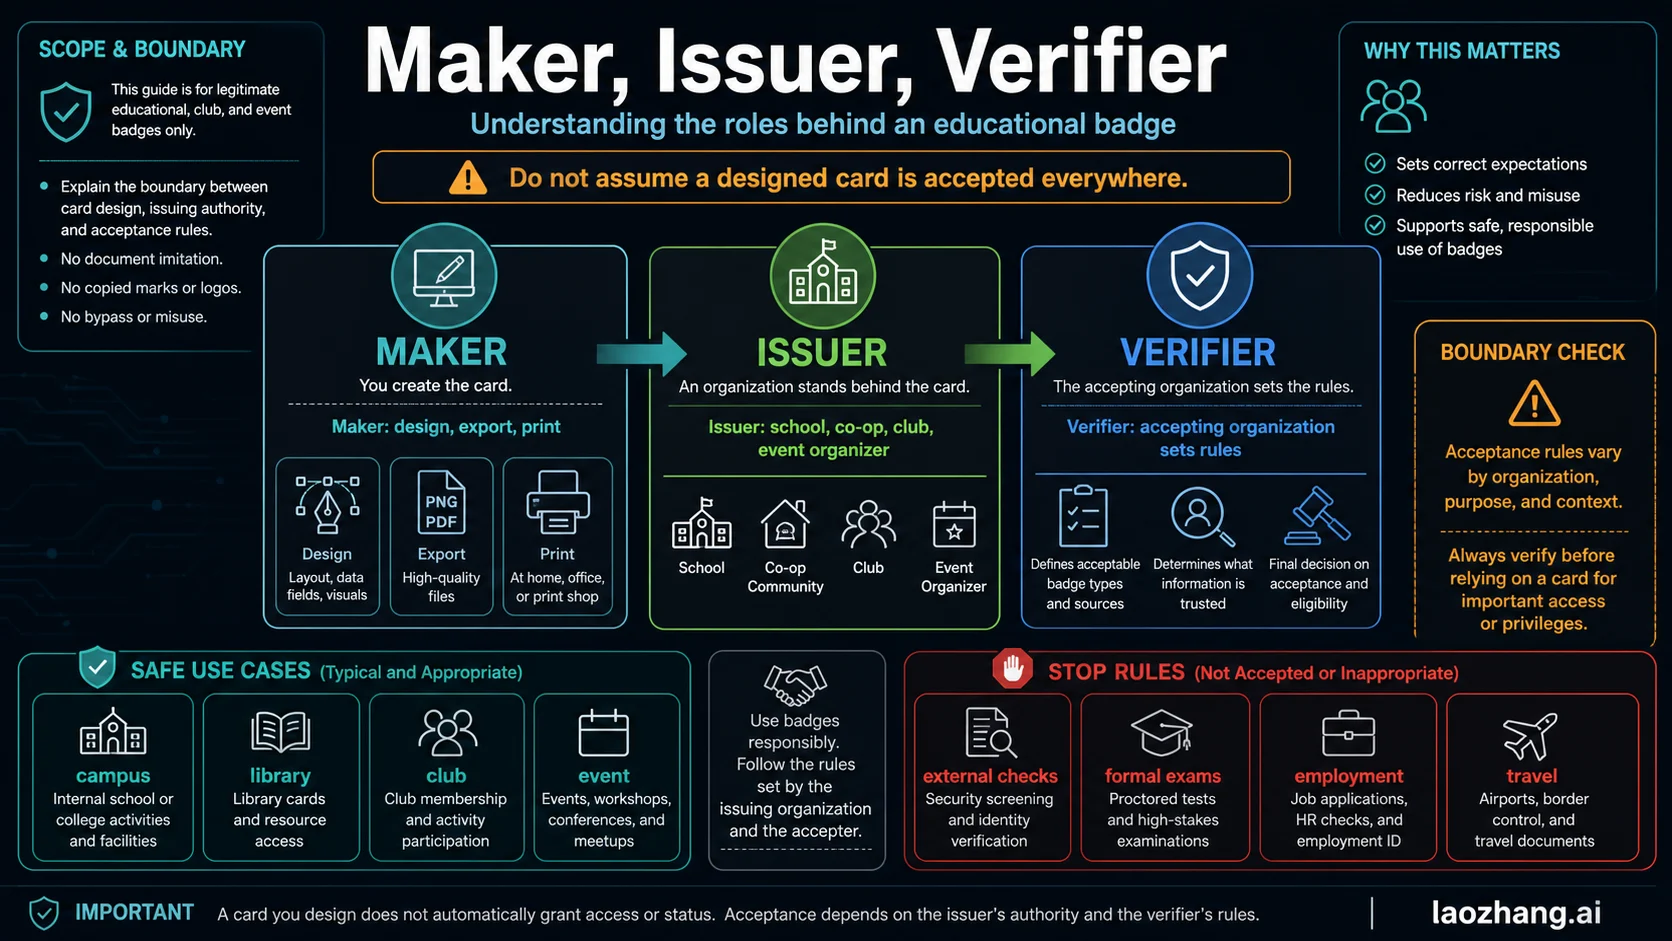
A maker owns production. It helps with layout, photo placement, QR or barcode fields, export format, print size, and sometimes bulk generation. An issuer owns meaning. It decides that the person is a current student, member, participant, or cardholder. A verifier owns acceptance. It can accept one kind of card for campus access and reject the same card for a formal exam, discount program, job form, travel check, or age-sensitive flow.
This matters most when the card will be shown outside the organization that created it. A school-produced photo ID may satisfy one rule and fail another. A homeschool co-op badge may be useful for internal activities but not for outside identity checks. A club card may work at a club desk and nowhere else.
When a vendor or editor advertises "student ID card maker", read it as a production promise. Do not read it as an acceptance promise unless the accepting organization says so.
Match tool type to the real job
Use tool categories instead of hunting for one universal winner. Common maker routes include school ID printing vendors, general design editors, AI layout generators, browser-based bulk PDF tools, mobile apps, and DIY tutorials. Each route can be useful, but each route has a different stop rule.
| Tool route | Best fit | Strength | Main risk to check |
|---|---|---|---|
| School-authorized printing vendor | Schools or districts issuing official school cards | PVC cards, roster workflows, school-specific fields, support | The vendor may require proof that the school authorized the order. |
| General design editor | Clubs, events, co-ops, and small programs | Easy templates, brand control, printable exports | It creates a design, not issuer authority. |
| AI layout generator | Fast draft, mockup, or visual starting point | Quick layout ideas and editable fields | AI output is not a credential. Verify every field and claim. |
| Browser bulk PDF or CSV tool | Many similar cards from a roster | Reusable template and batch output | Roster privacy, photo handling, and field permission. |
| In-house printer system | Repeating school or campus issuance | Card printers, encoding, overlays, access-control options | Hardware cost, staff process, and data controls. |
| Mobile app or Word tutorial | Low-stakes one-off design practice | Fast experimentation | Easy to overstate what the card means. |
As observed on June 4, 2026, IDCreator's school ID page described school-oriented PVC cards and an authorization requirement, IDville emphasized student card systems and printer workflows, Canva offered a general drag-and-drop ID design route, Template.net framed AI-generated editable card layouts, and TheCrafity described a reusable design plus CSV or print-ready PDF flow. Treat those as route examples, not timeless feature guarantees. Recheck pricing, shipping, no-signup, app availability, privacy claims, and export details before you buy or upload a roster.
Decide what belongs on the card
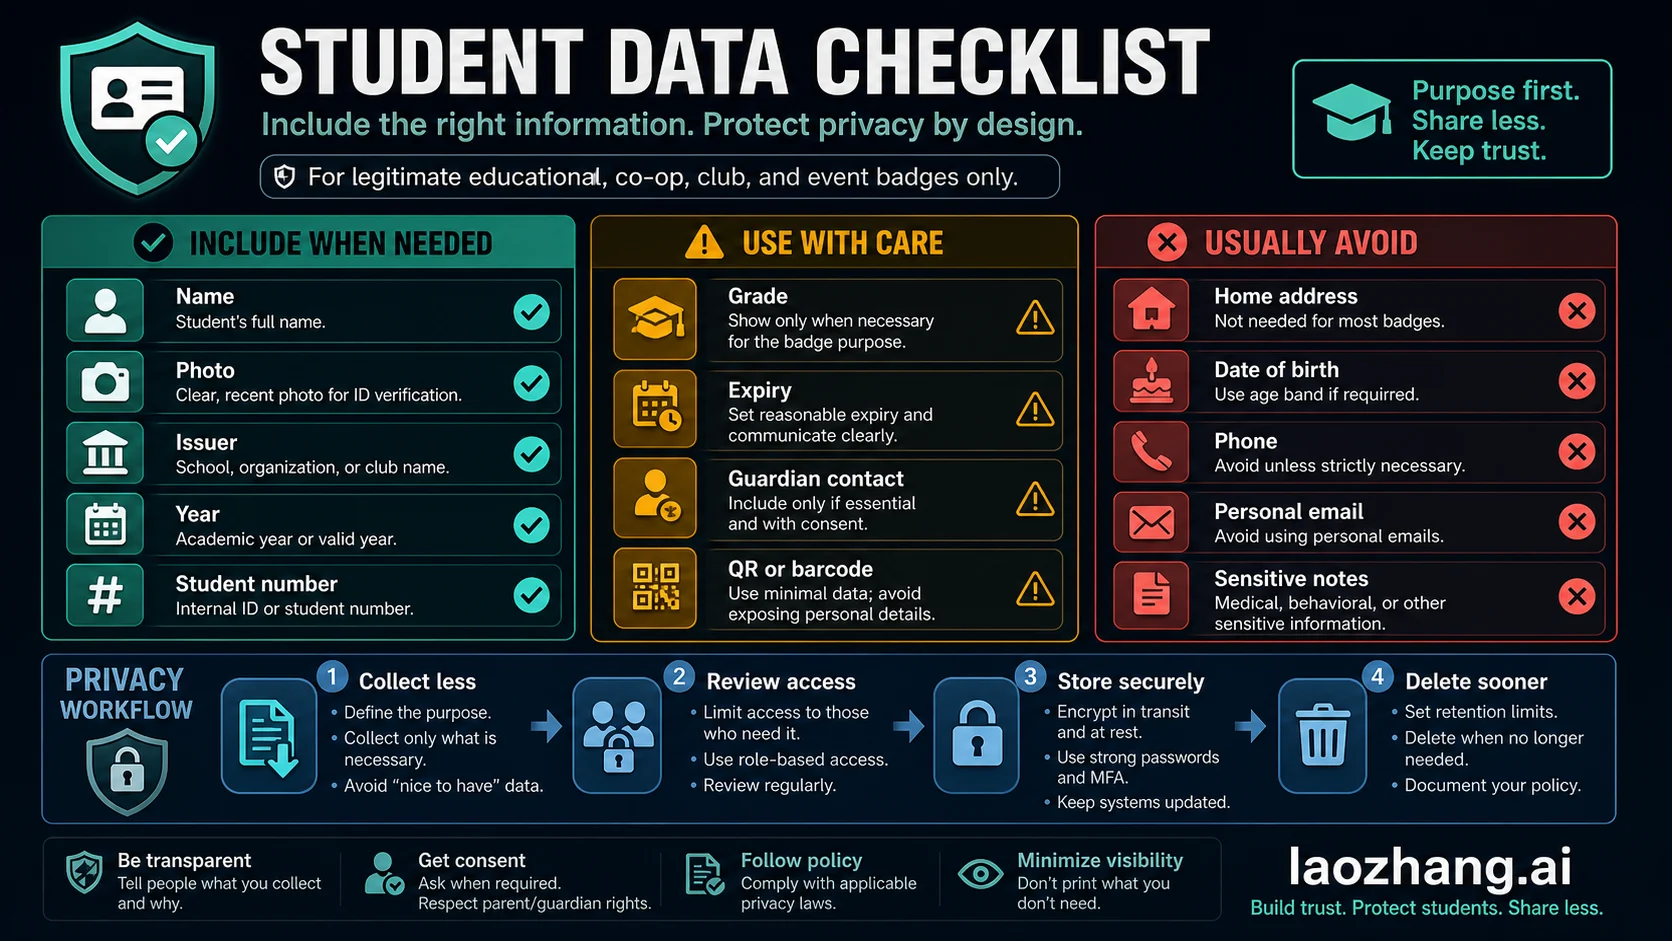
Good student cards are specific without being invasive. They show enough information for the intended purpose and avoid data that creates risk without helping the card work.
Usually useful fields include the student's name, a clear photo, the issuing school or organization, the academic year or validity year, and an internal student or member number. Sometimes useful fields include grade, role, expiration date, emergency desk contact, QR code, barcode, or access-control identifier. Those fields should exist only when the issuer has a reason and a policy for them.
Usually avoid home address, birth date, personal phone number, personal email, medical details, behavioral notes, and sensitive internal comments. If a card is lost, every printed field becomes public. If a roster is uploaded to a tool, every field also becomes part of the data-handling question.
QR codes and barcodes deserve extra care. They can be harmless when they point to an internal member number or check-in record, but they can expose personal data when used casually. If the code is not needed for the accepting workflow, leave it off.
Protect student photos and rosters
Privacy is part of tool choice. A card maker that is fine for a single club badge may be the wrong route for 300 student photos, birth dates, and parent contacts. Before uploading anything, decide who can access the data, how long it will be kept, whether the tool processes data in the browser or on its servers, and how the issuer will delete or rotate old records.
Use a four-step privacy check:
| Step | What to do | Why it matters |
|---|---|---|
| Collect less | Use only fields needed for the card's purpose. | Smaller uploads reduce harm if data leaks or the card is lost. |
| Review access | Limit editing and roster access to the people issuing cards. | Badge projects often start as shared design files. |
| Store securely | Keep exports, photos, and roster CSV files in approved storage. | Print-ready files can contain every student's data. |
| Delete sooner | Remove old proofs, rejected photos, and outdated rosters. | Annual card projects should not keep stale student data forever. |
If you are a school or program administrator, align the card project with your existing student-data policy. If you are a club or event organizer, keep the card honest and narrow: member name, role, event year, and issuer are usually enough.
Build a bulk issuance workflow before making hundreds
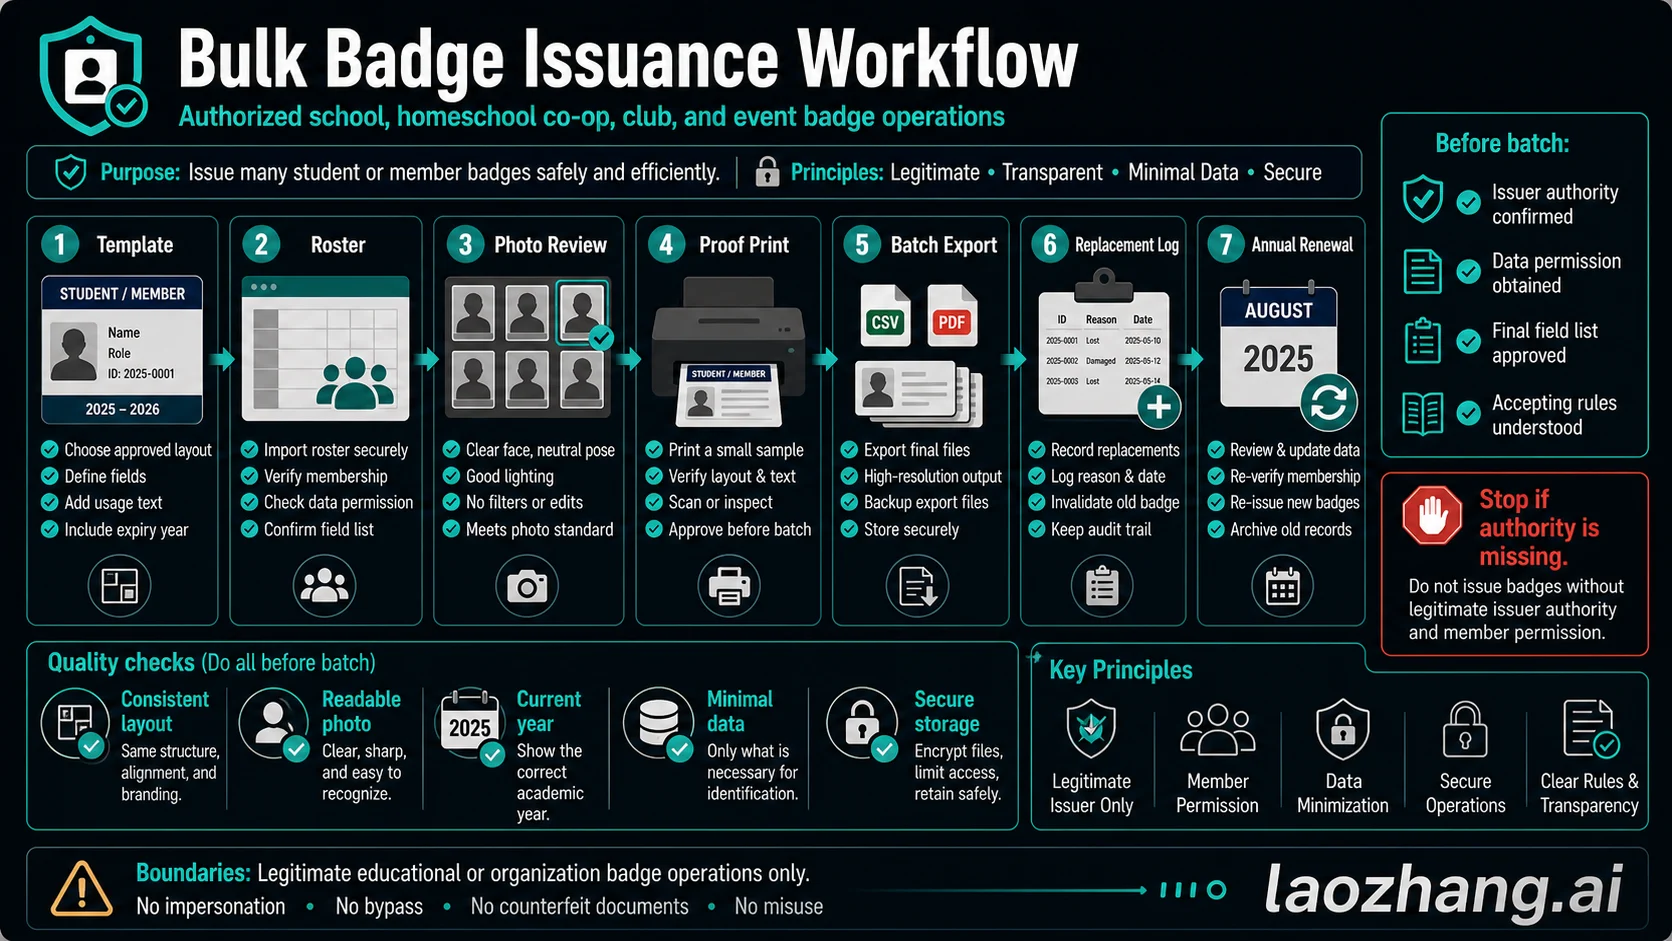
Bulk generation saves time only when the process is controlled. The fastest way to create mistakes is to import a roster before the template, photo rules, field list, and issuer authority are settled.
Use this order:
- Approve the template and required fields.
- Confirm who is authorized to receive a card.
- Collect photos with a consistent standard.
- Print or export one proof card.
- Review text, photo crop, year, issuer name, and barcode or QR behavior.
- Export the batch only after the proof is approved.
- Log replacements, lost cards, and invalidated cards.
- Renew the card set annually or when membership changes.
For school teams, the log is not paperwork for its own sake. It prevents old cards from staying active, helps staff answer "is this current?", and creates a record when a card is replaced. For small co-ops and clubs, a lighter version still helps: keep a simple list of active cards, issue date, replacement date, and who approved the batch.
Homeschool, co-op, club, and event cards
Small organizations can still make useful cards when the card tells the truth. Name the real issuer, use the current year, state the purpose, and avoid language that implies a school district or government body issued the card if it did not.
For homeschool and co-op cards, the safest framing is membership or program participation. Add a parent, administrator, or program contact only when needed and with consent. For clubs and events, use "participant", "member", "staff", or "volunteer" where that is more accurate than "student".
The limitation is not a flaw. A narrow, honest card is more useful than a broad card that gets challenged. If the card will be used outside the group, ask the accepting organization what it accepts before designing around assumptions.
External verification stop rules
Do not use a student ID card maker as the first step for outside verification. Use the outside rule as the first step.
Testing bodies, employers, travel operators, age-check flows, financial platforms, and discount programs can each define acceptable ID differently. College Board SAT rules checked on June 4, 2026 are a useful example: acceptable IDs are specific, physical, valid photo IDs from a government or the current school, or a specified Student ID Form when applicable. A design made at home is not a substitute for those rules.
Use this stop checklist:
| If the card is for... | First move | Why |
|---|---|---|
| Exam check-in | Read the current testing-body ID page. | Requirements can name exact forms and consequences. |
| Student discount or eligibility | Read the merchant or platform verification rule. | Many programs use school email, platform verification, or official enrollment proof. |
| Employment or HR | Ask the employer which documents are accepted. | Work eligibility rules are not solved by a student badge. |
| Travel or government services | Use the official document requirement. | School or club cards usually do not replace government ID. |
| Age checks | Do not use a homemade student card. | Age verification needs the verifier's accepted document list. |
If a tool page encourages copied logos, false school names, false signatures, unrealistic seals, or cards for outside verification, leave that route. A safe student ID maker should help an authorized issuer make a clear card, not blur who issued it.
Before you publish or print
Run one proof card through a final check before you make a batch:
- The issuer name is true and complete.
- The card purpose is clear.
- The year or expiration date is current.
- The photo is recognizable and appropriate.
- The fields are minimal.
- The roster and photo files are stored safely.
- The accepting rule has been checked when the card leaves your organization.
- Replacements and old cards have a simple log.
That proof step catches most expensive errors: outdated year, wrong school name, missing role, overexposed data, bad photo crop, unreadable code, and a card that the intended receiver will not accept.
FAQ
Can I make a student ID card at home?
You can make a design or internal badge at home when you are honest about the issuer and purpose. That does not make it an accepted identity document. If another organization must accept it, check that organization's rules first.
What is the safest free student ID card maker?
The safest route is the one that matches your use case and data risk. A free design tool can be fine for a club badge or draft layout. For school-issued cards, authorization, roster control, and printing workflow matter more than whether the editor is free.
Are AI ID card generators safe to use?
AI layout tools can help create a draft design, but they do not verify enrollment, issuer authority, or acceptance. Use AI output as a layout starting point, then check every field, remove excessive data, and avoid any design that suggests authority you do not have.
What fields should a student card include?
Use the minimum fields needed for the card's purpose: usually name, photo, issuer, year, and internal number. Add grade, role, expiration, QR code, or barcode only when the workflow actually needs them. Avoid home address, birth date, personal email, phone, and sensitive notes.
Can a homeschool student ID be accepted outside the co-op?
Sometimes, but not automatically. A homeschool or co-op card should name the real issuer and purpose. For exams, discounts, travel, employment, or platform checks, read the current verifier rule and use the form or proof it requires.
How should schools make cards in bulk?
Approve the template, confirm the roster, review photos, print one proof, then export or print the batch. Keep a replacement log and renew cards annually. Do not upload a full roster until the issuer authority, data permission, and required fields are settled.